Tutorial [ILLUSION] HS2 Studio Neo|Chara Maker - (Help & guides Thread)

5.00 star(s) 1 Vote

hun hunter

Member
Dec 30, 2018
194
617
thread logo.png
Welcome to the HS2 (Studio Neo 2 - Chara Maker - Related Plugins - Tools) Help & guides Thread

button1.png Introduction:
the Illusion studio is vast and there is allot of details, it require practicing and experience too so if this is the first time using the studio please watch the first video guide posted below about the very studio basics and try it out yourself, get familiar with the menus, tools and functions before moving to a more advanced subject (one step at a time). studio neo has been released with other previous illusion games so taking reference of their tutorials is valid as well as they will cover the same tool mechanics available in HS2's studio.

button1.png in this thread we will have the following:
post guides we created or share other external guides related to the above subjects.
discuss about illusion's studio neo 2 matters, related plugins and tools.
provide aid, tips and help about these subjects.

button1.png Purpose:
to encourage those who never attempted to use the studio due to lack of information an tutorials.
to help the community learn the studio & tools more and provide guidance if needed.
to help the creative users, developers who use the studio to create and export asset for their games and projects to achieve better results.
to help people who are interested in this topic access the materials they are looking for more easily in a single place.
to follow future updates, changes, studio plugins, mods and how to adapt to them.
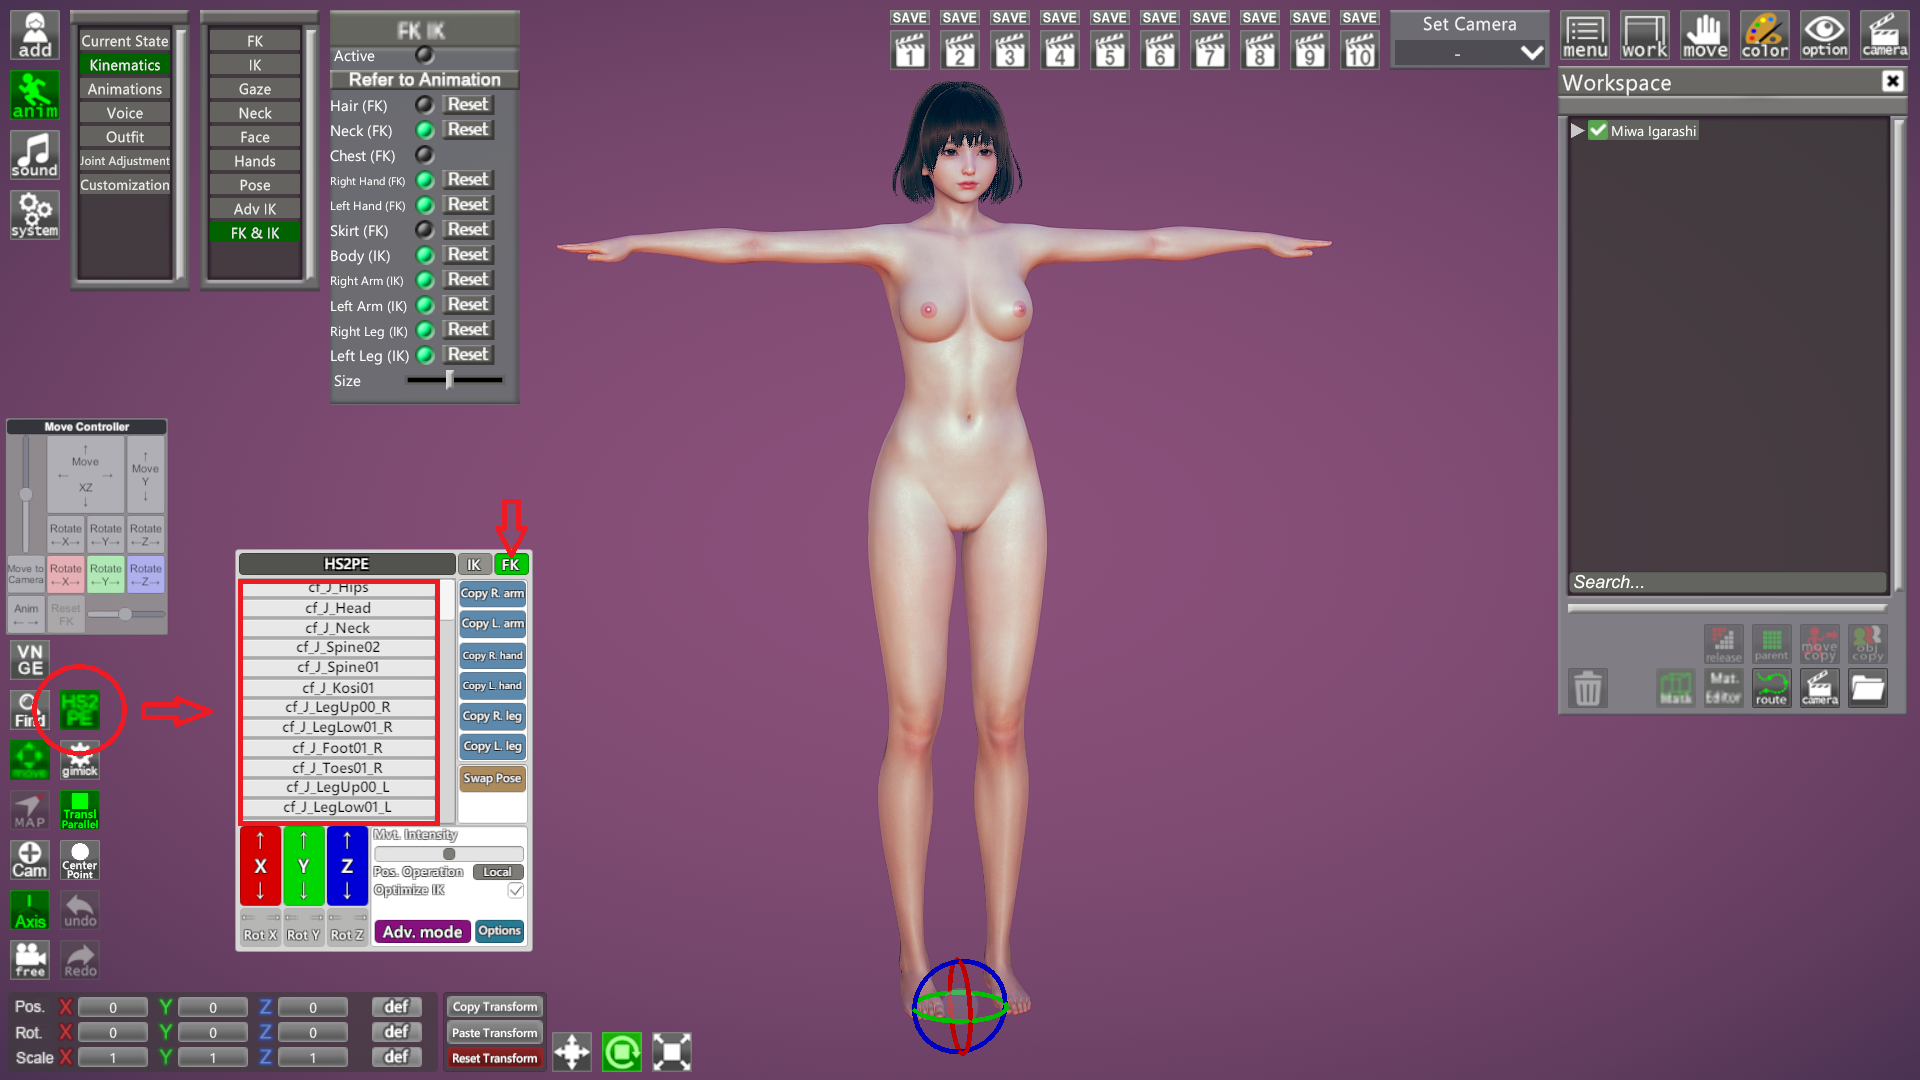
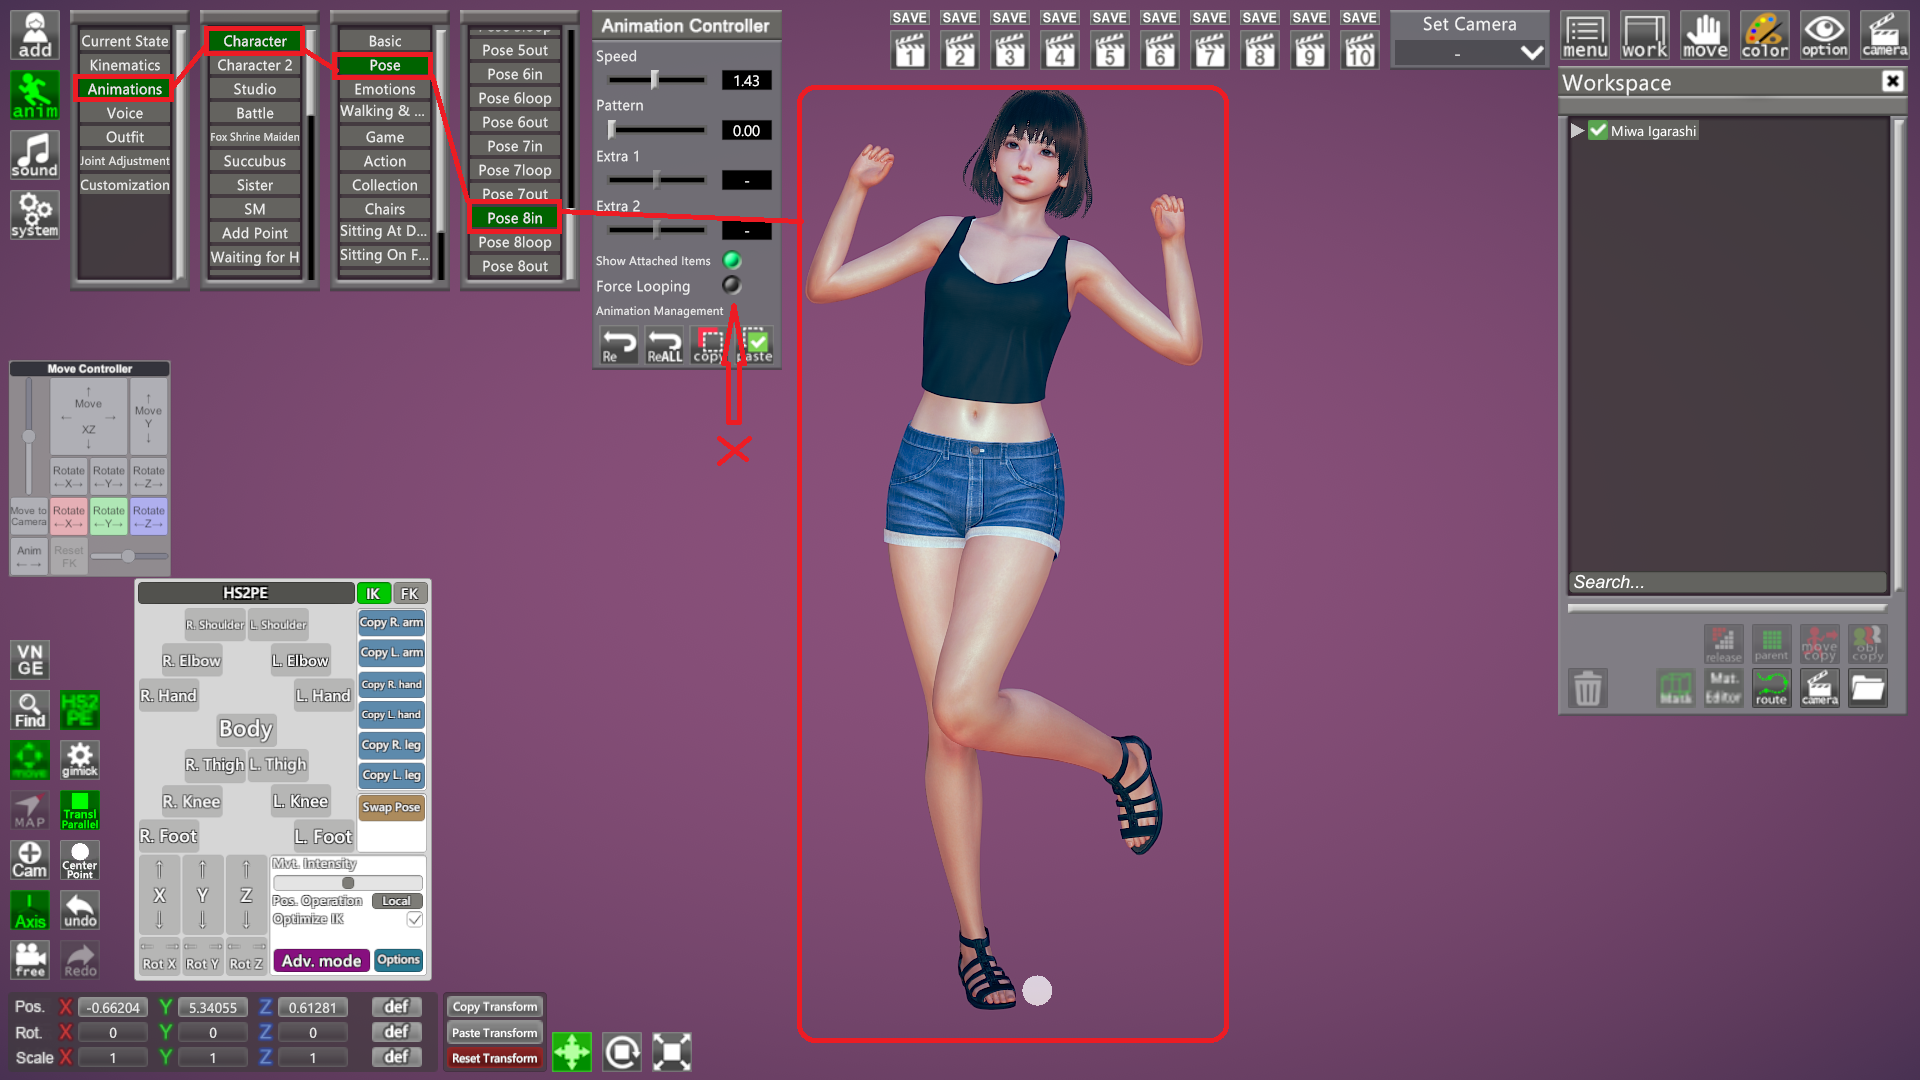
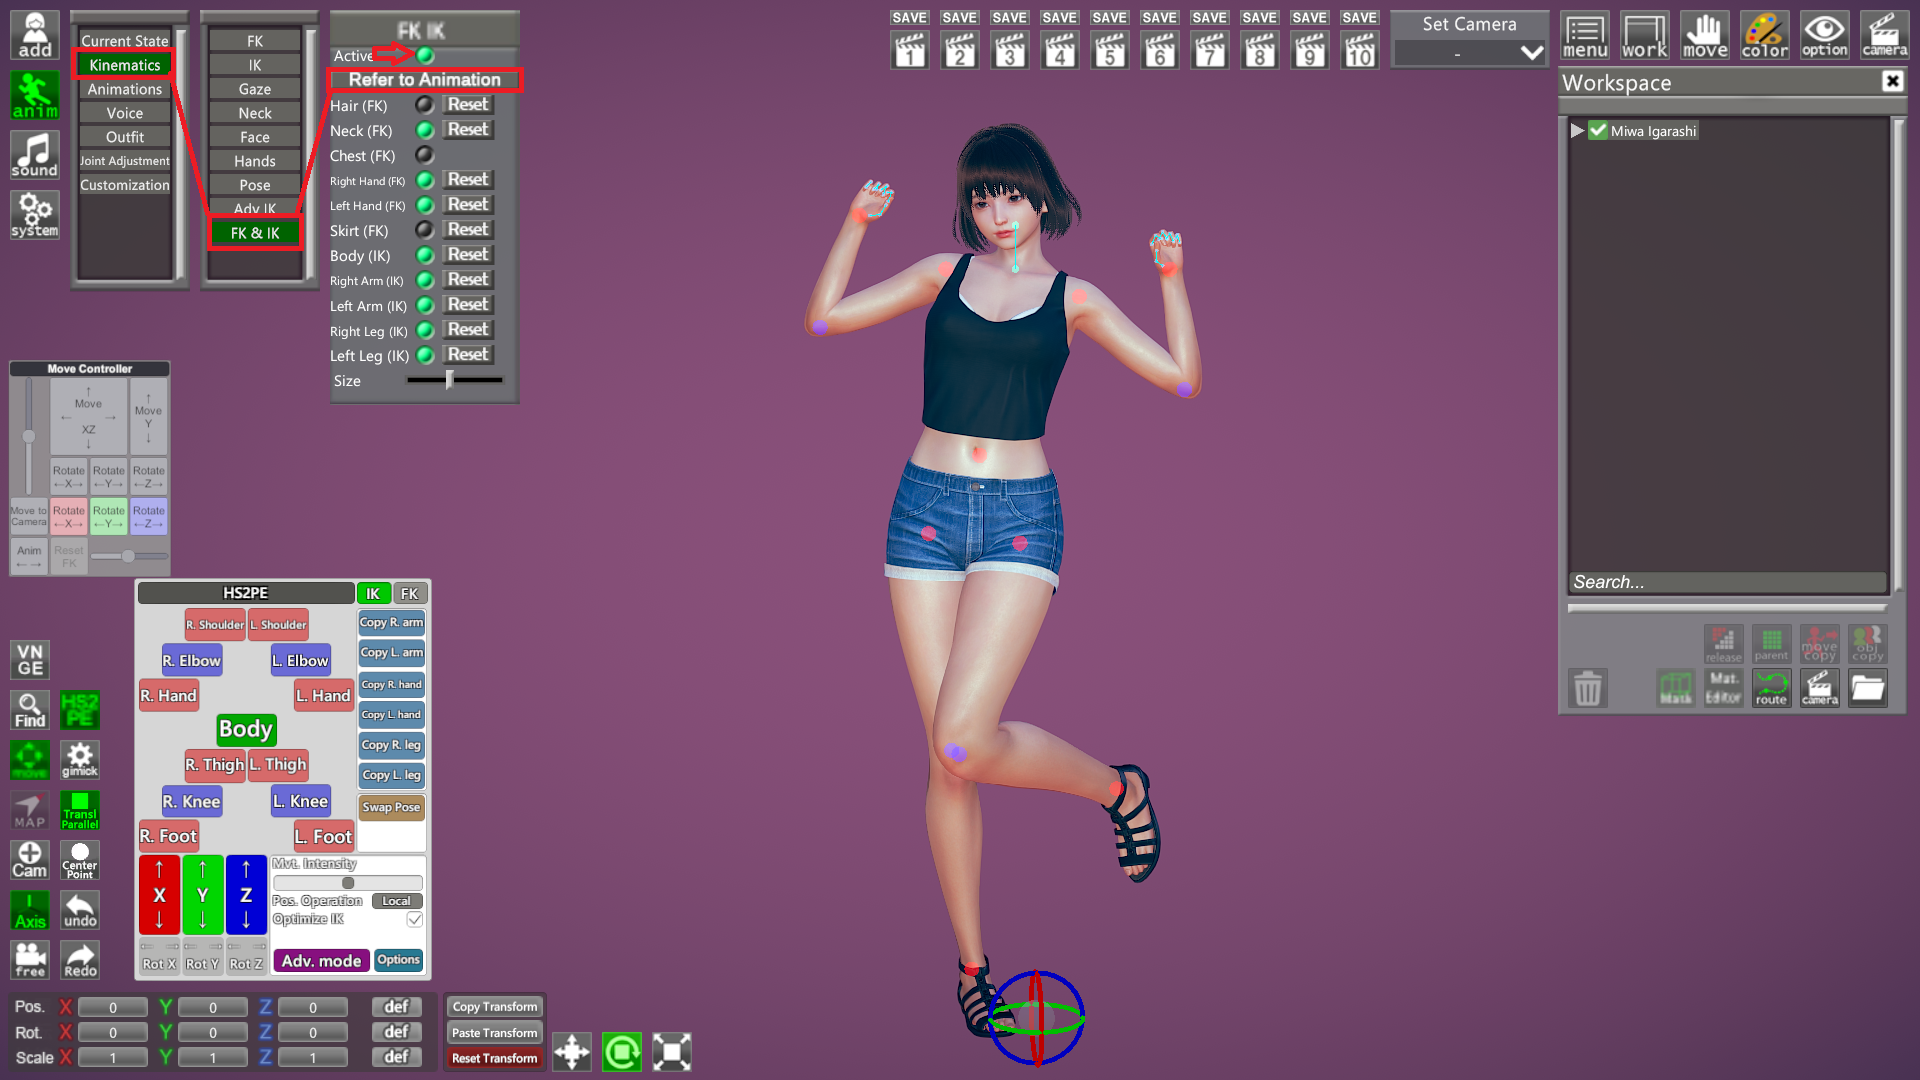
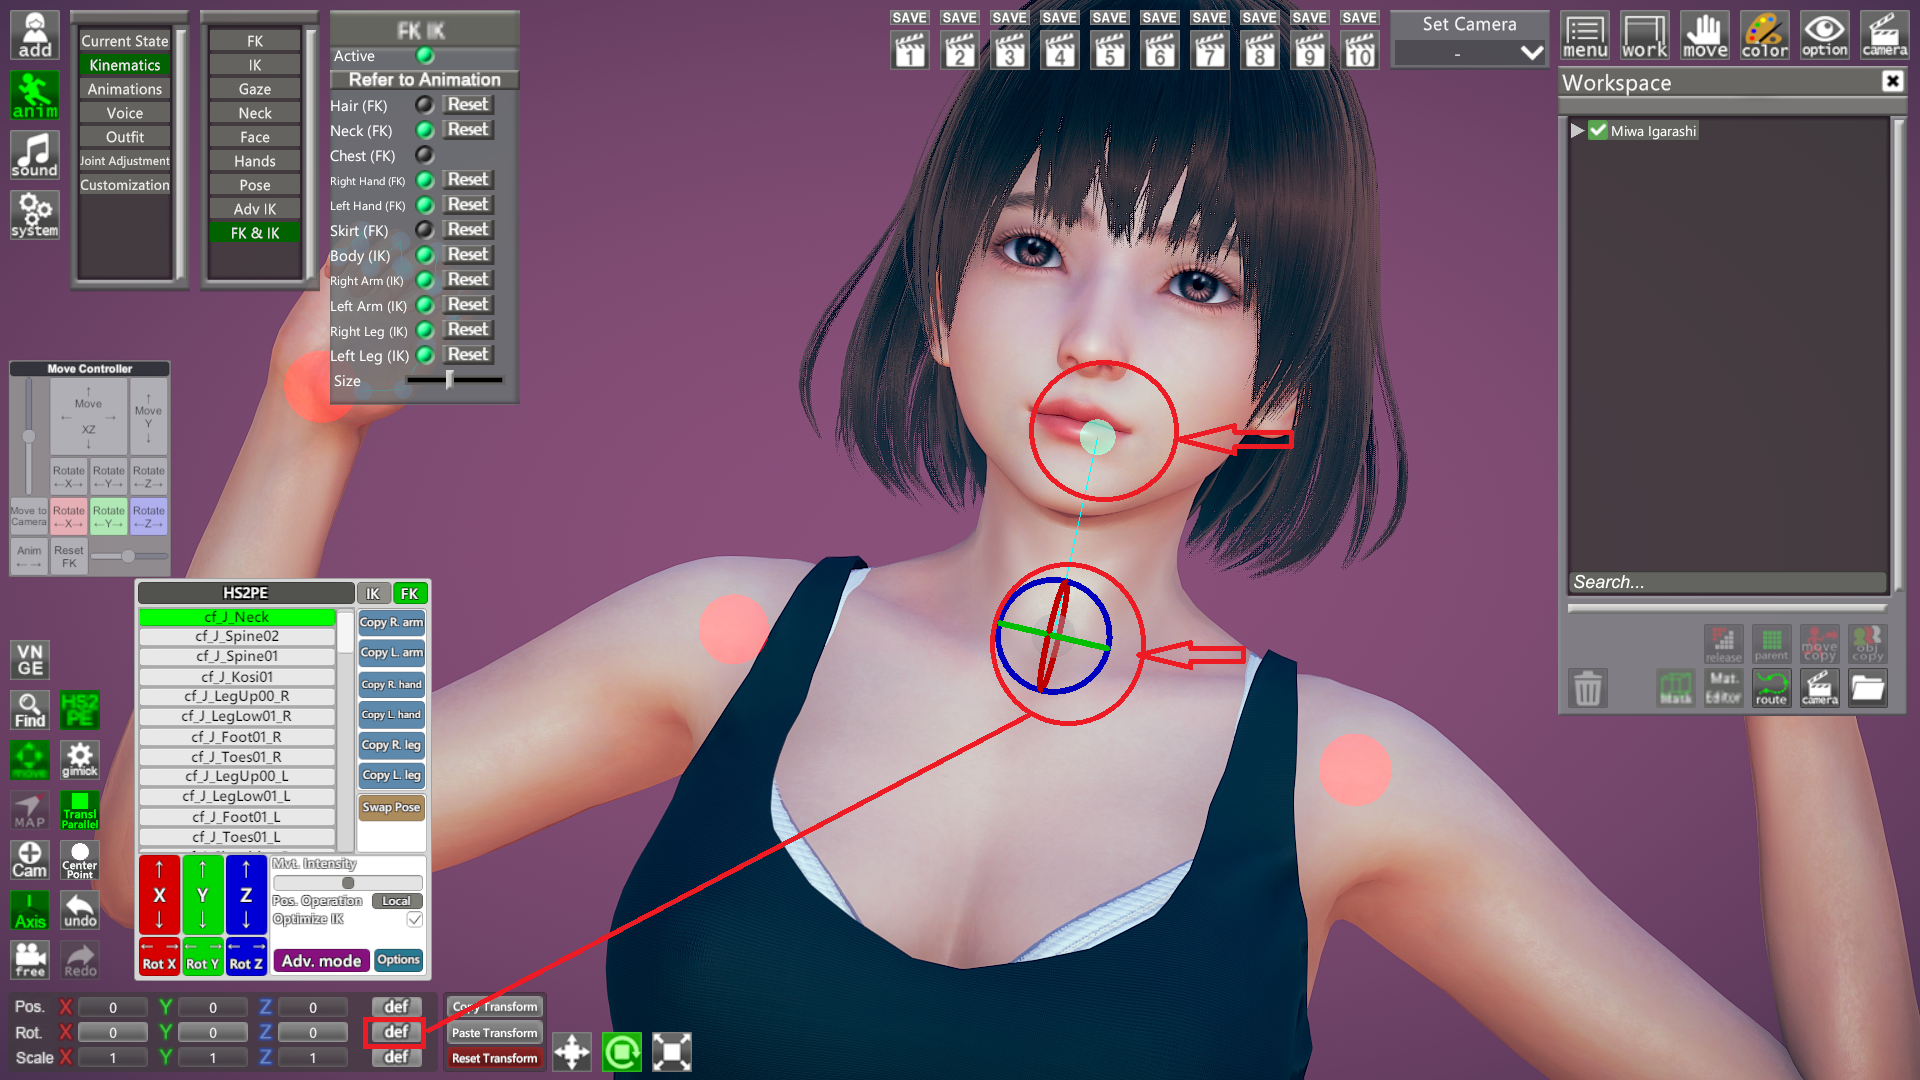
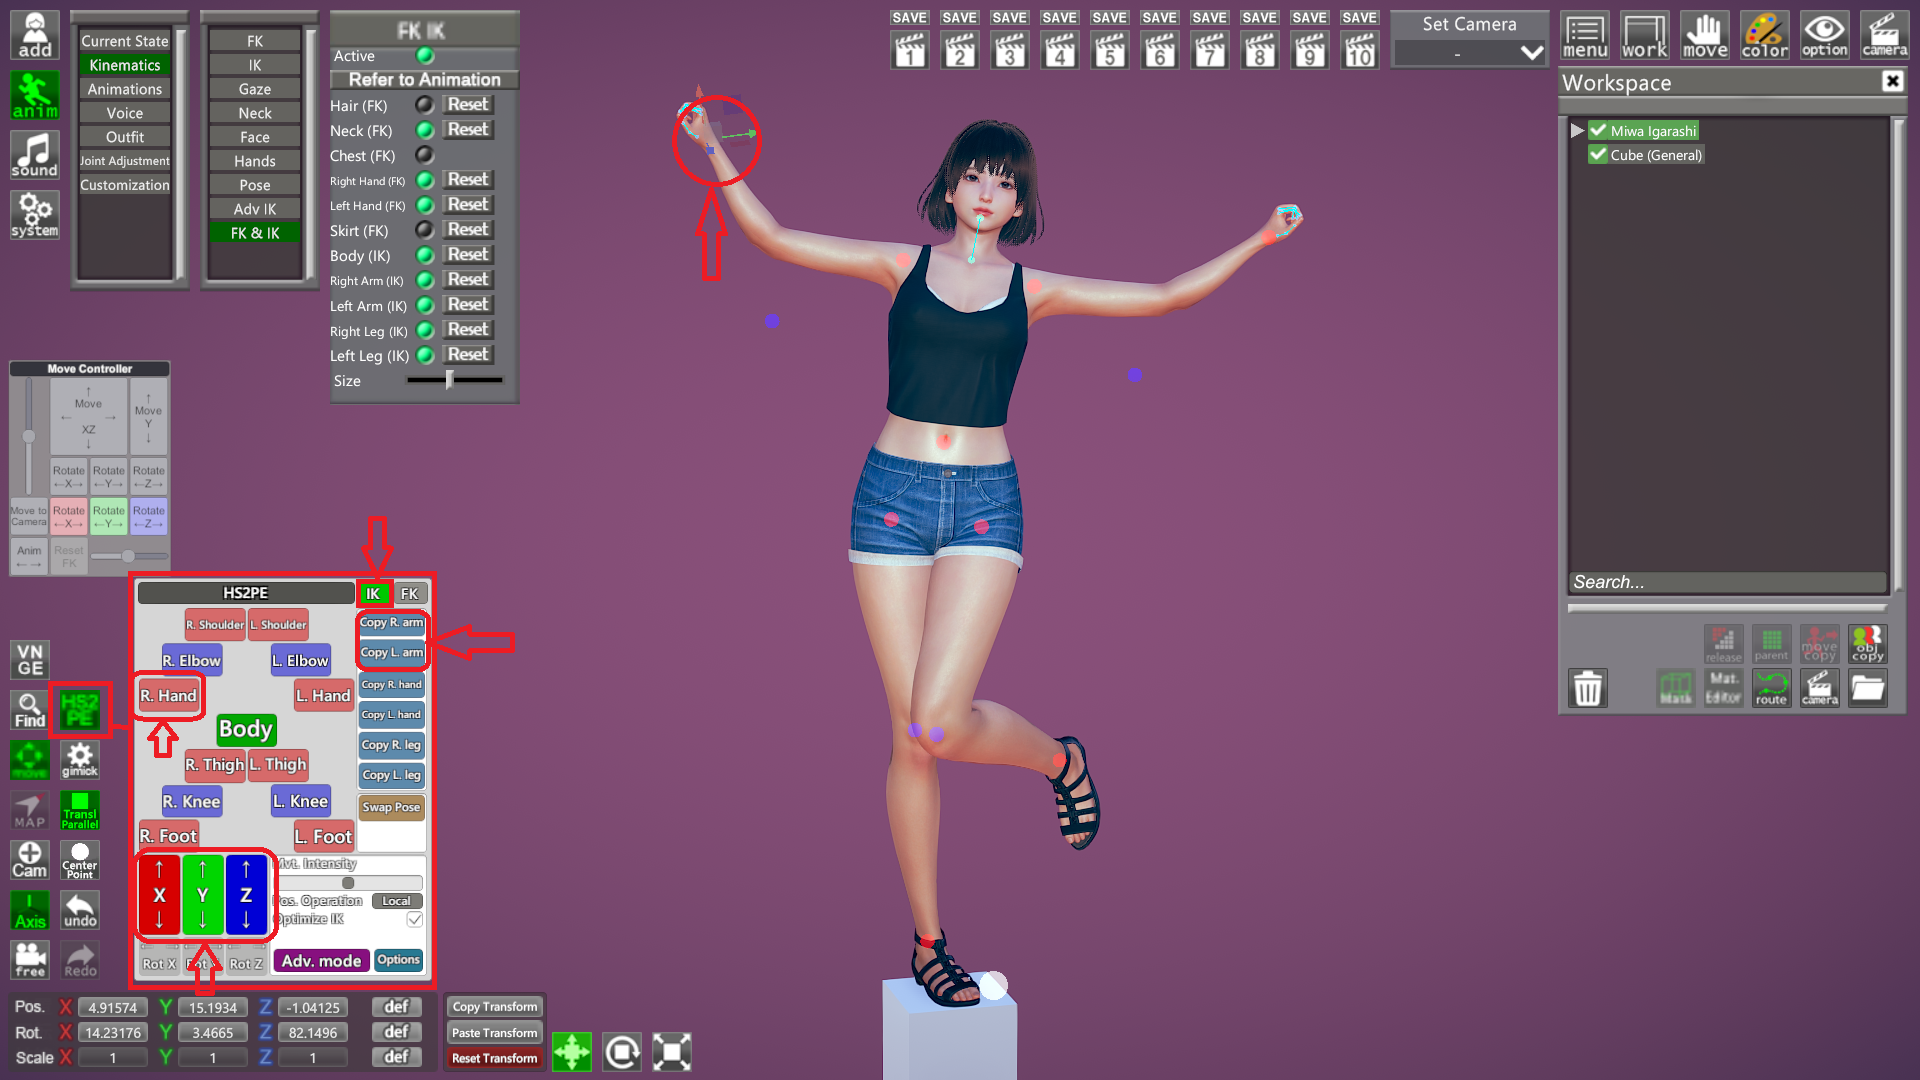
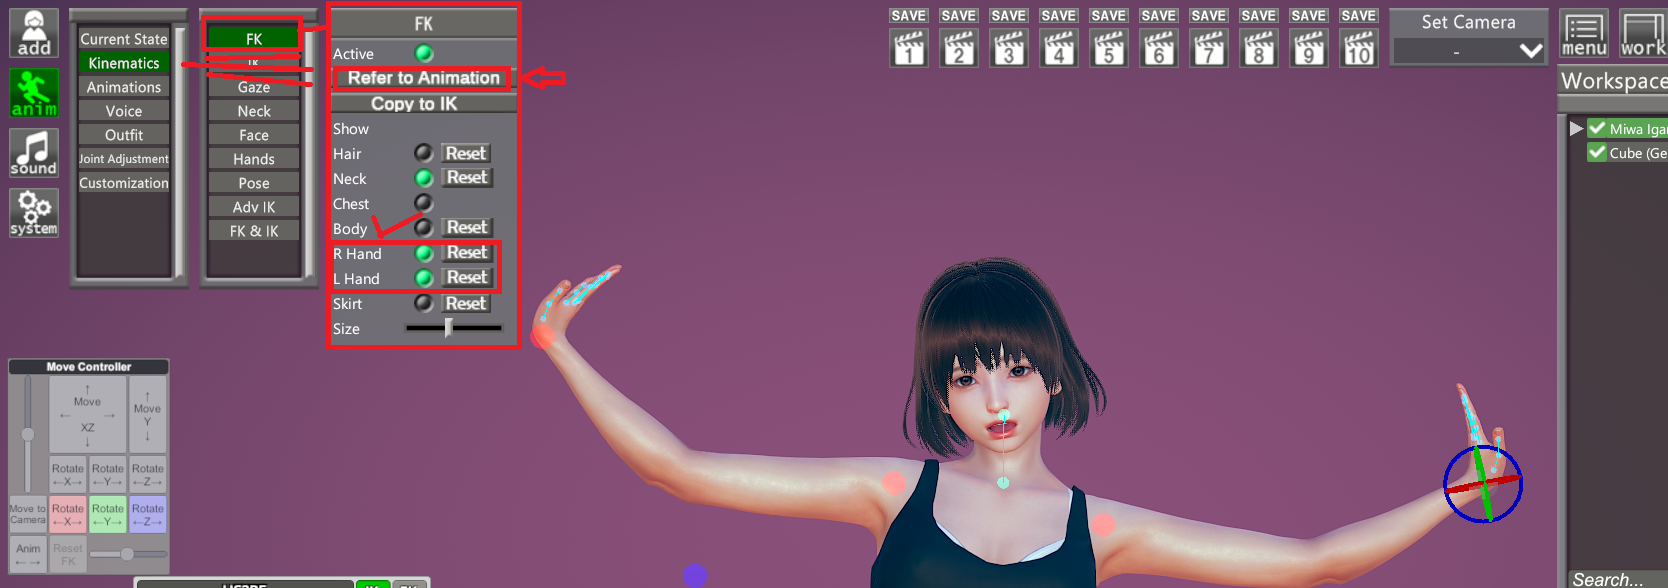
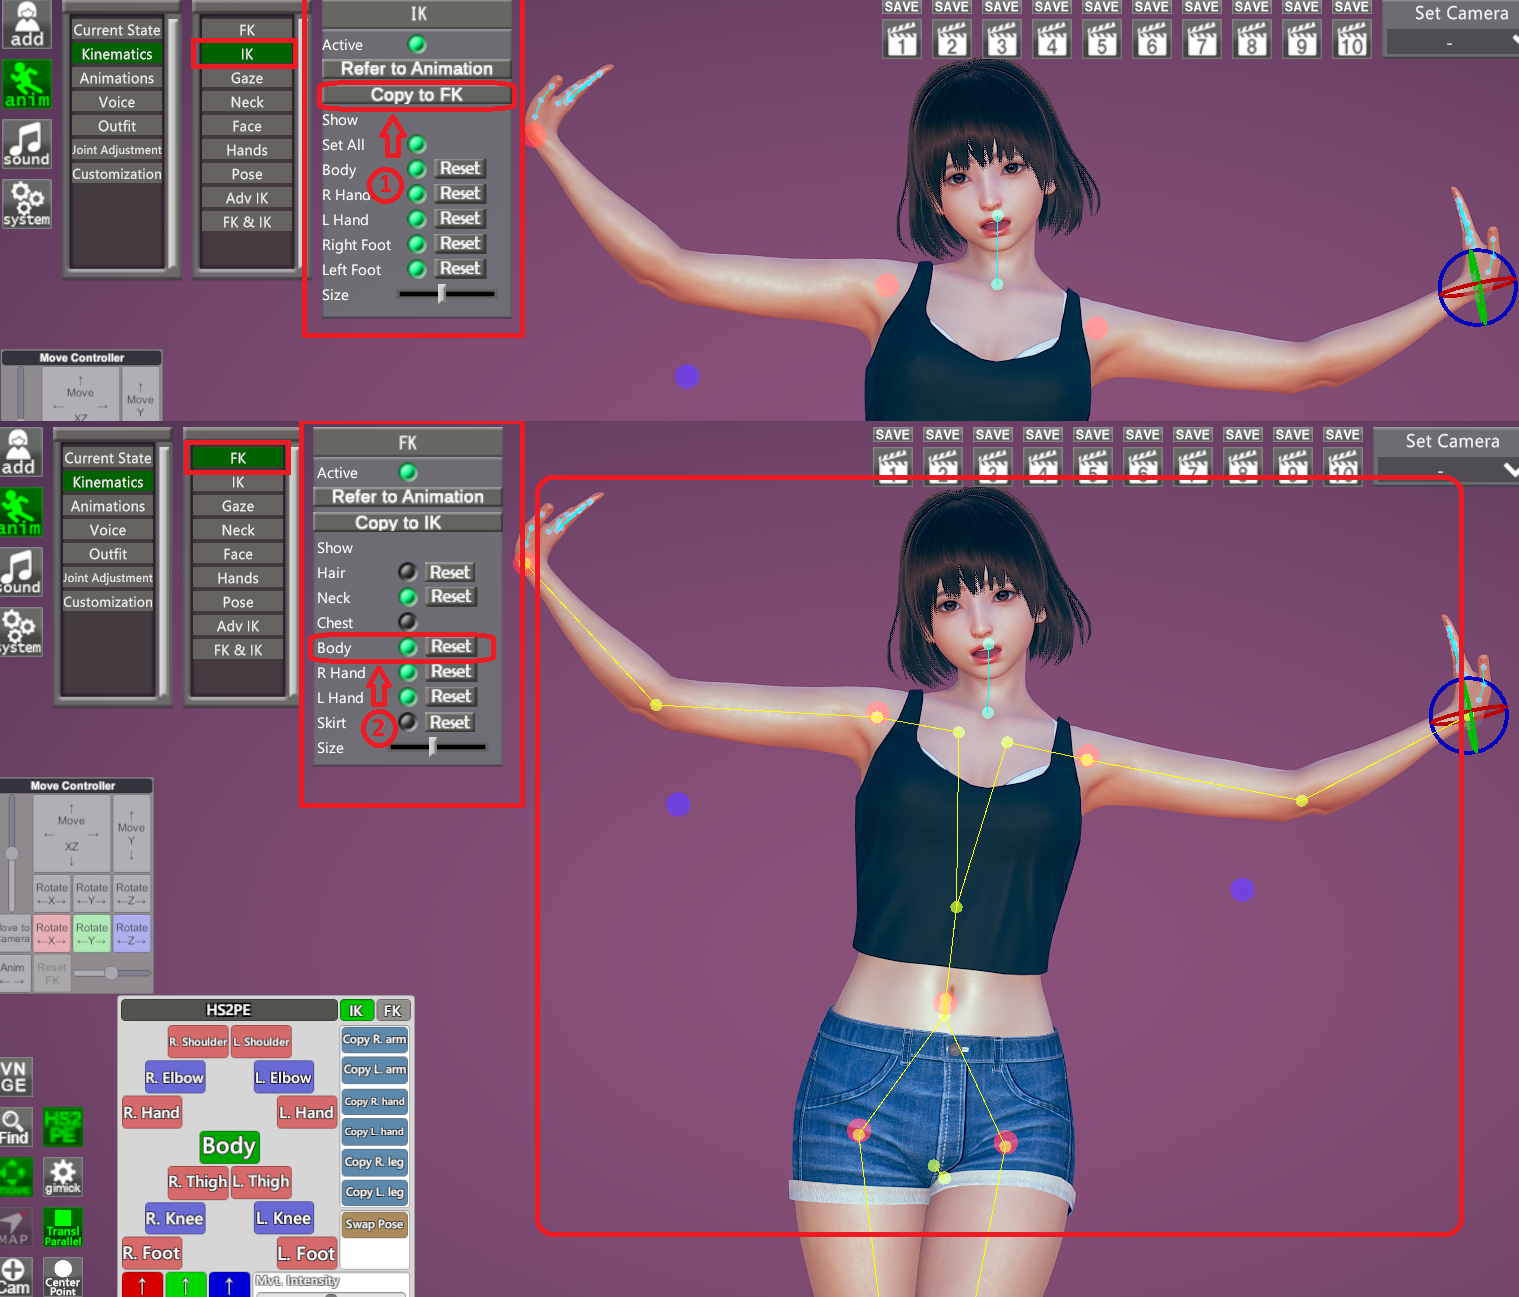
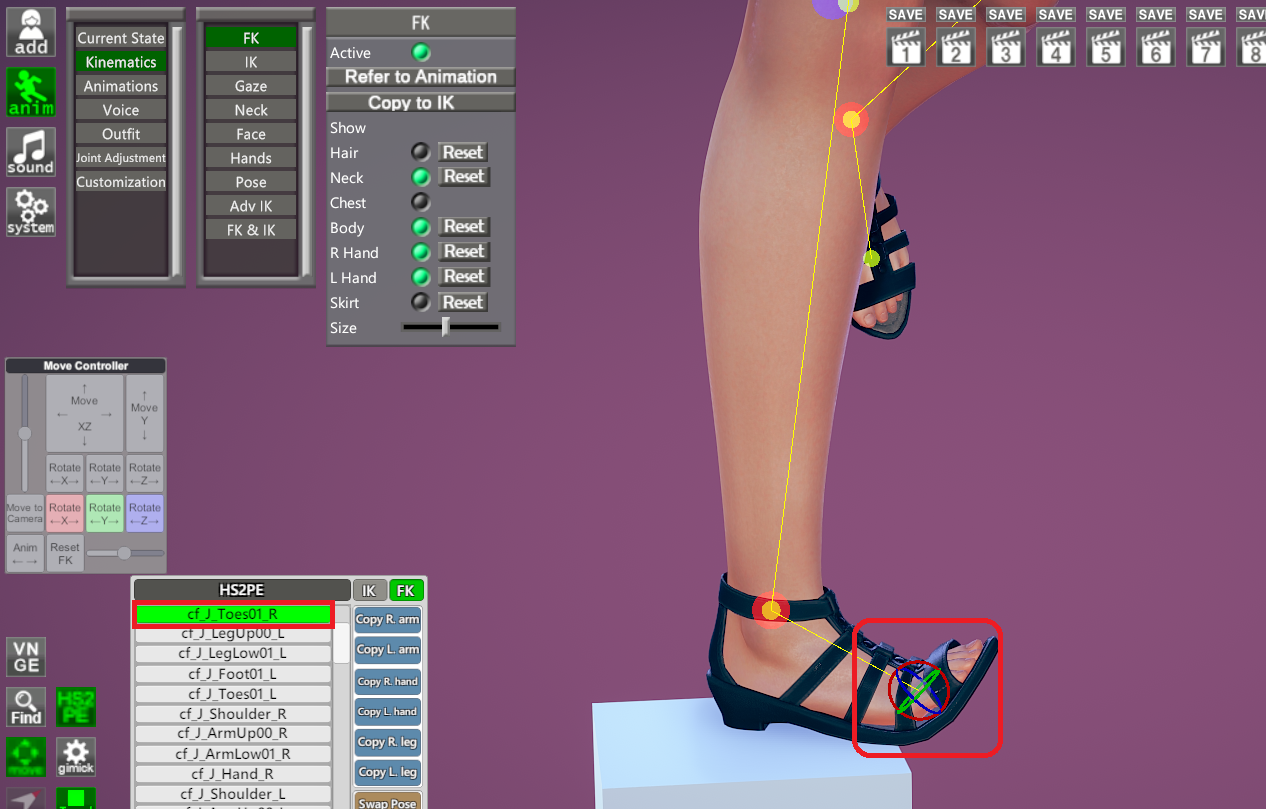
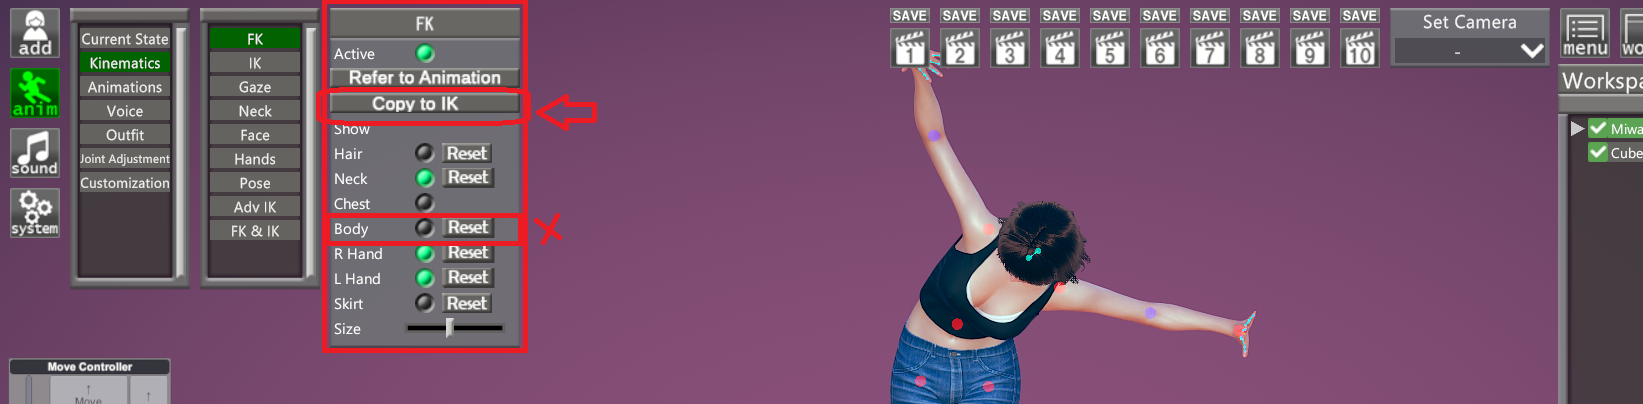
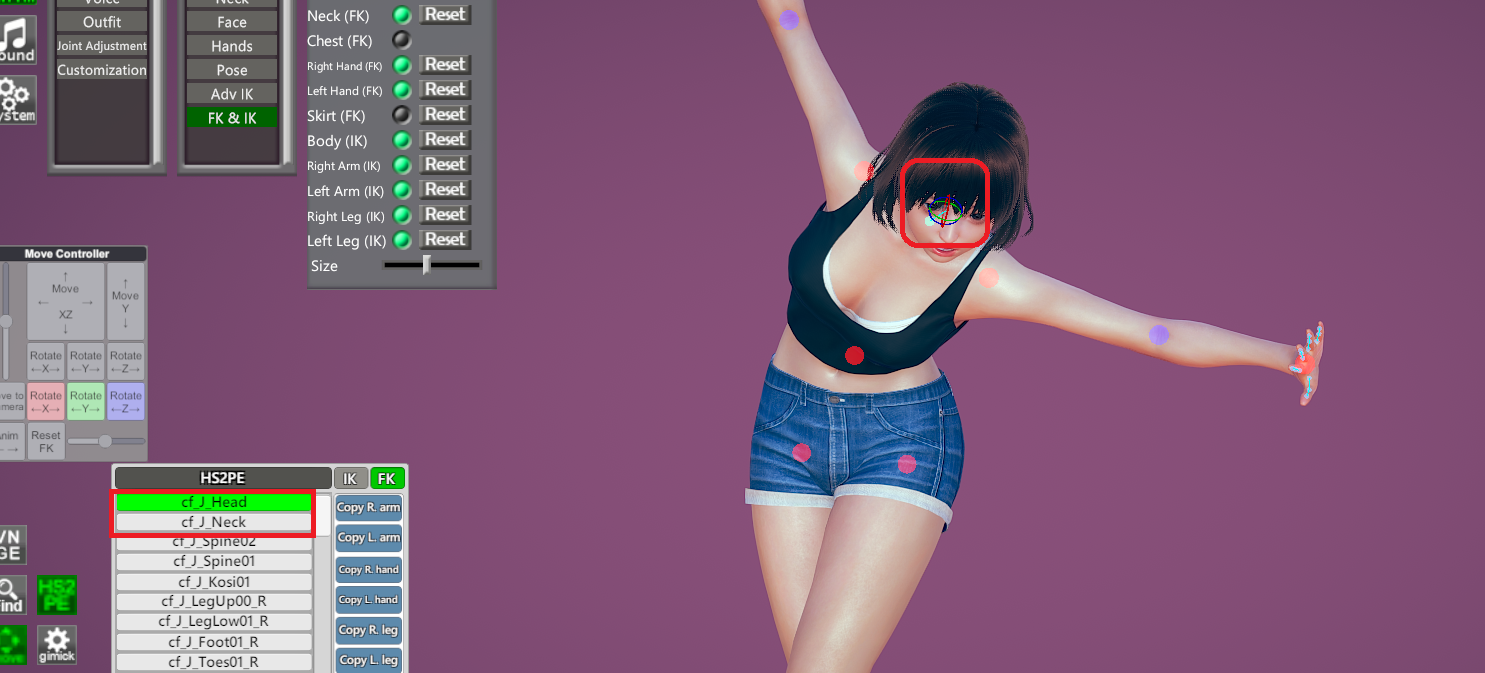
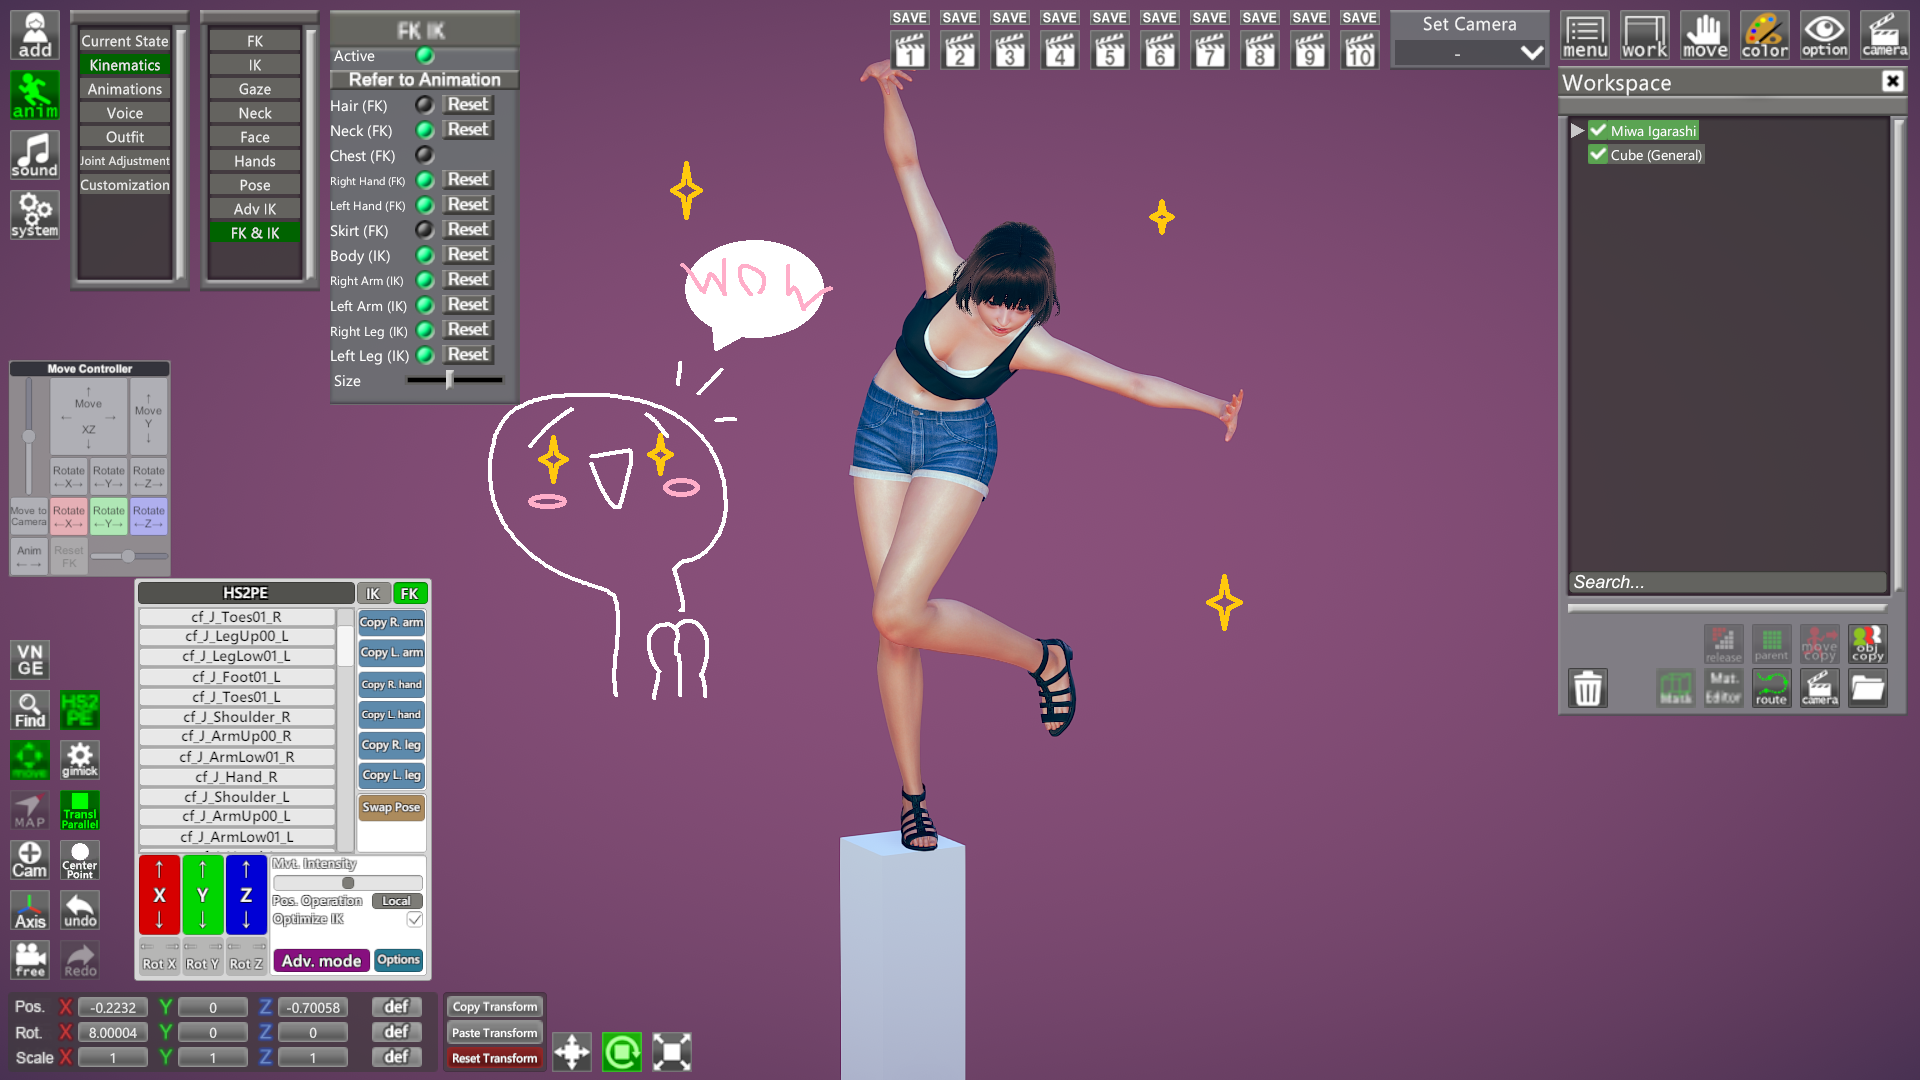
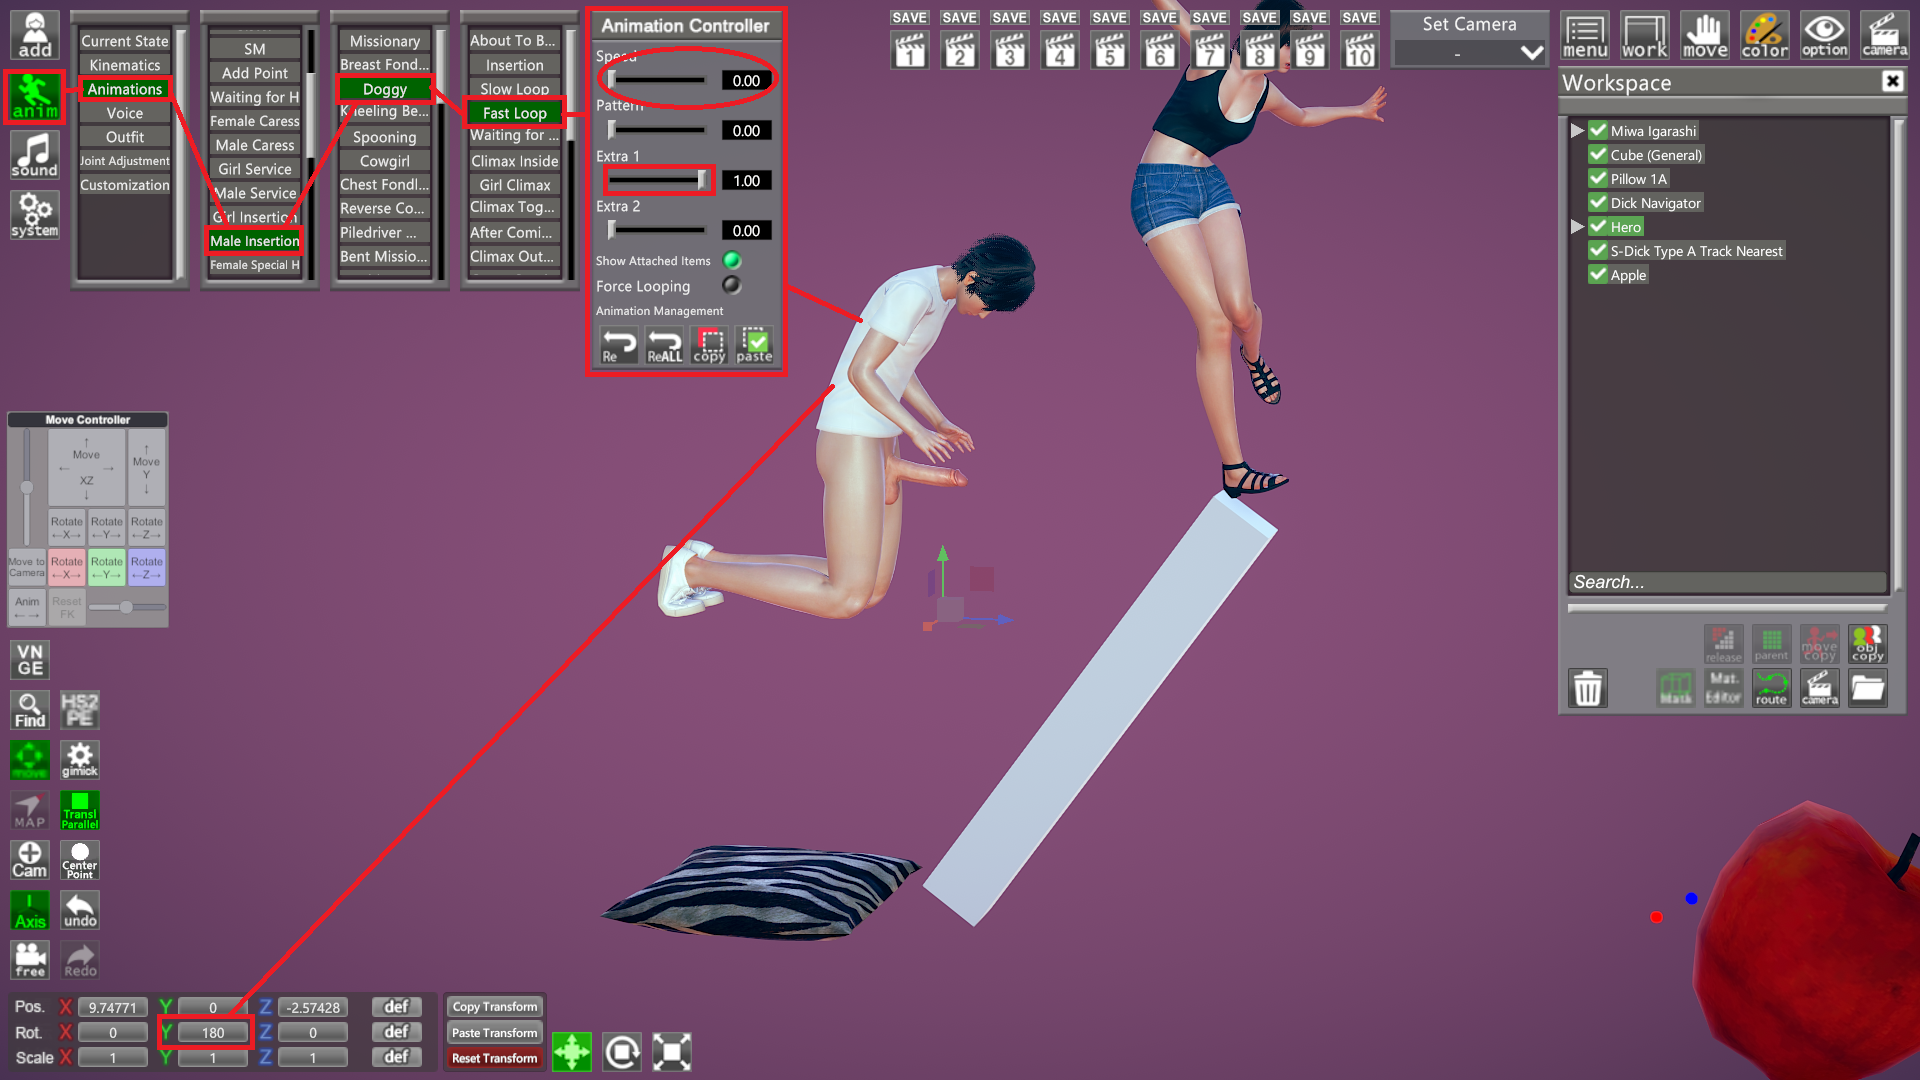
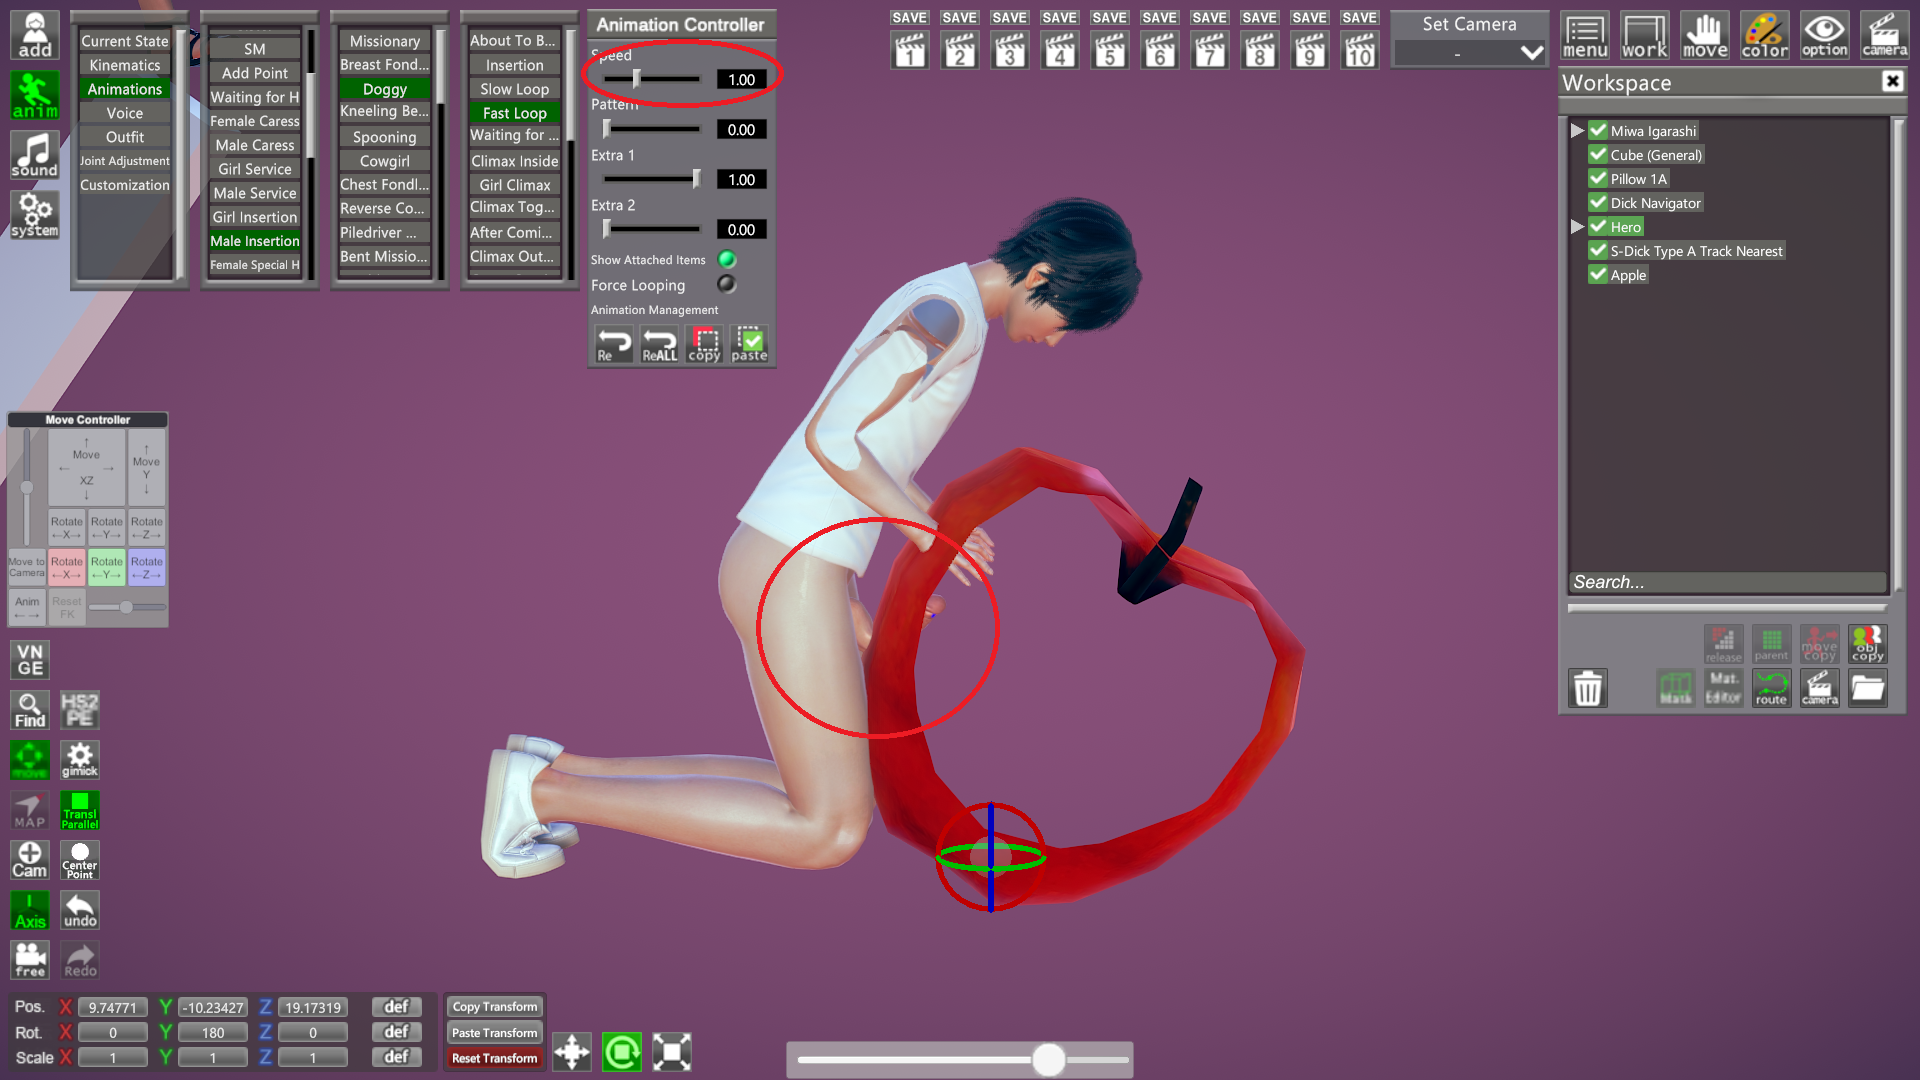
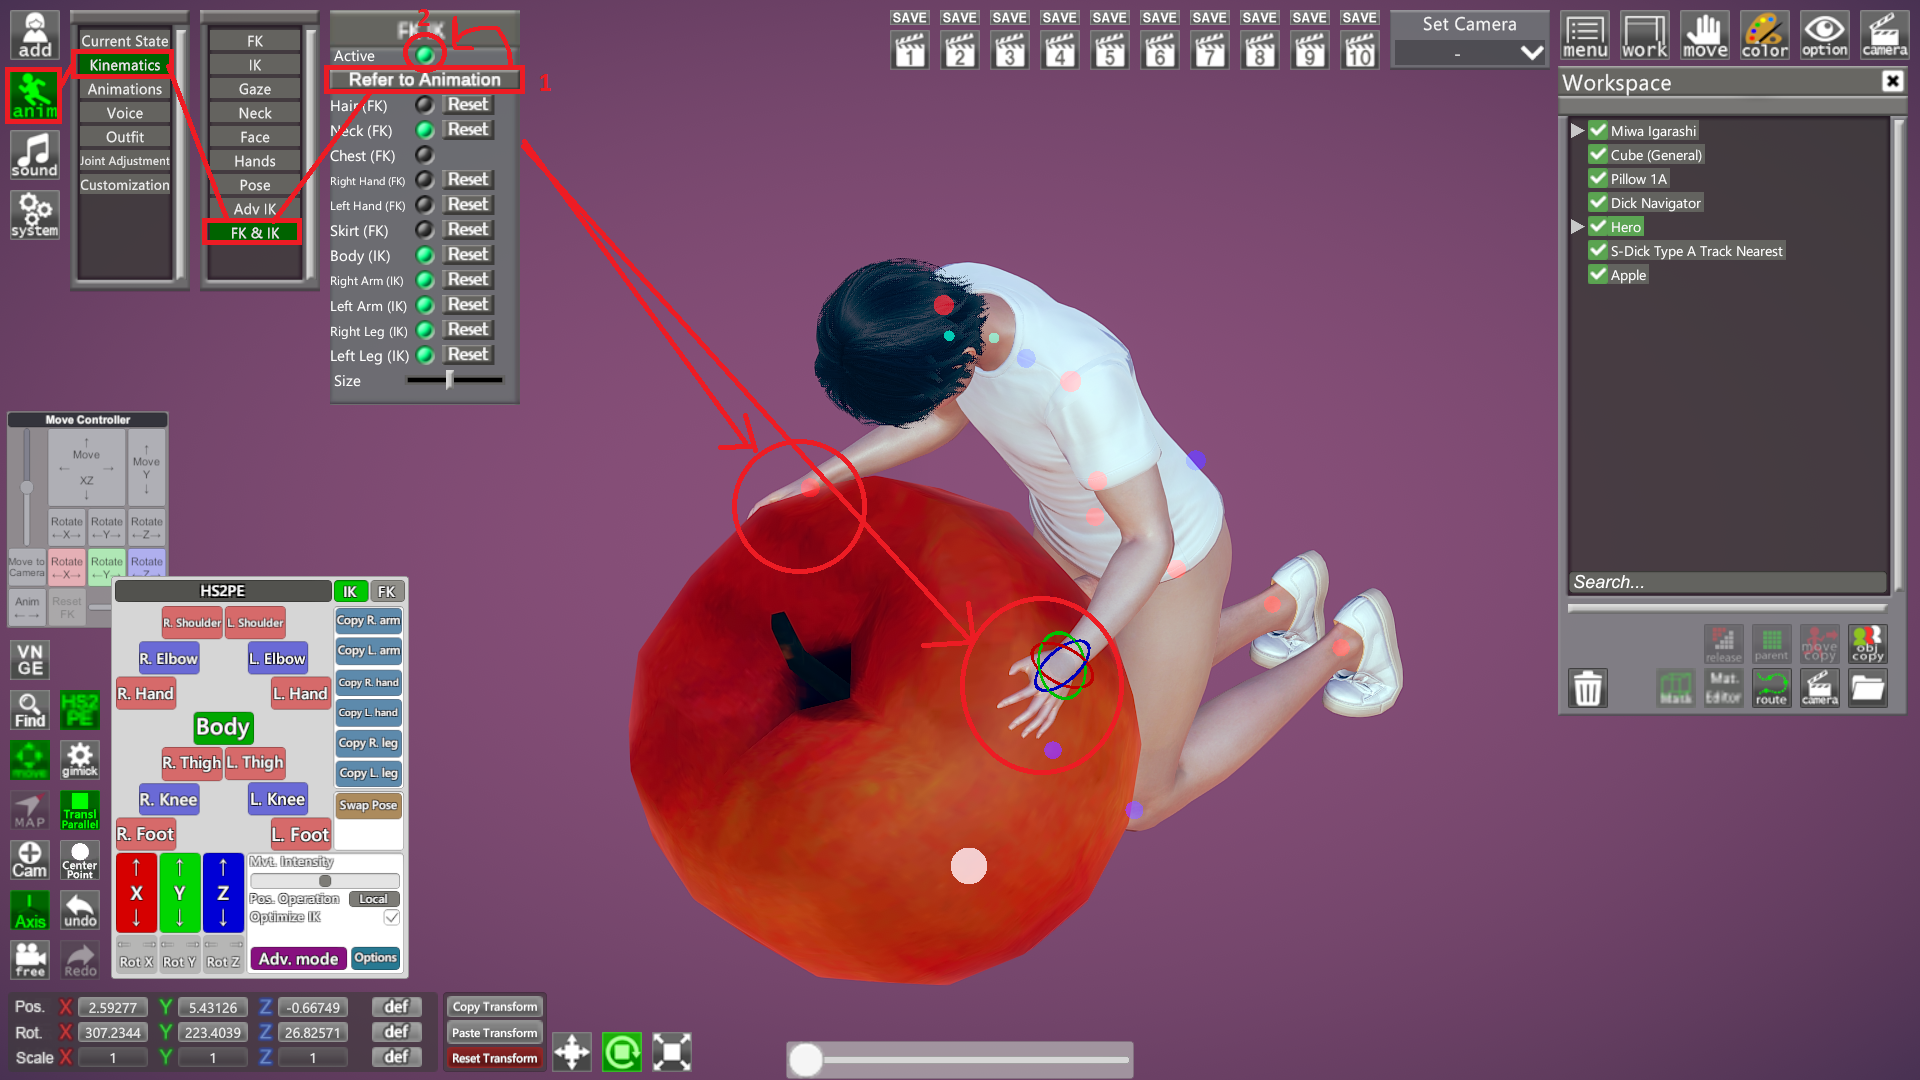
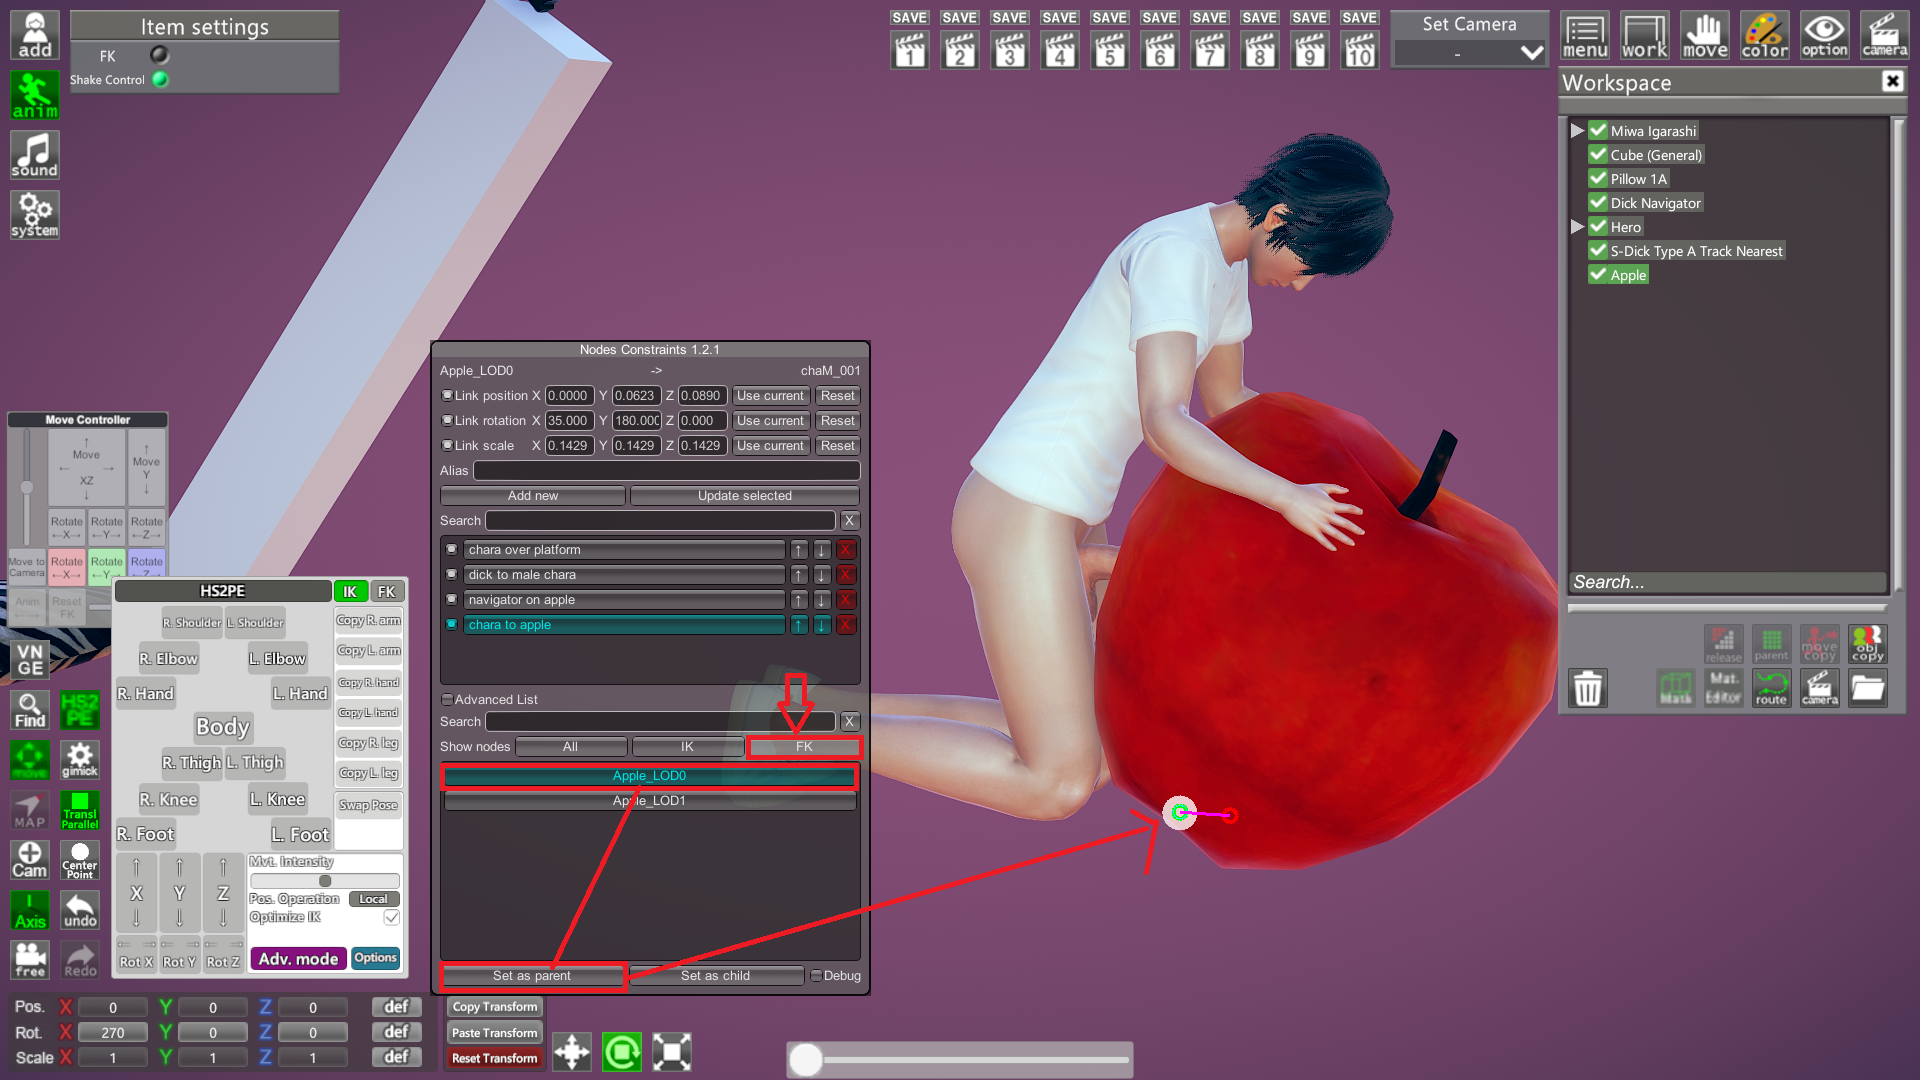
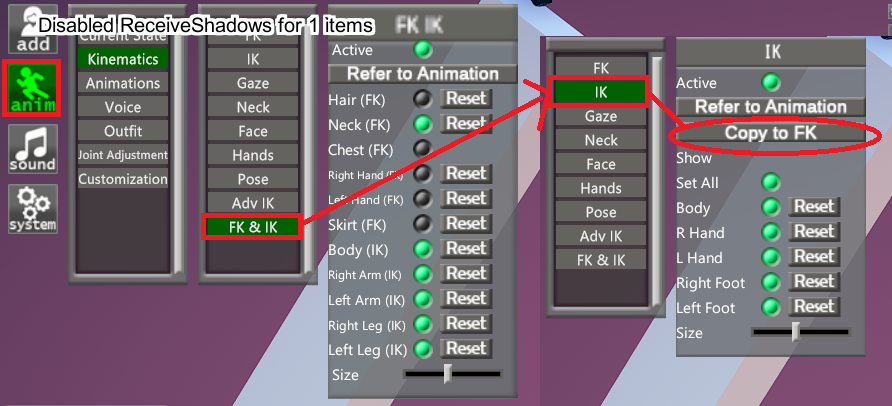
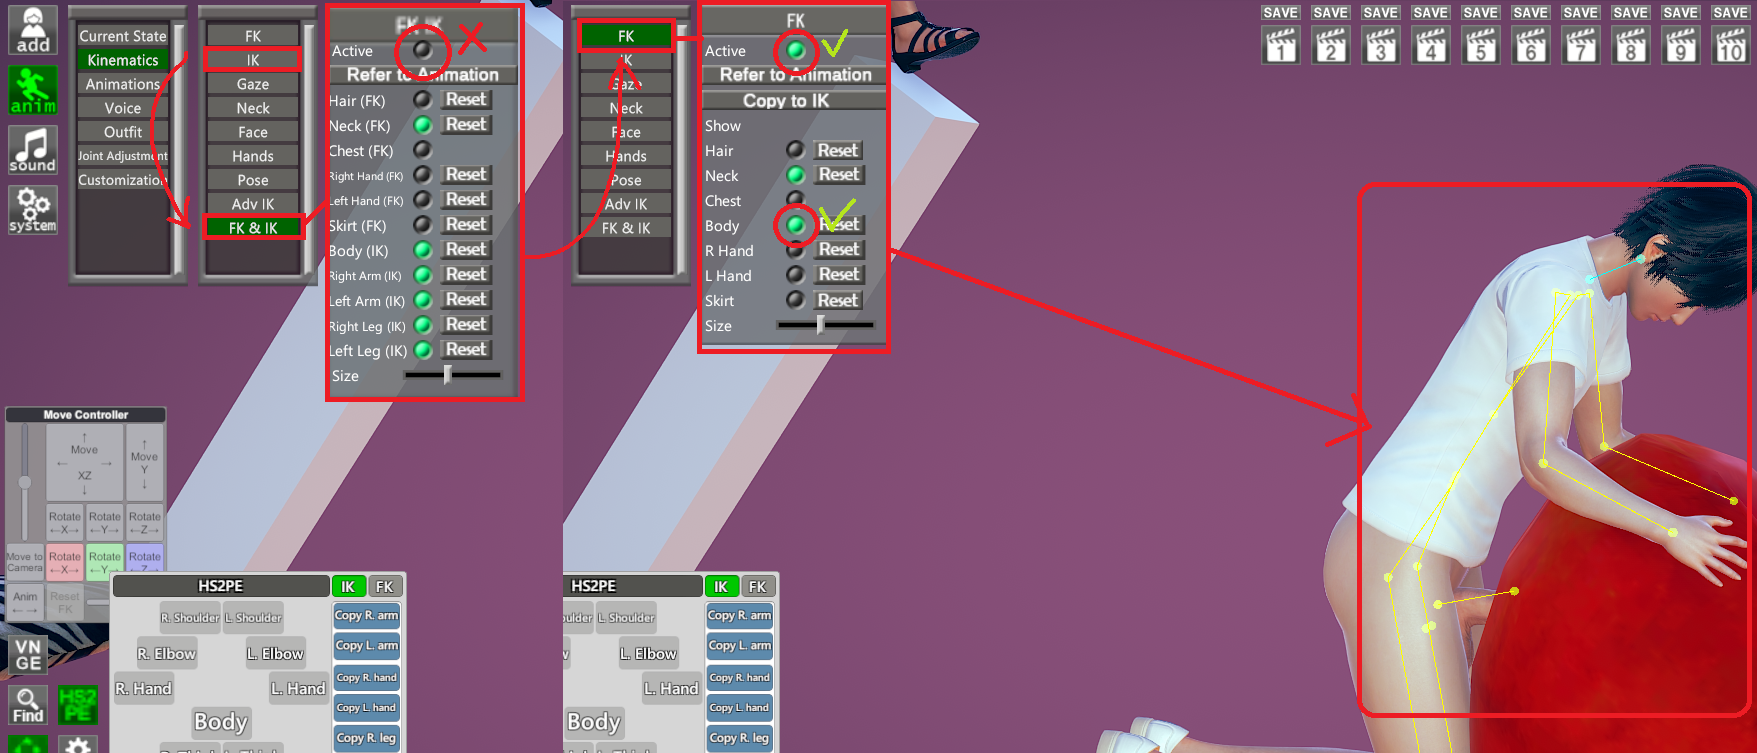
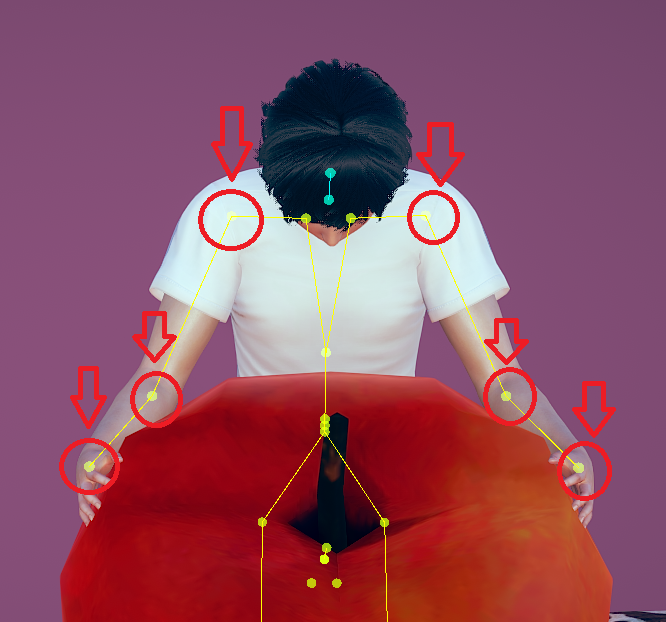
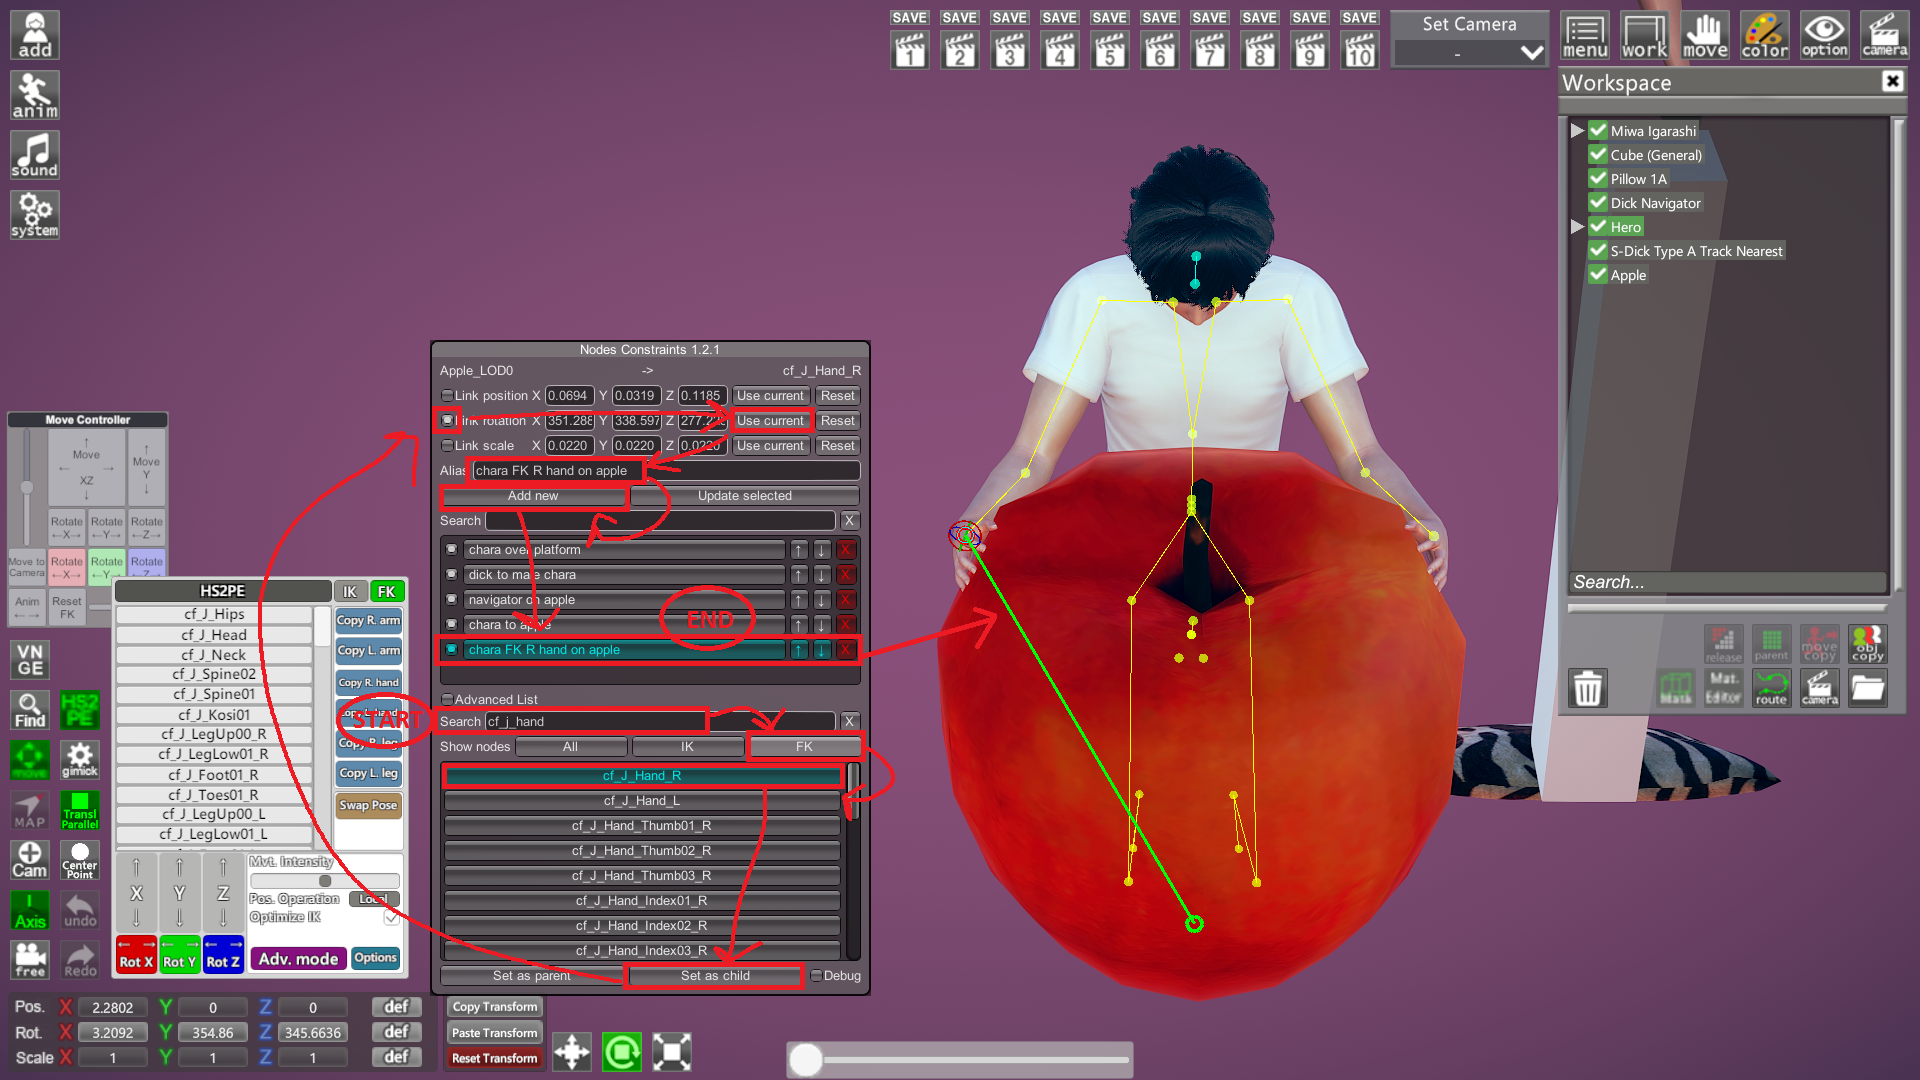
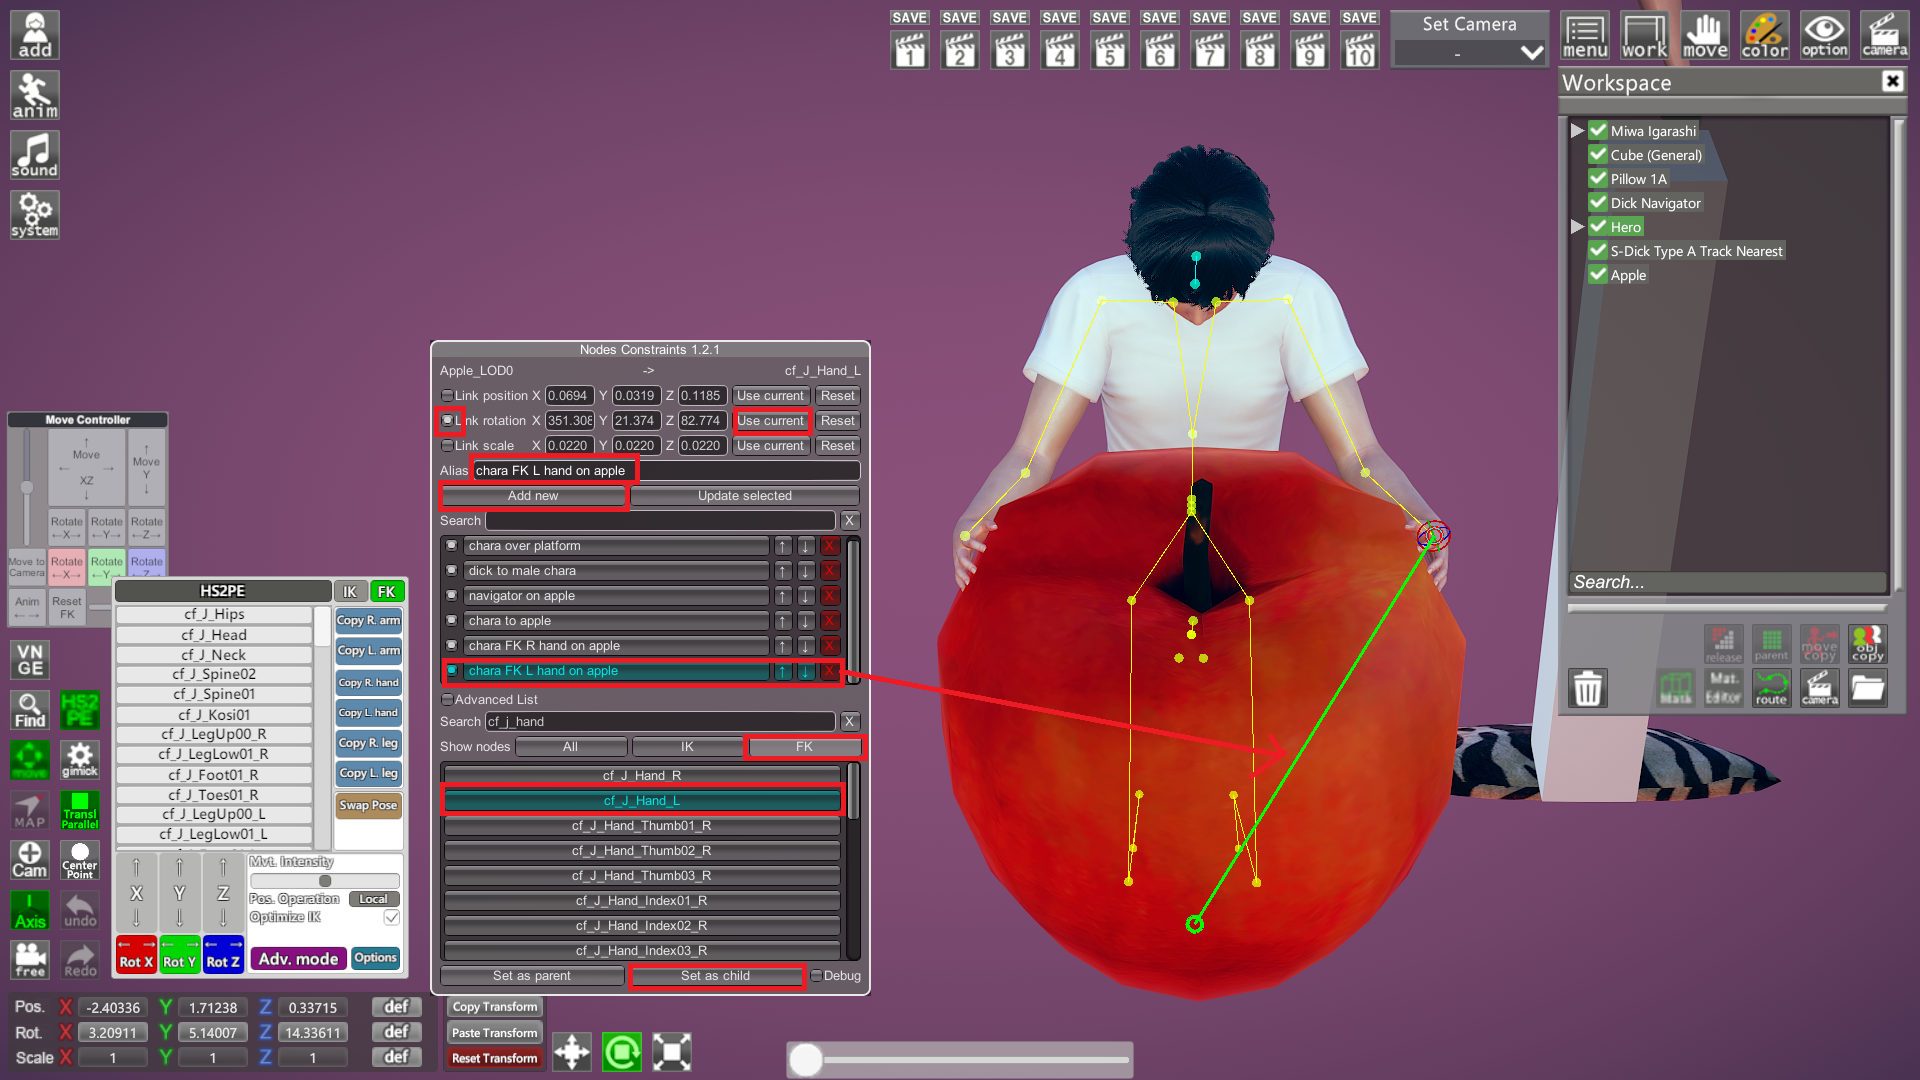
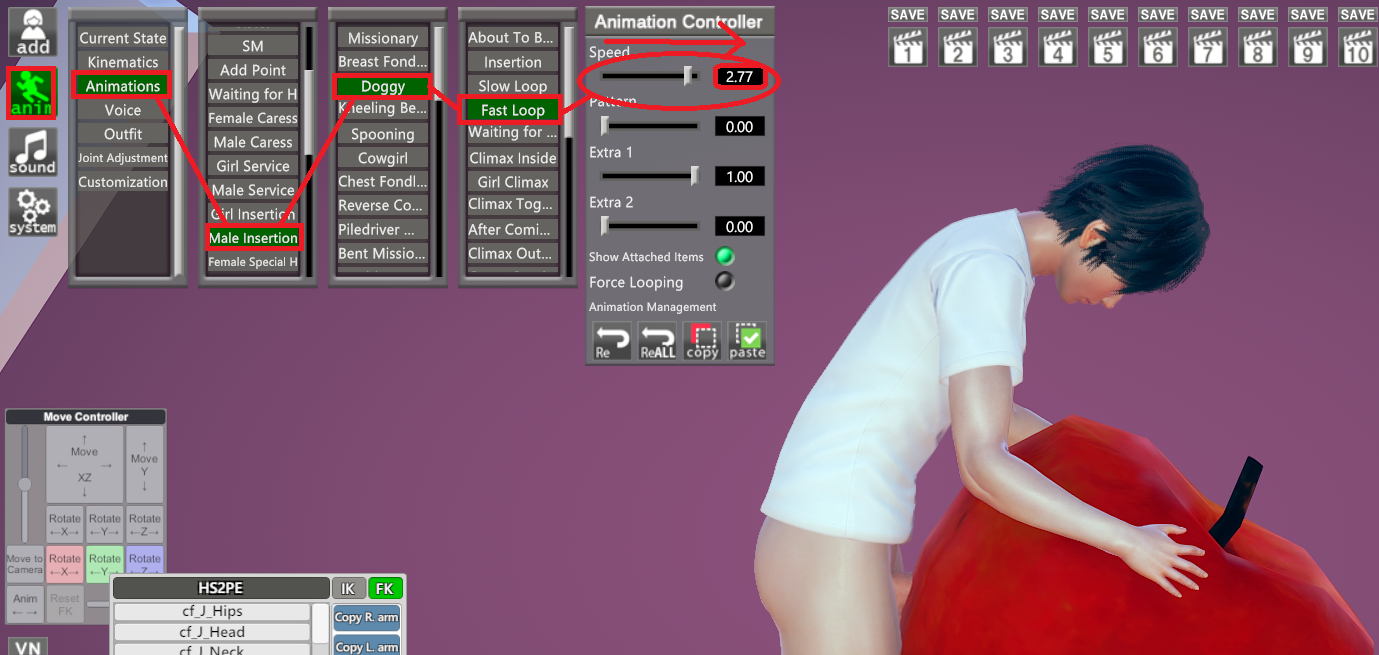
button1.png Subjects:
Studio Neo 2: and all it's tools, functions and features. creating scenes, importing them, loading objects, animations, editing FKs and IKs . . .etc.
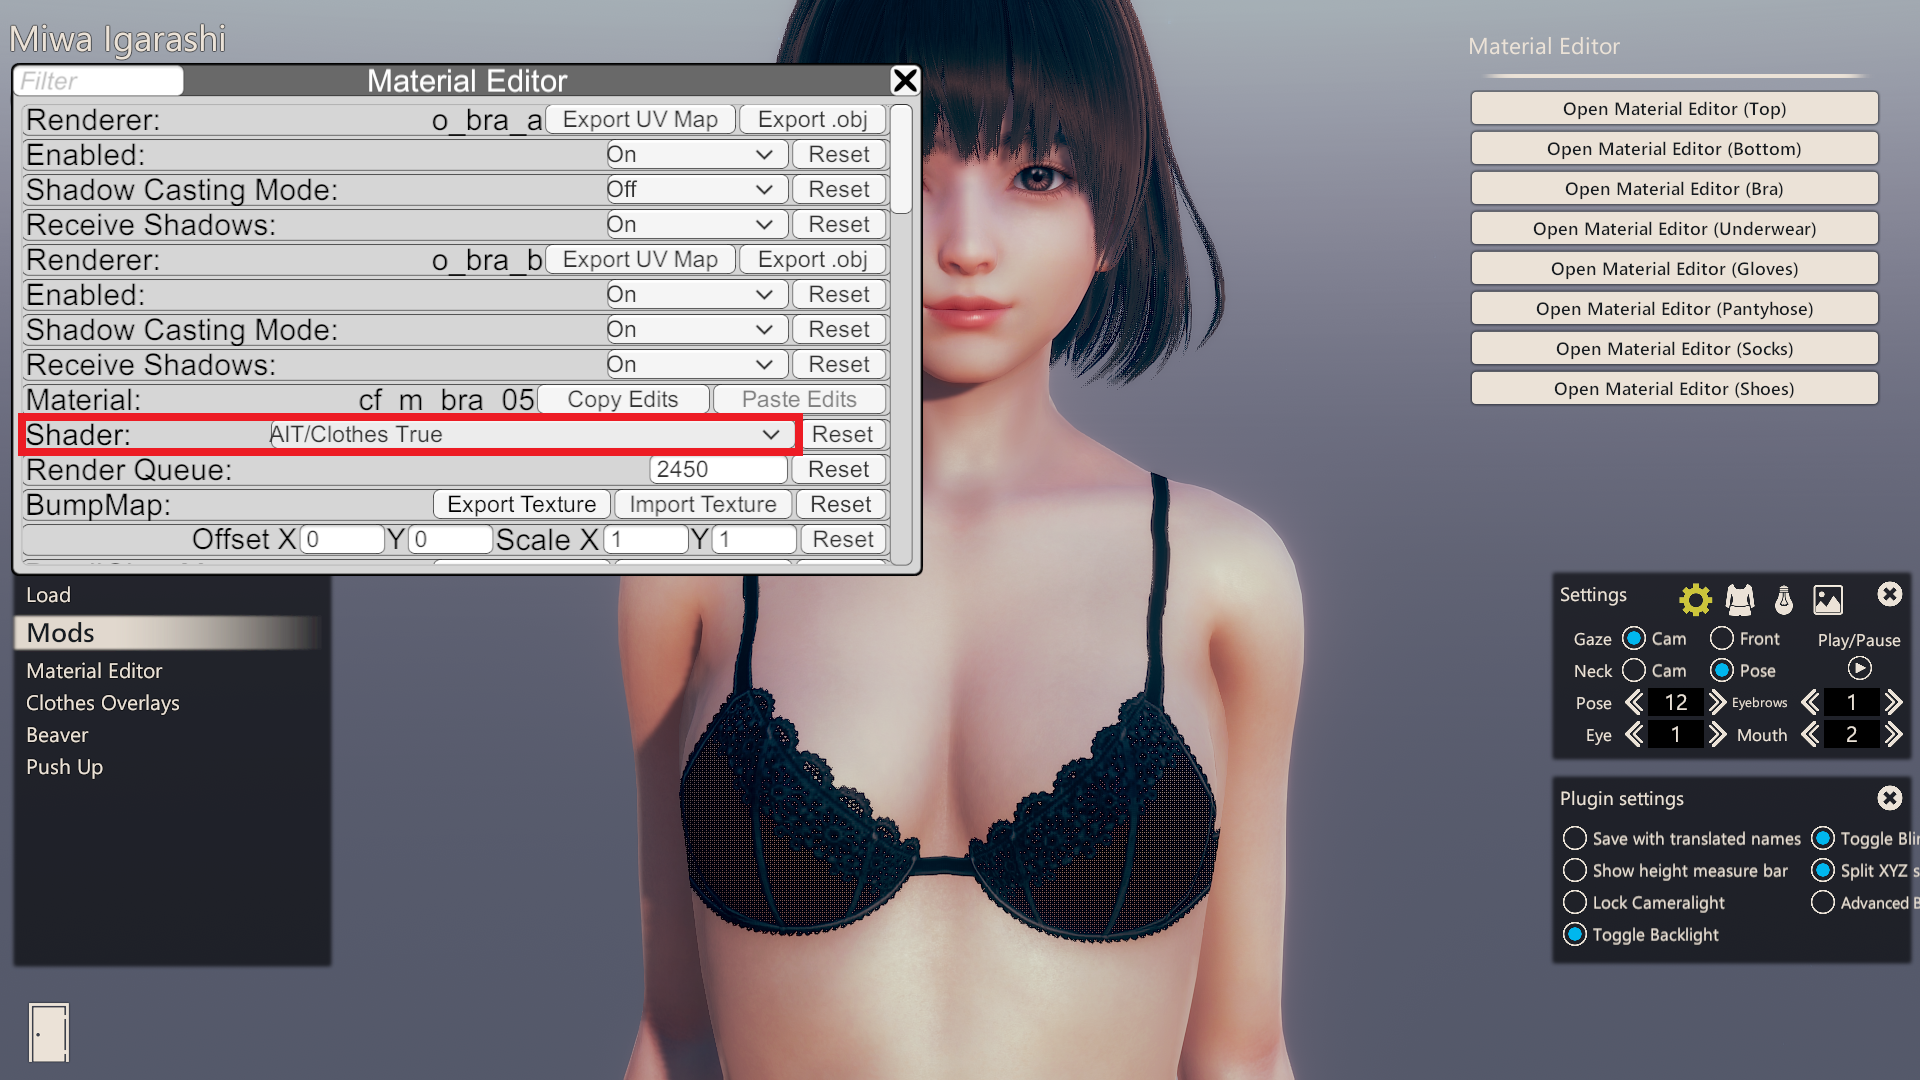
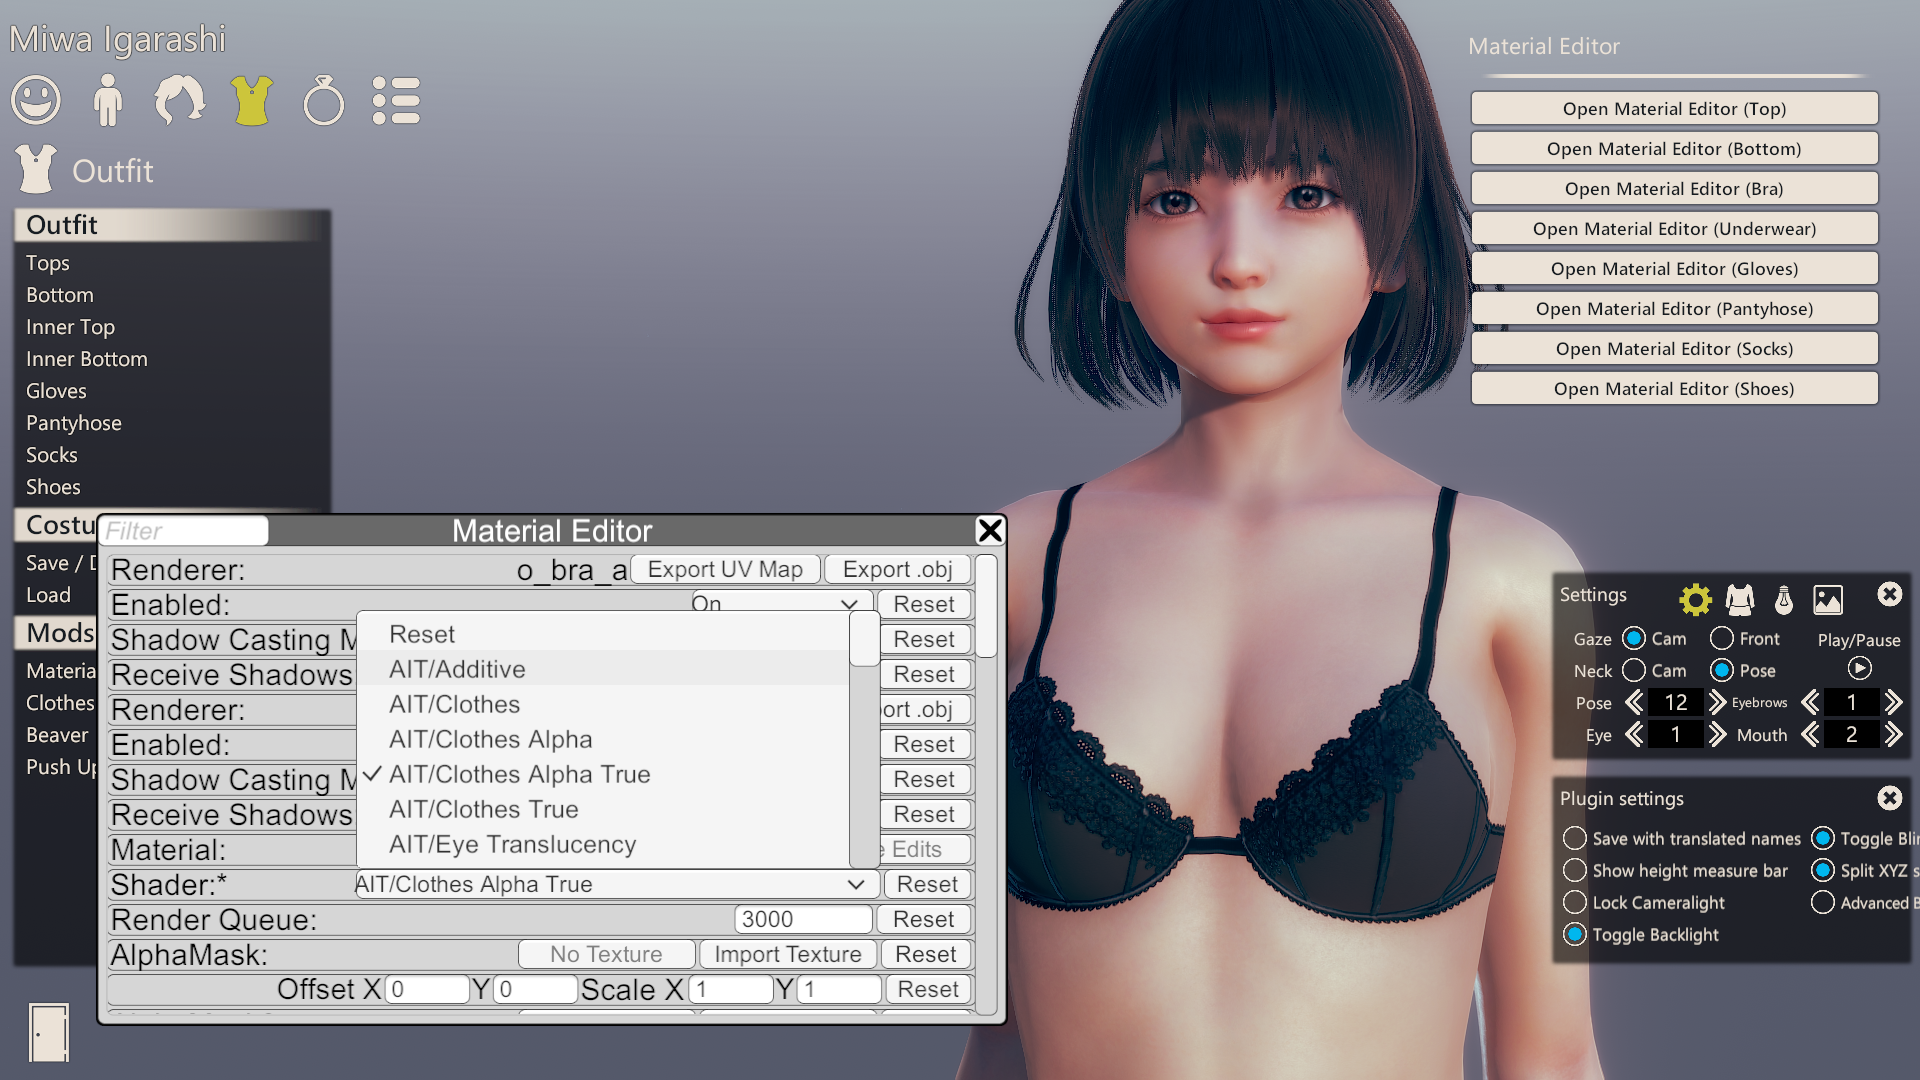
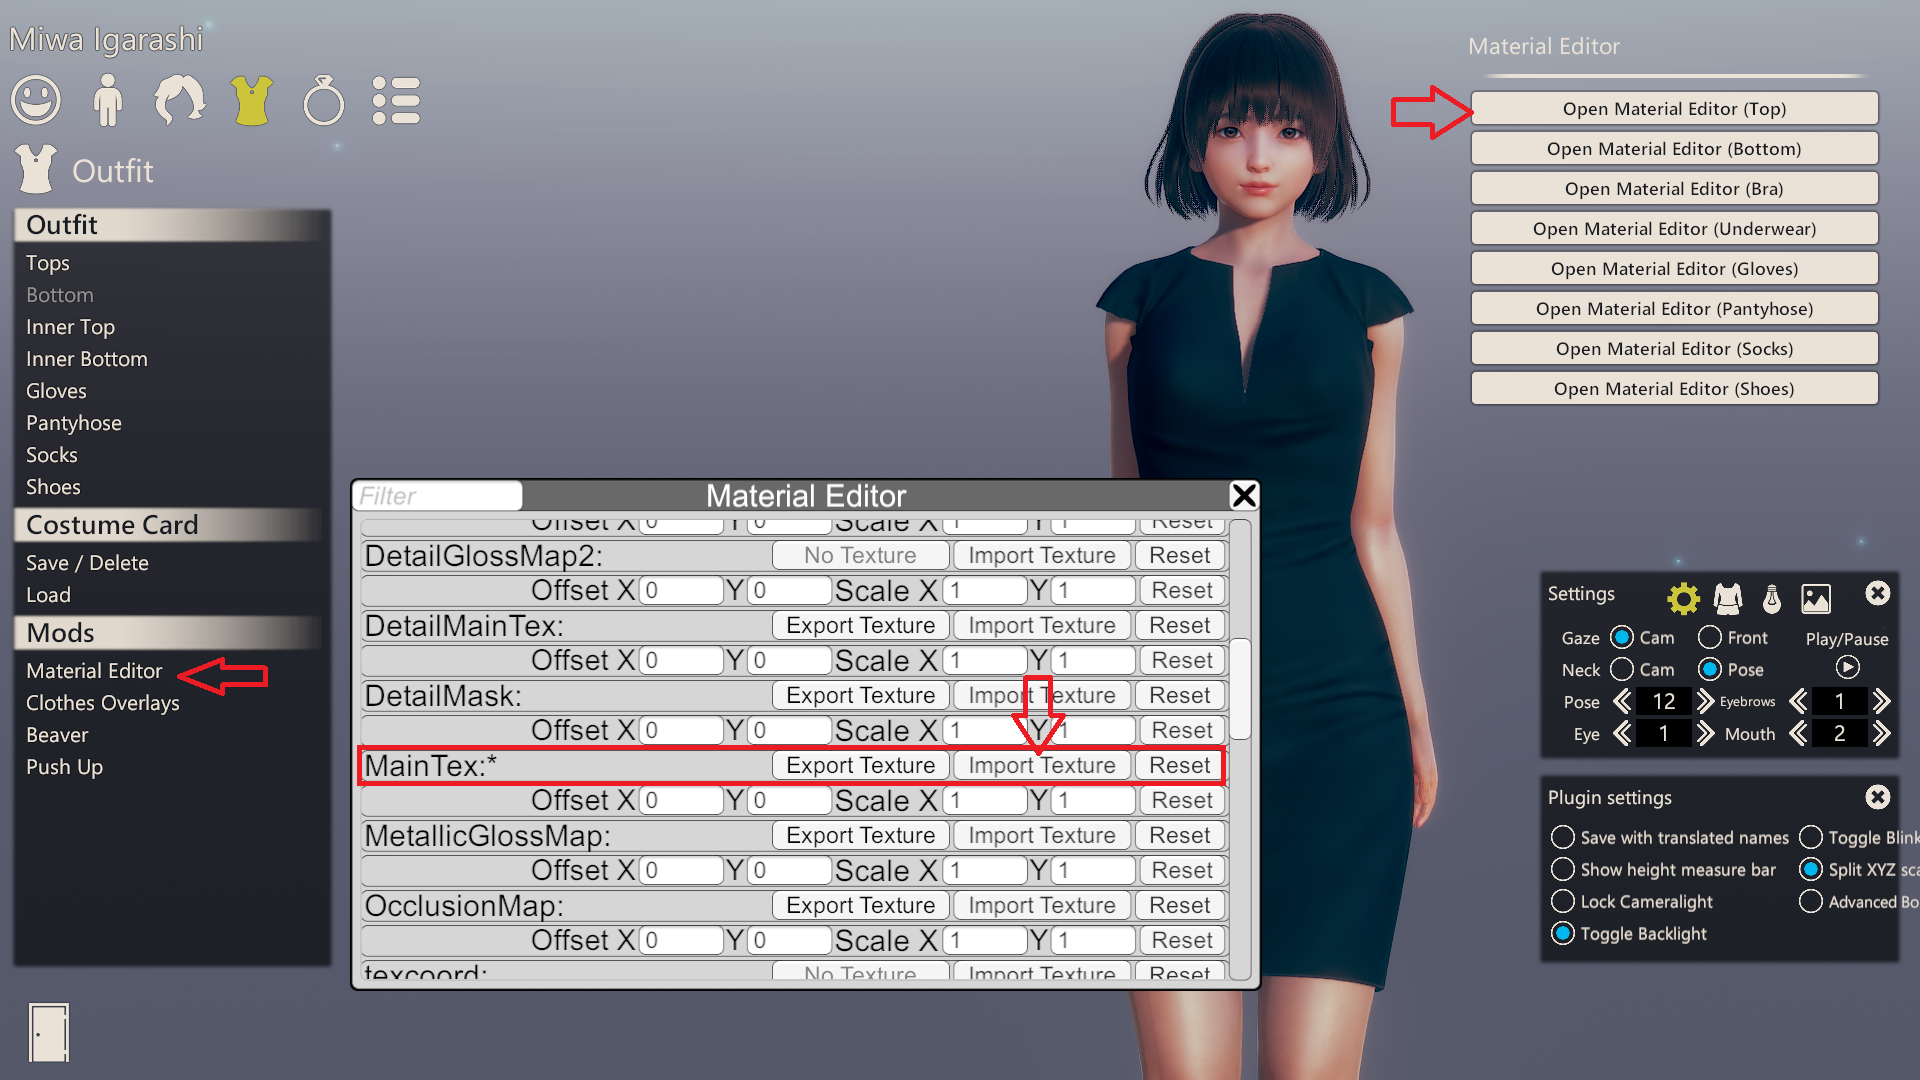
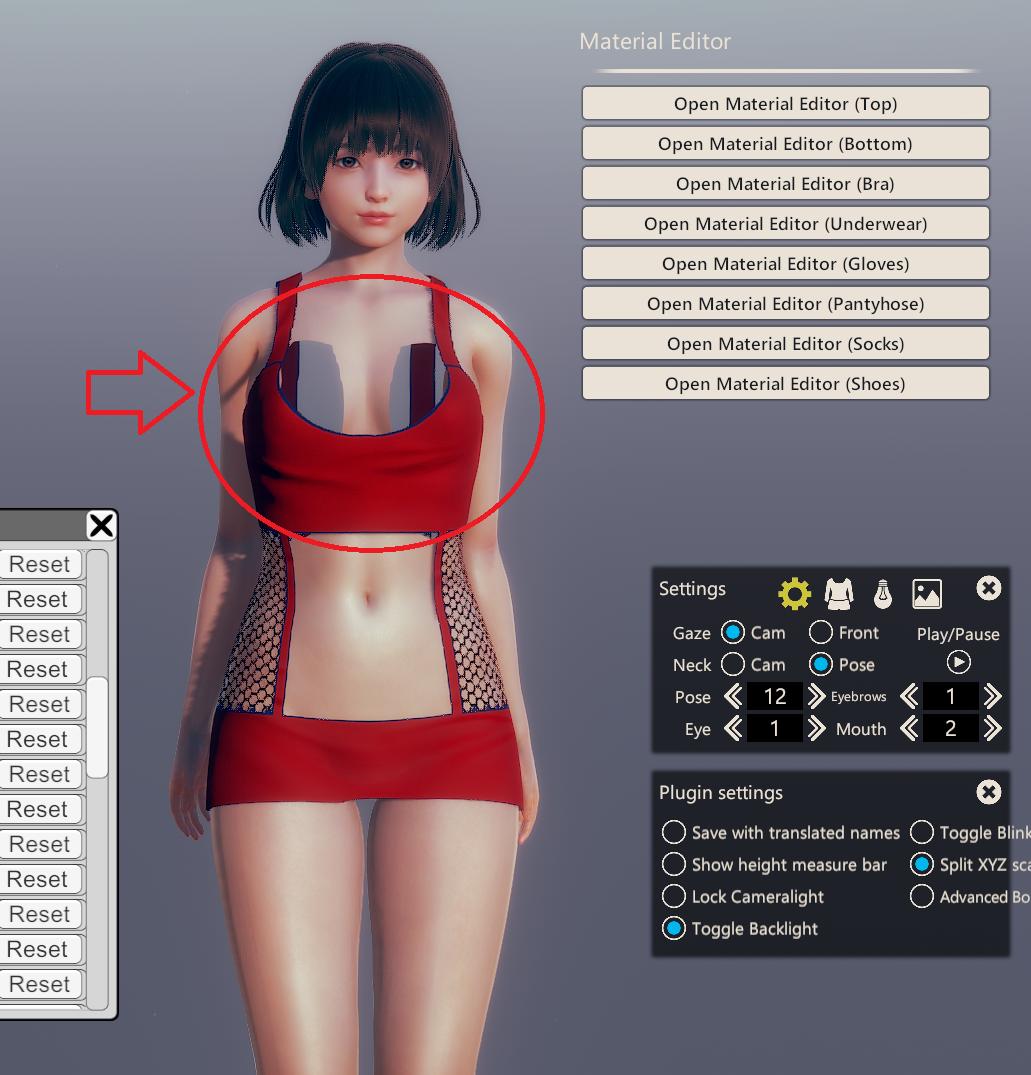
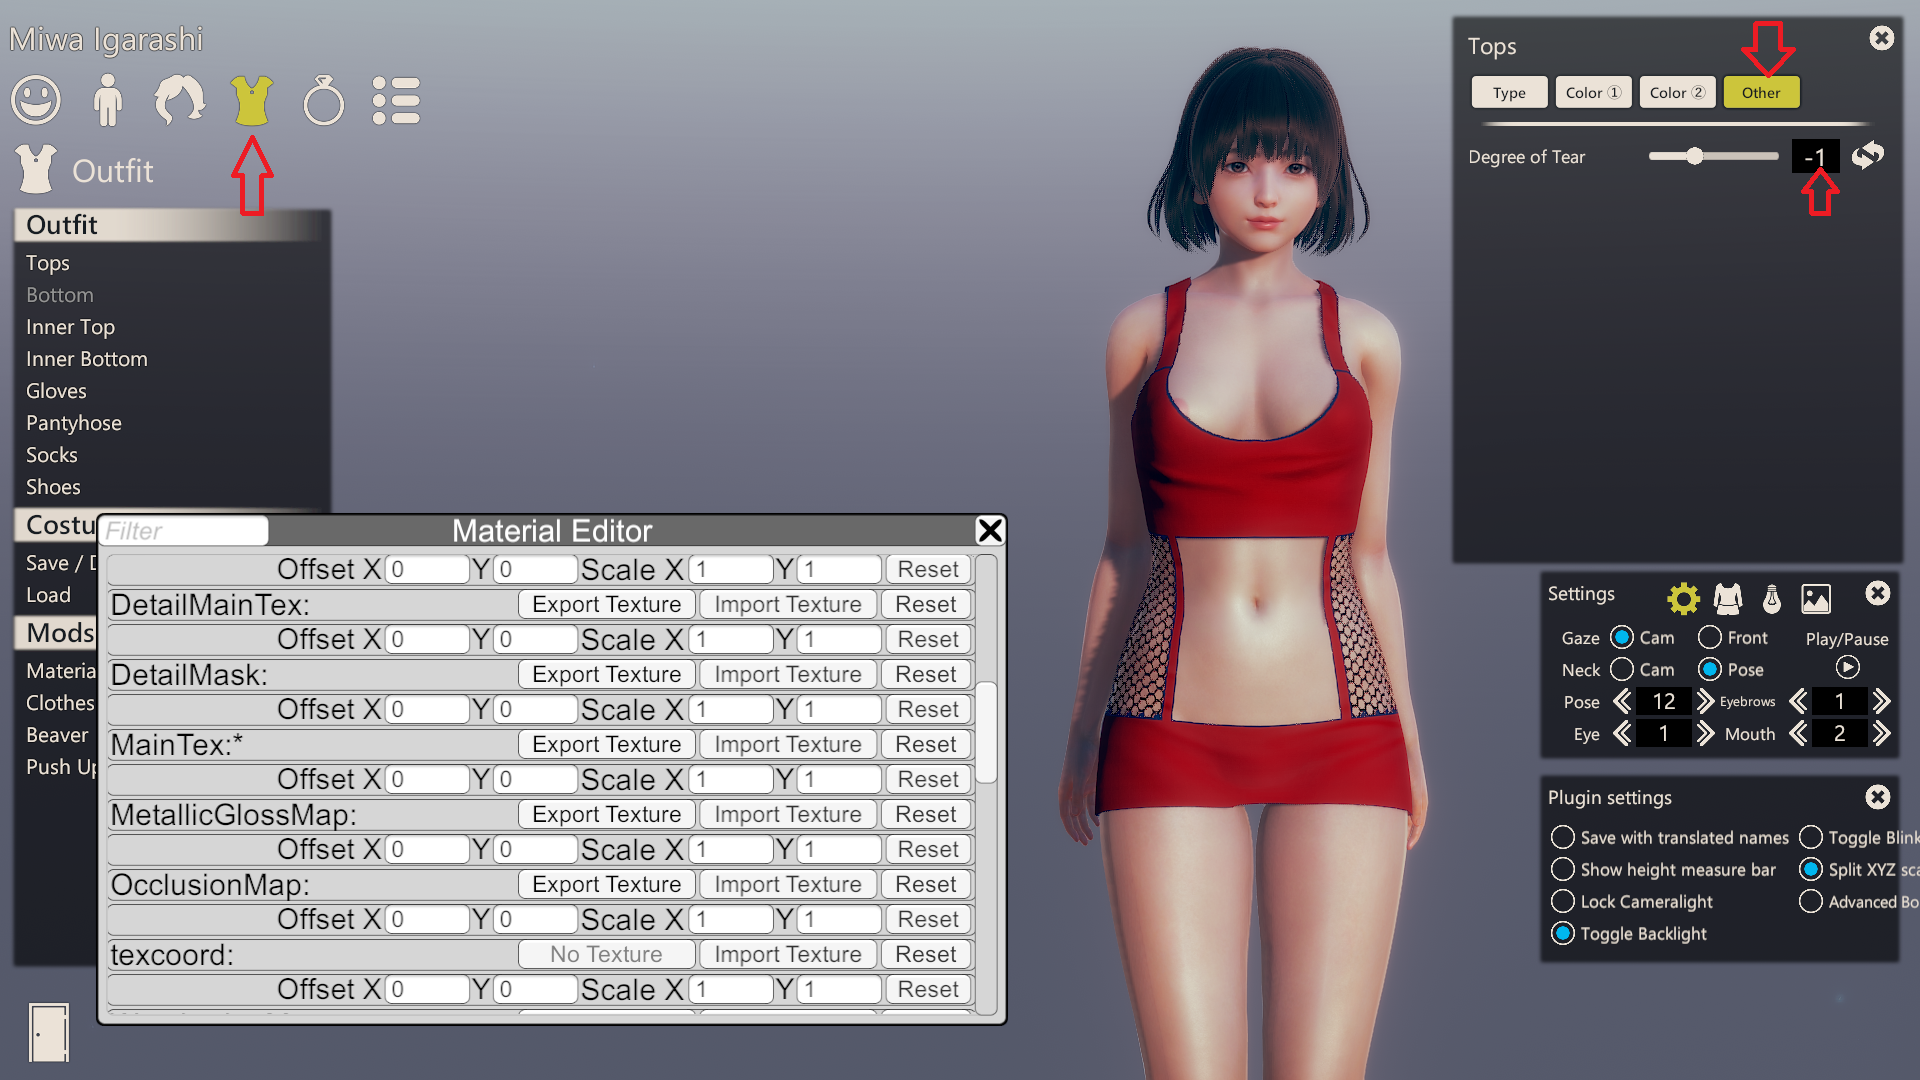
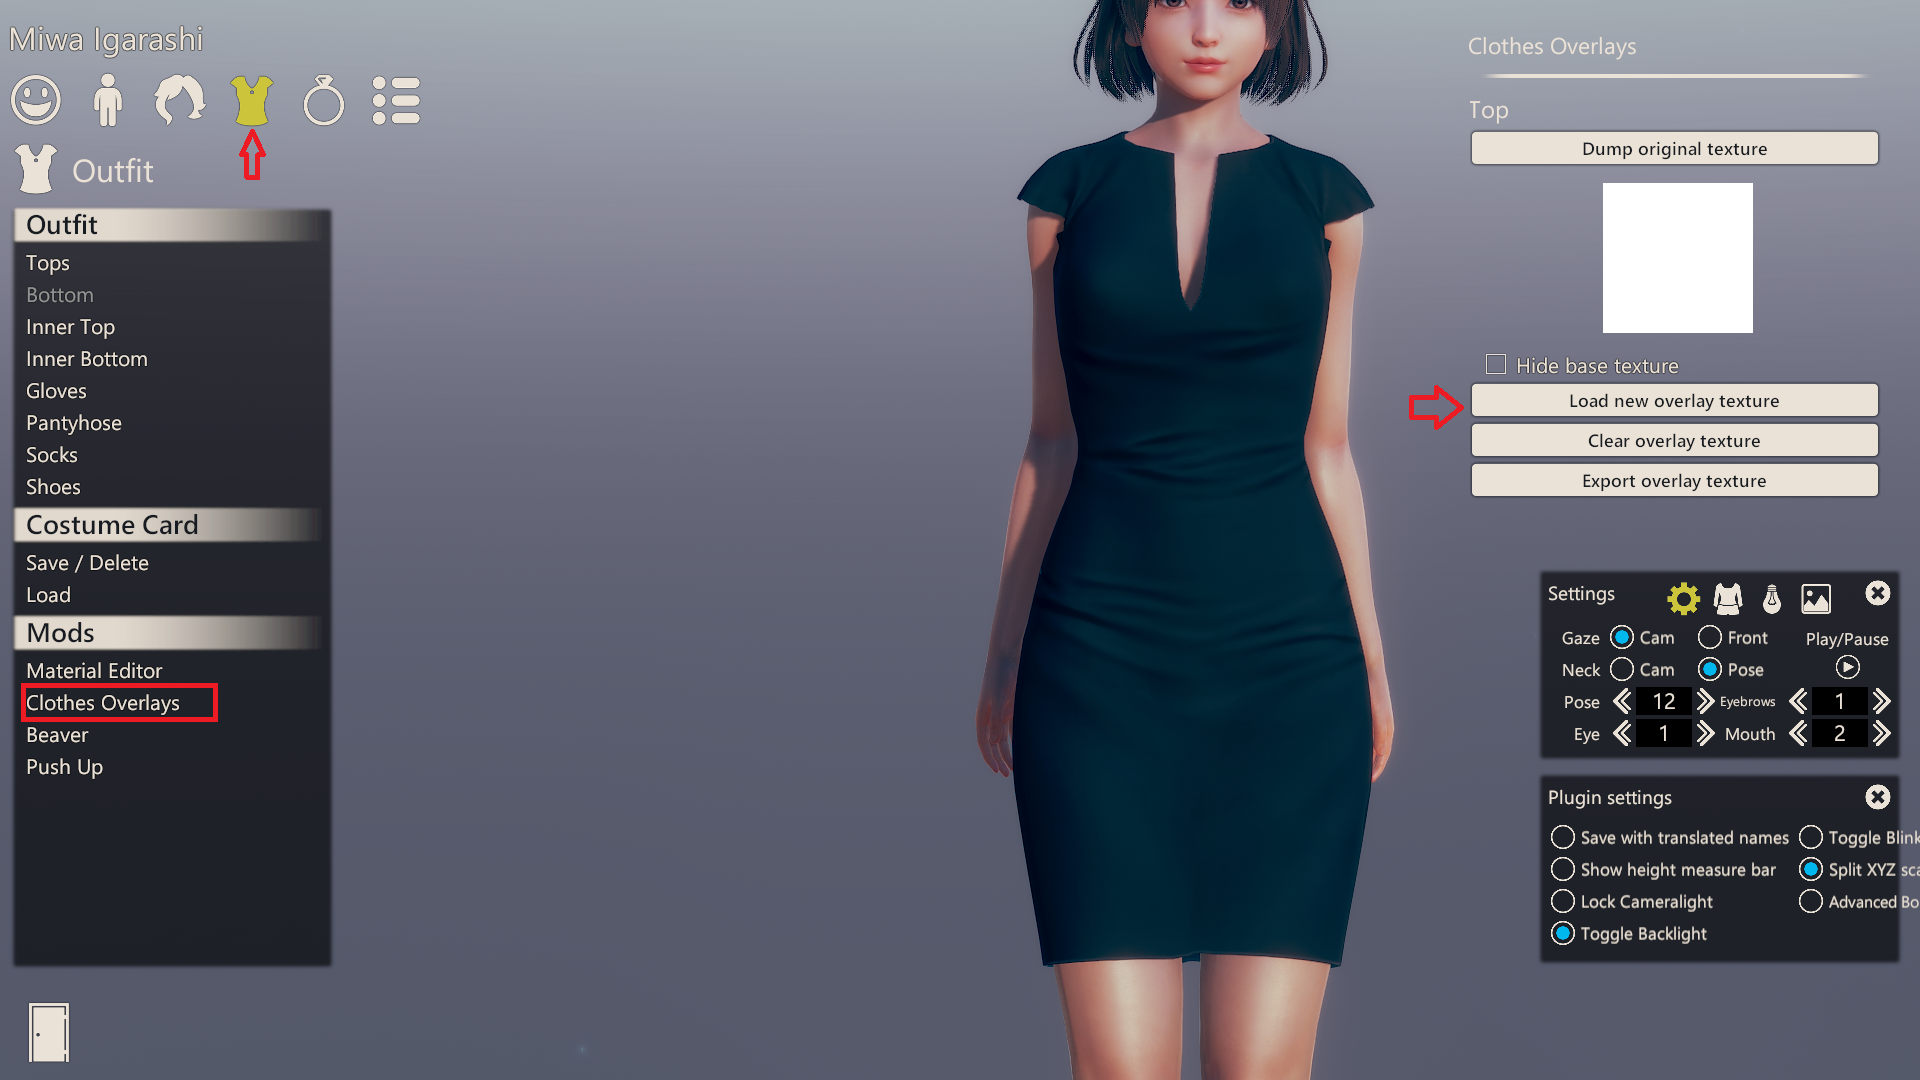
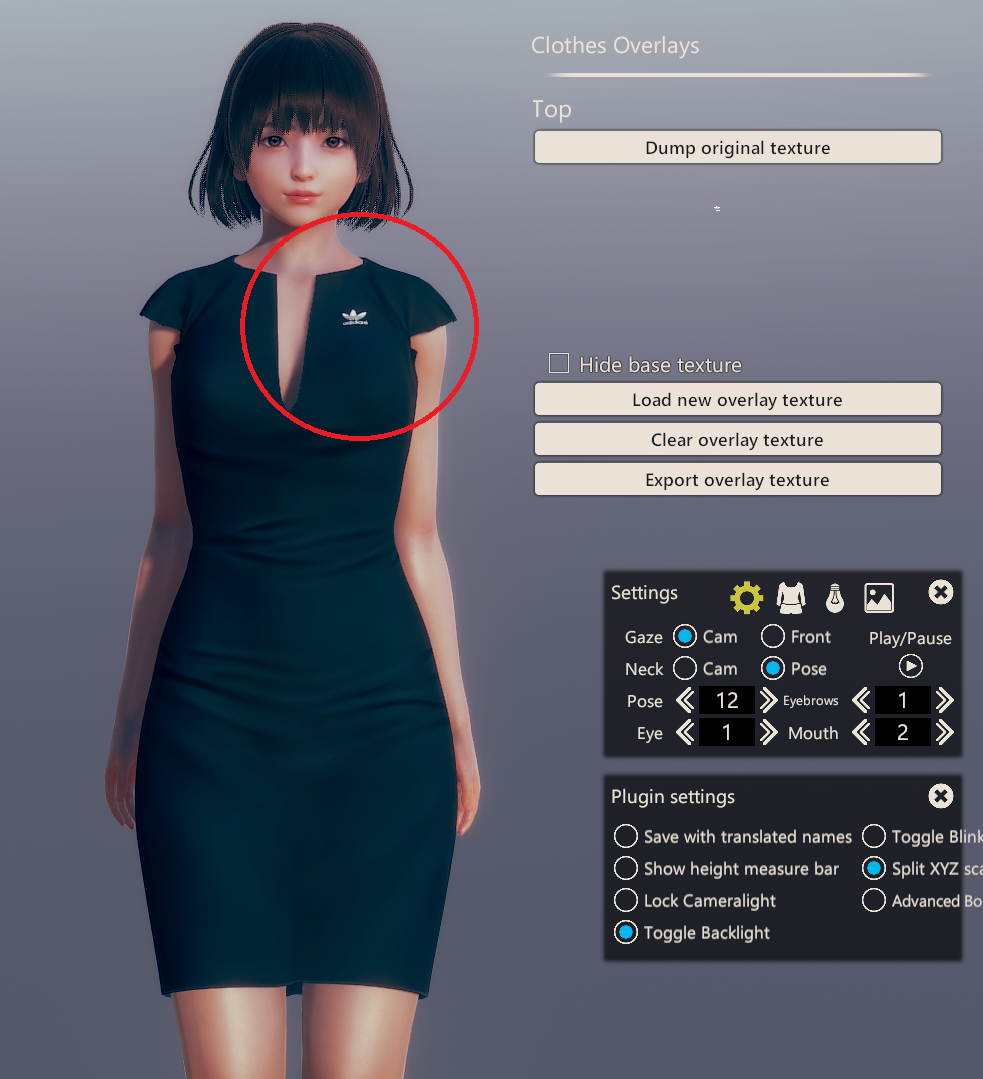
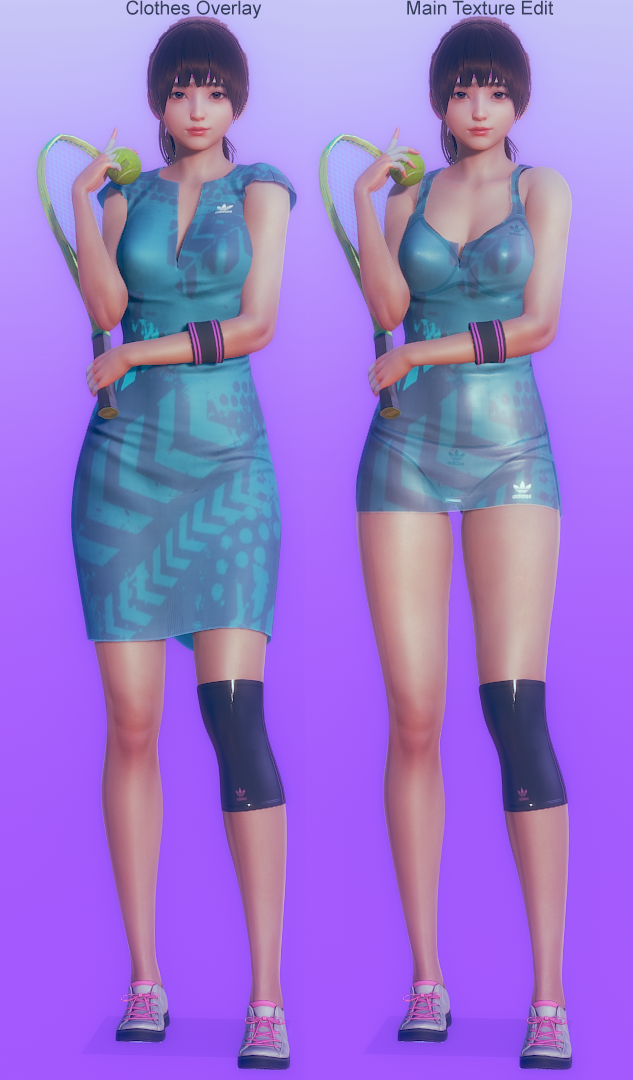
Chara Maker & plugins: since characters are one of the main elements that we use in our studio scenes, and editing them in the chara maker may effect our work process greatly. such as bonemod, materialeditor and others.
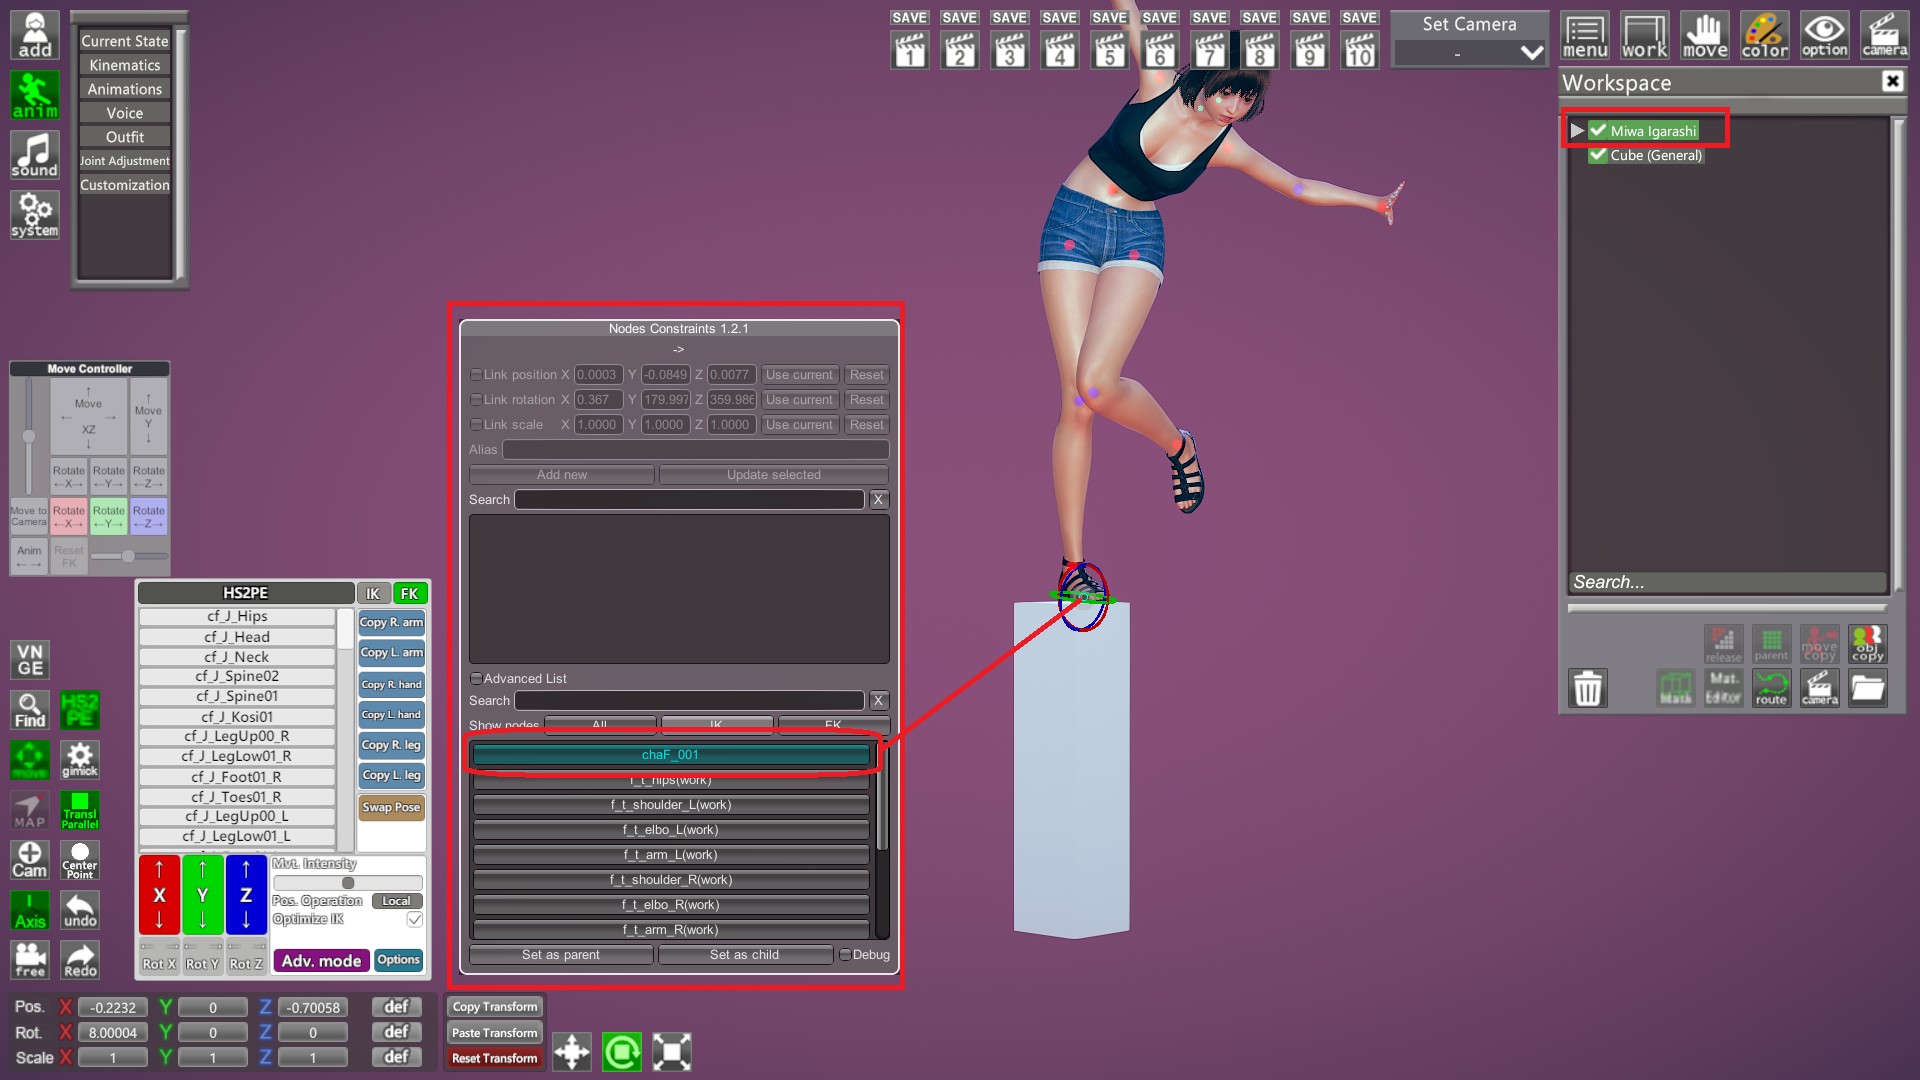
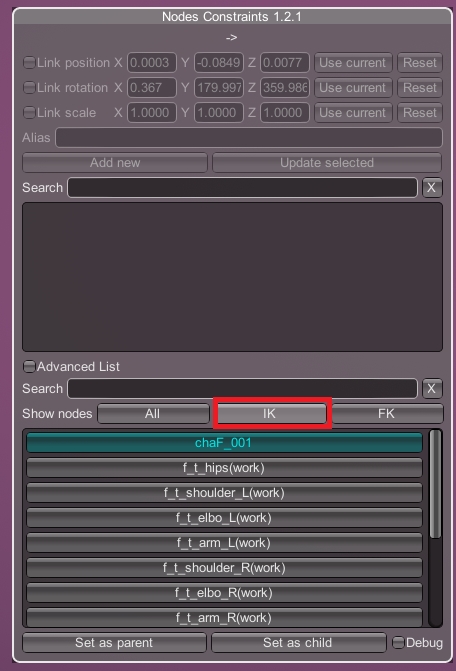
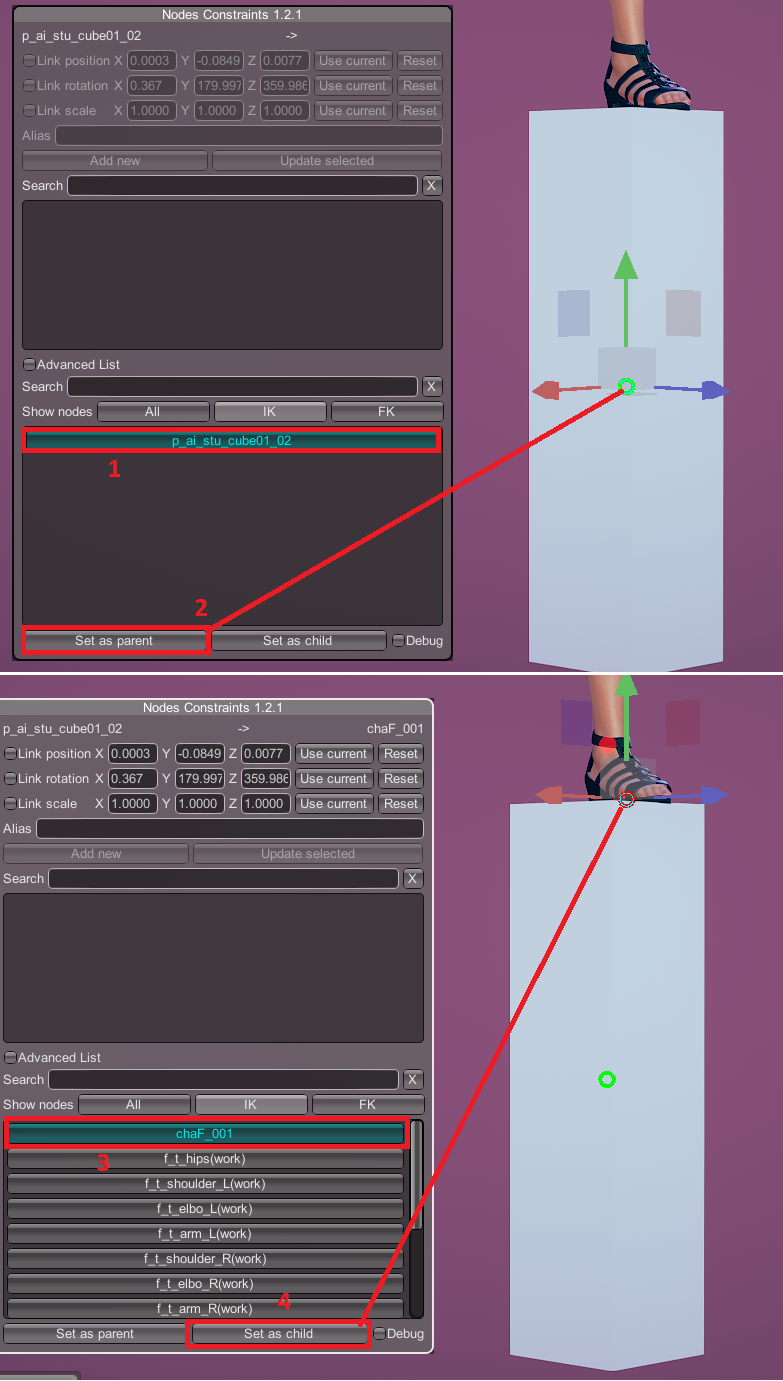
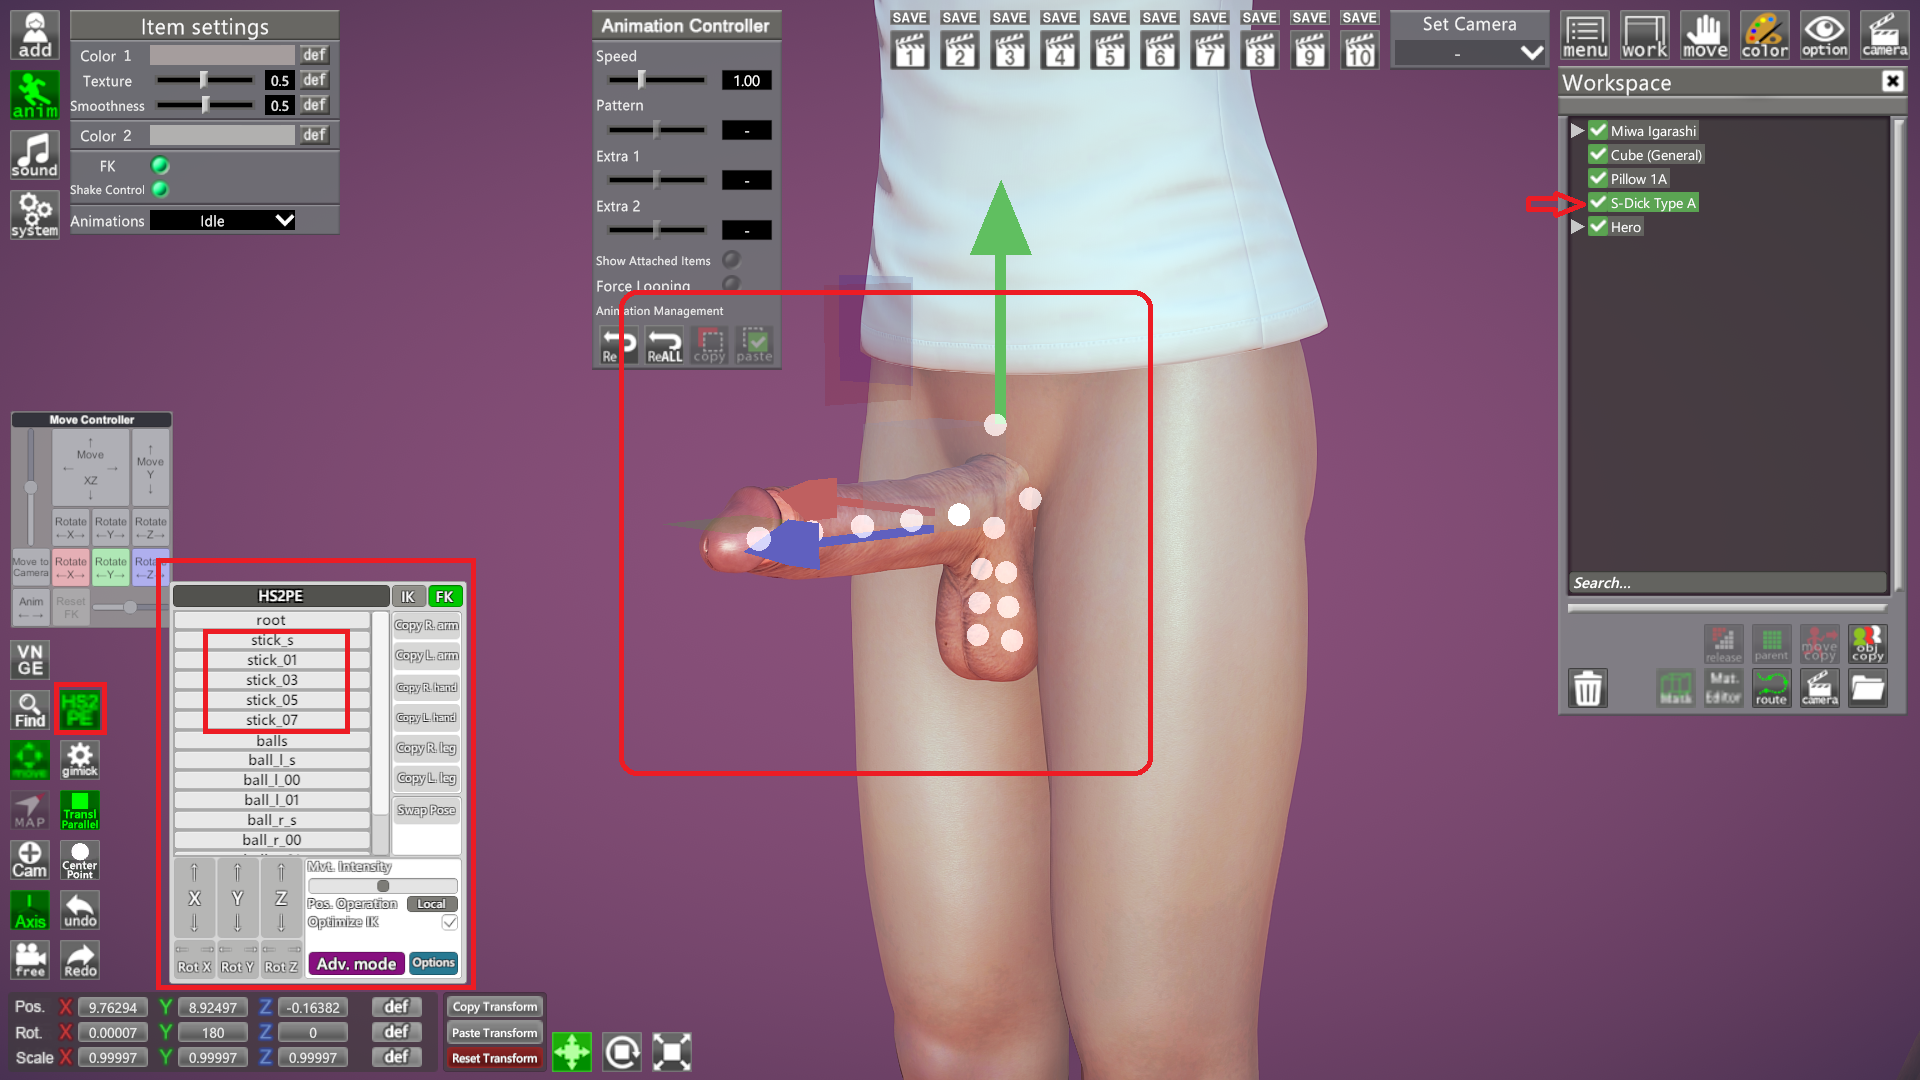
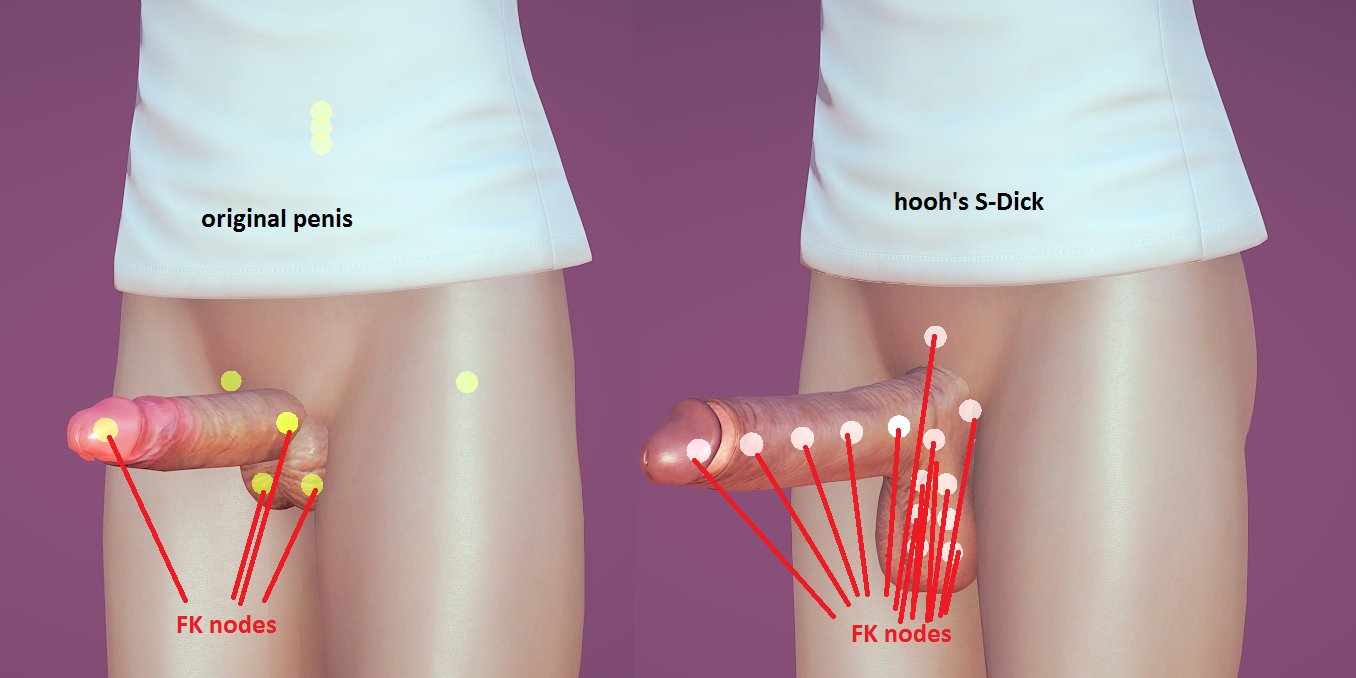
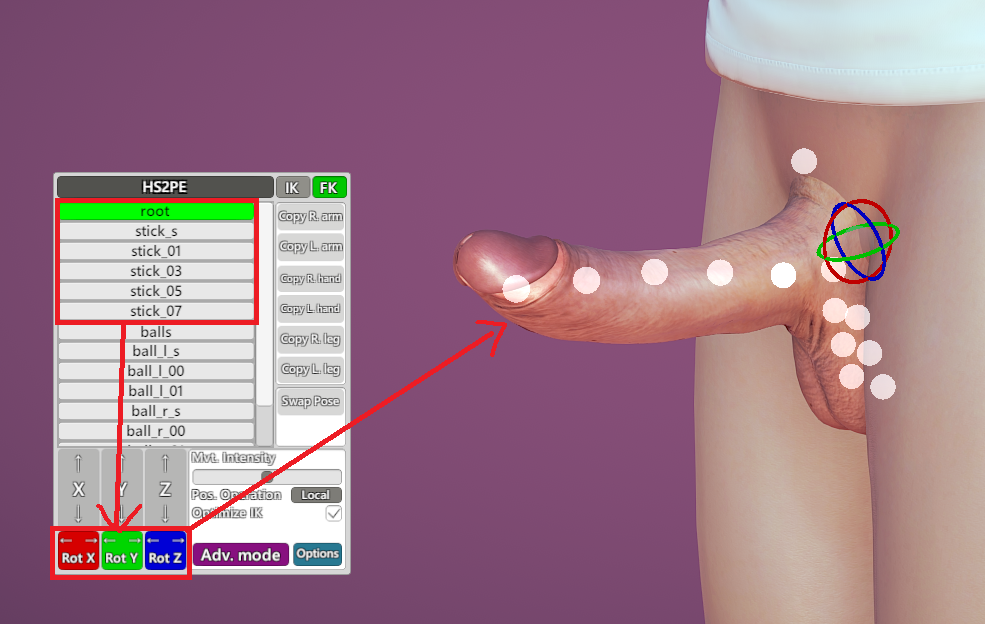
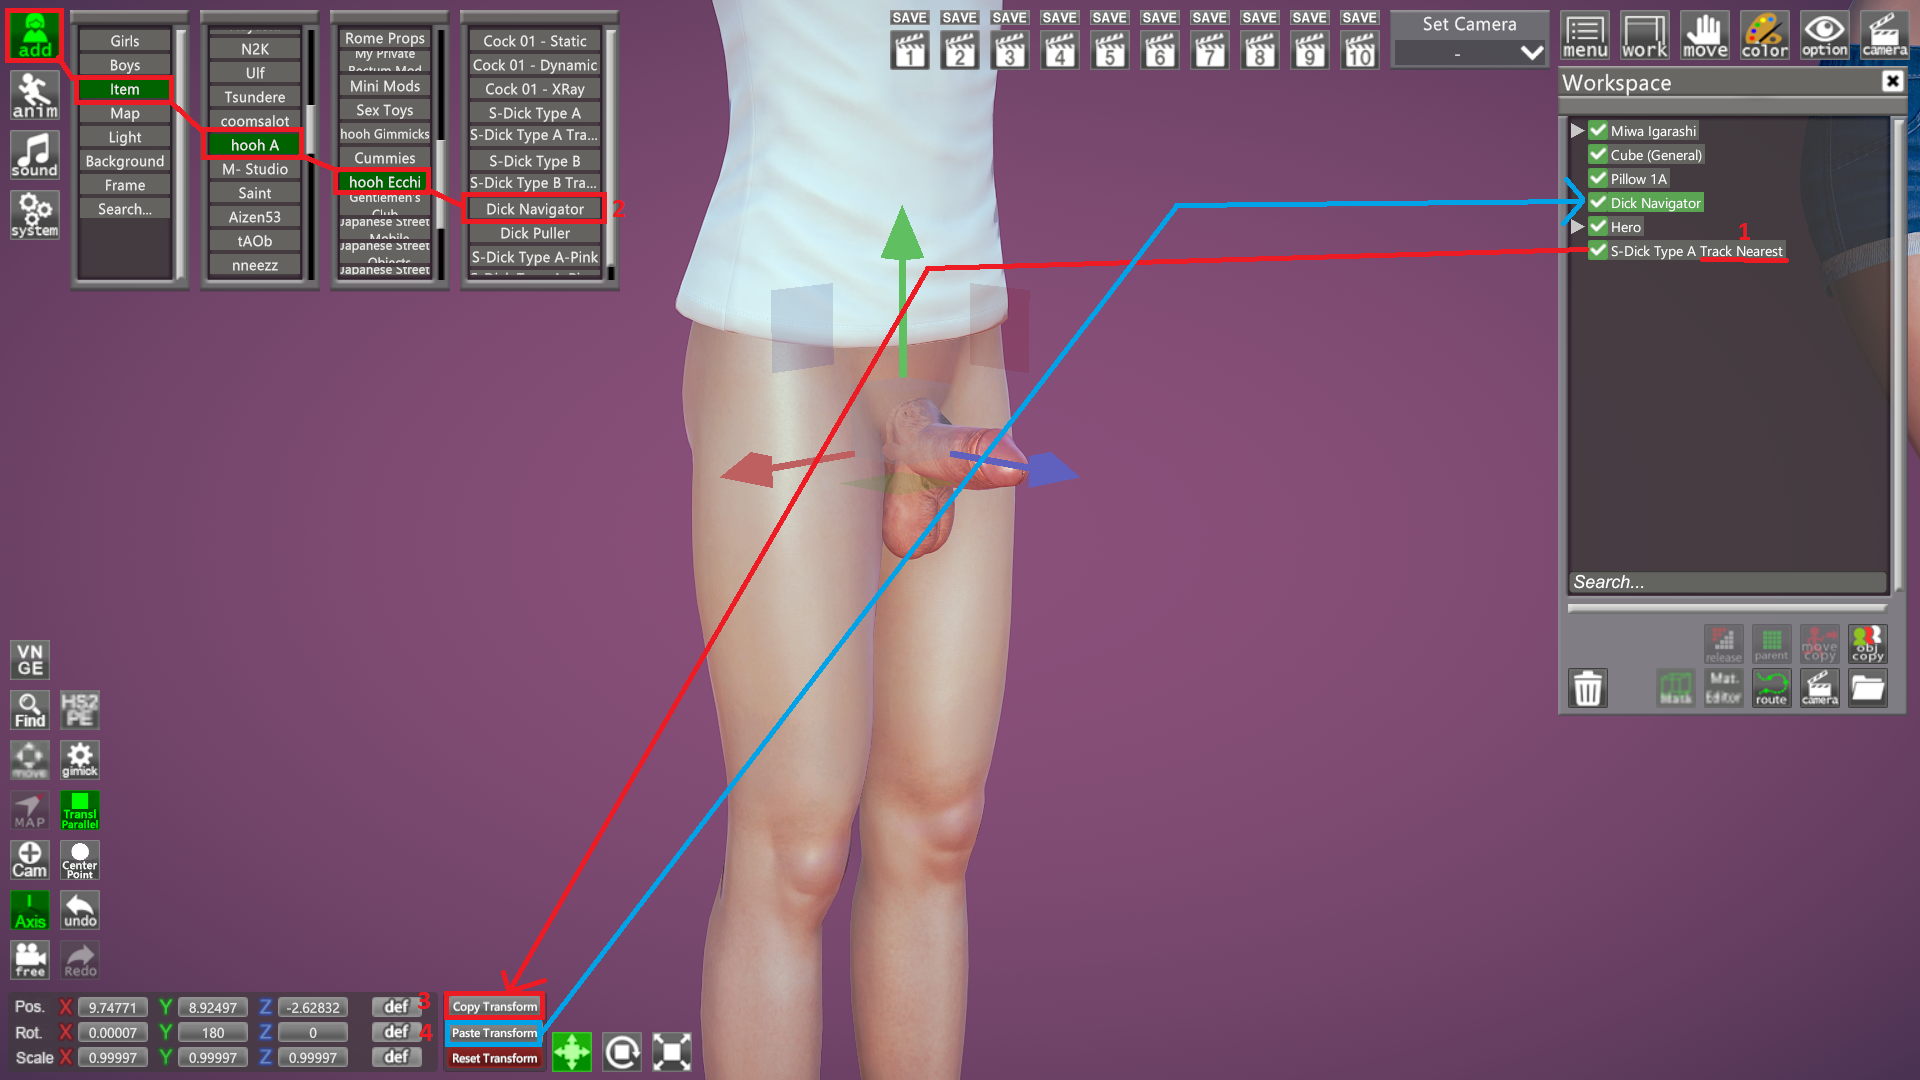
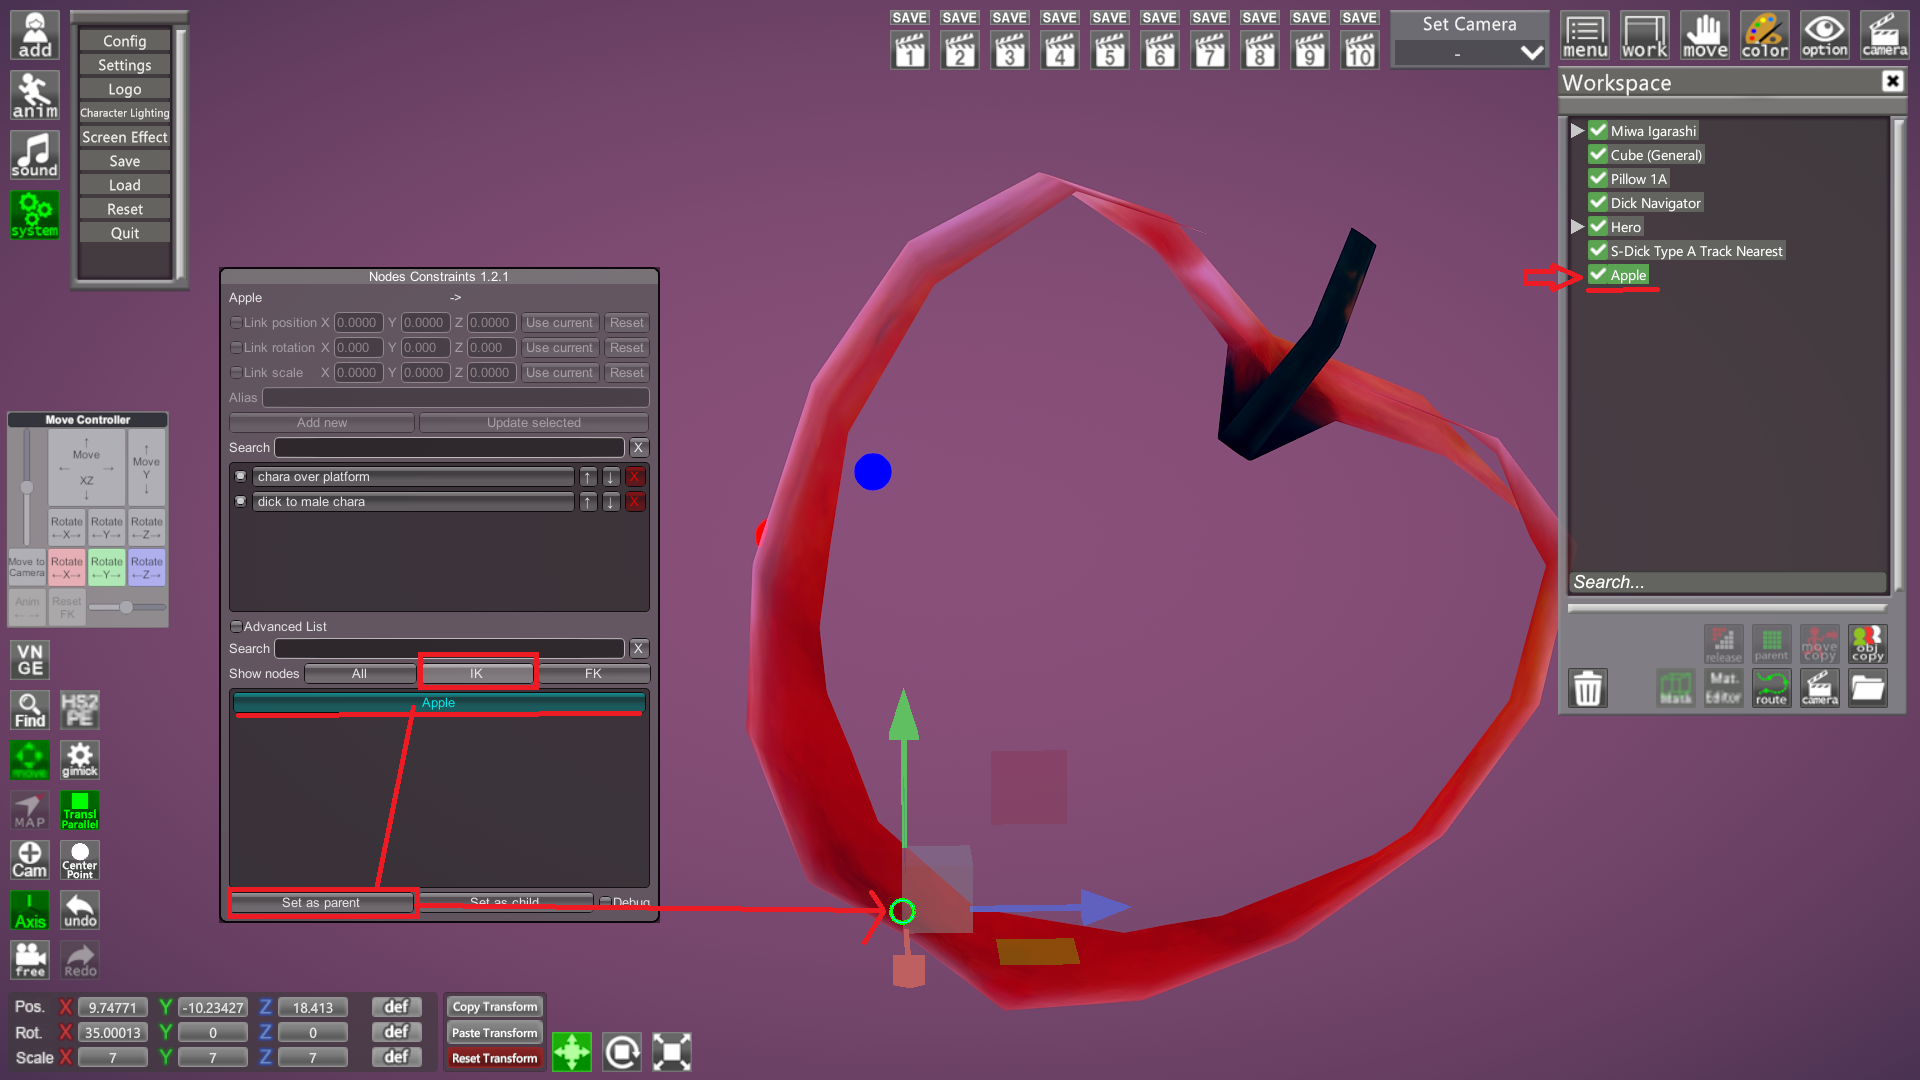
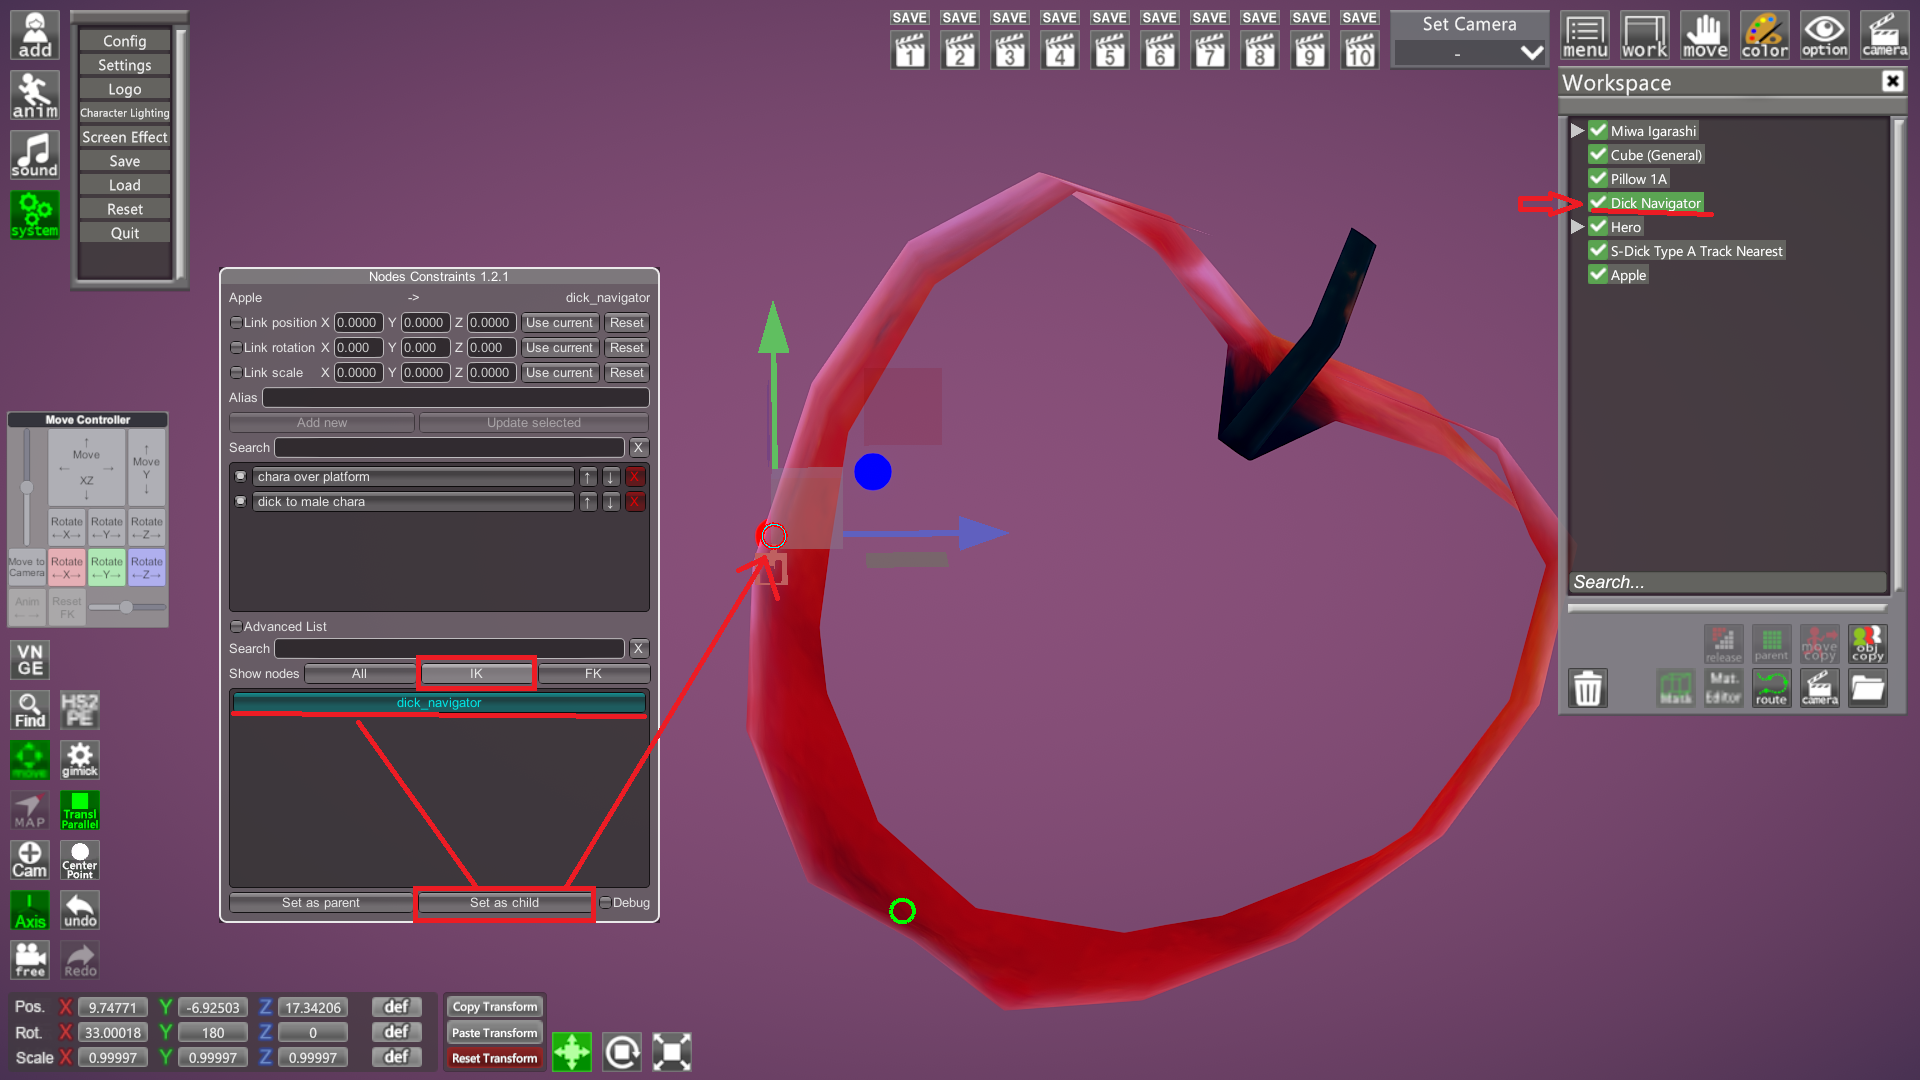
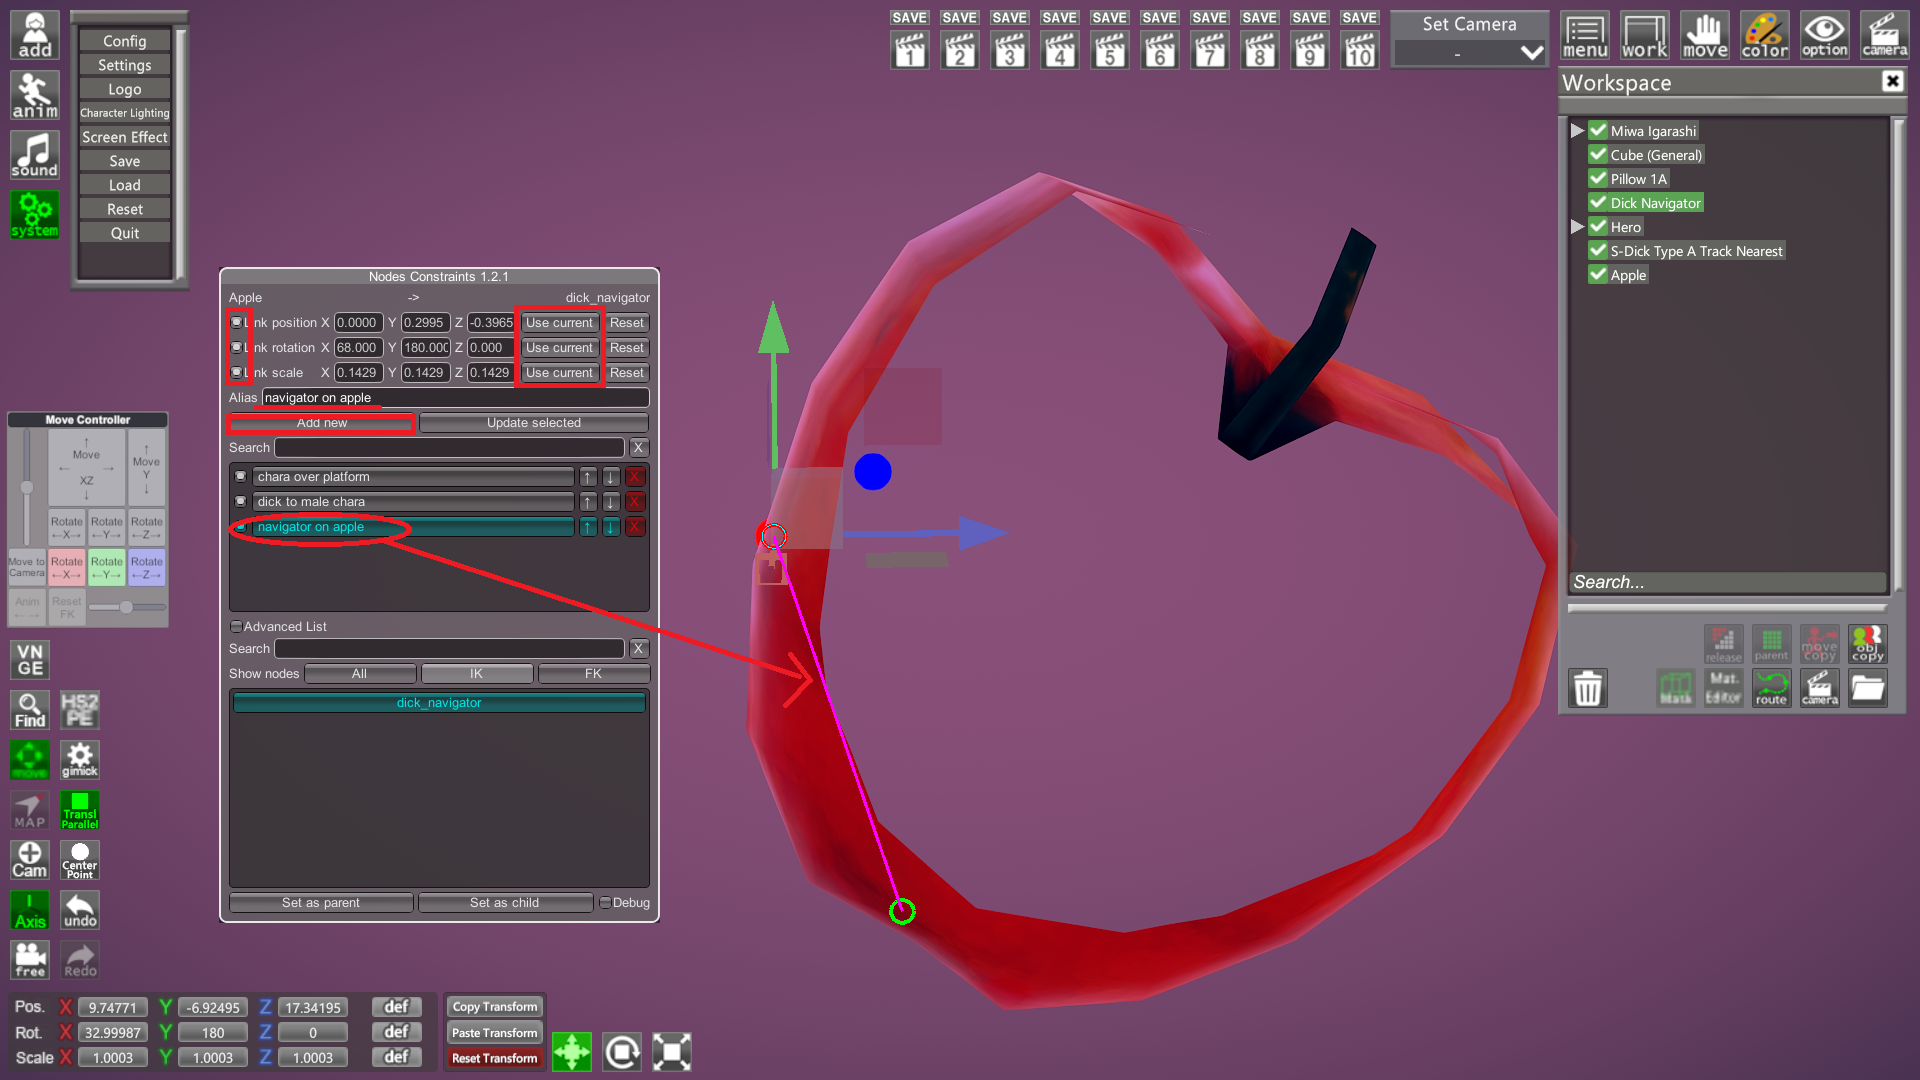
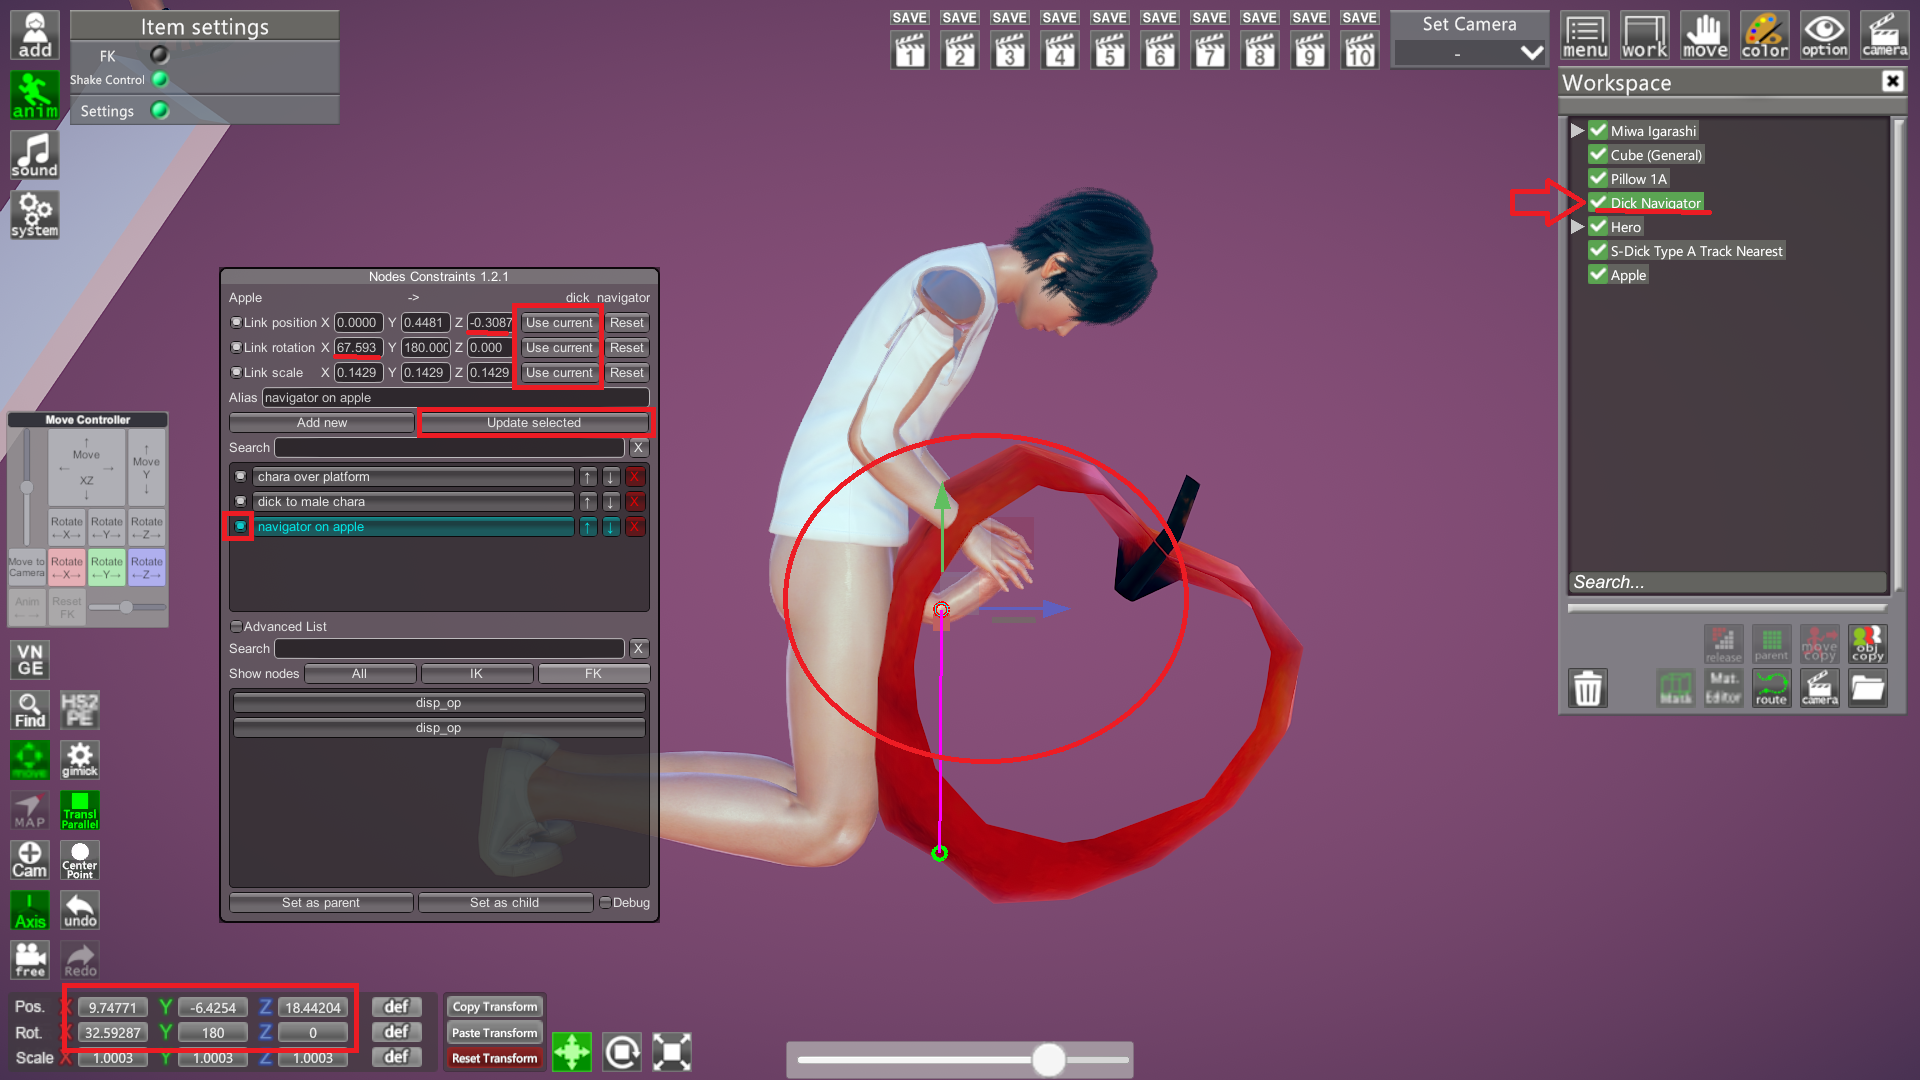
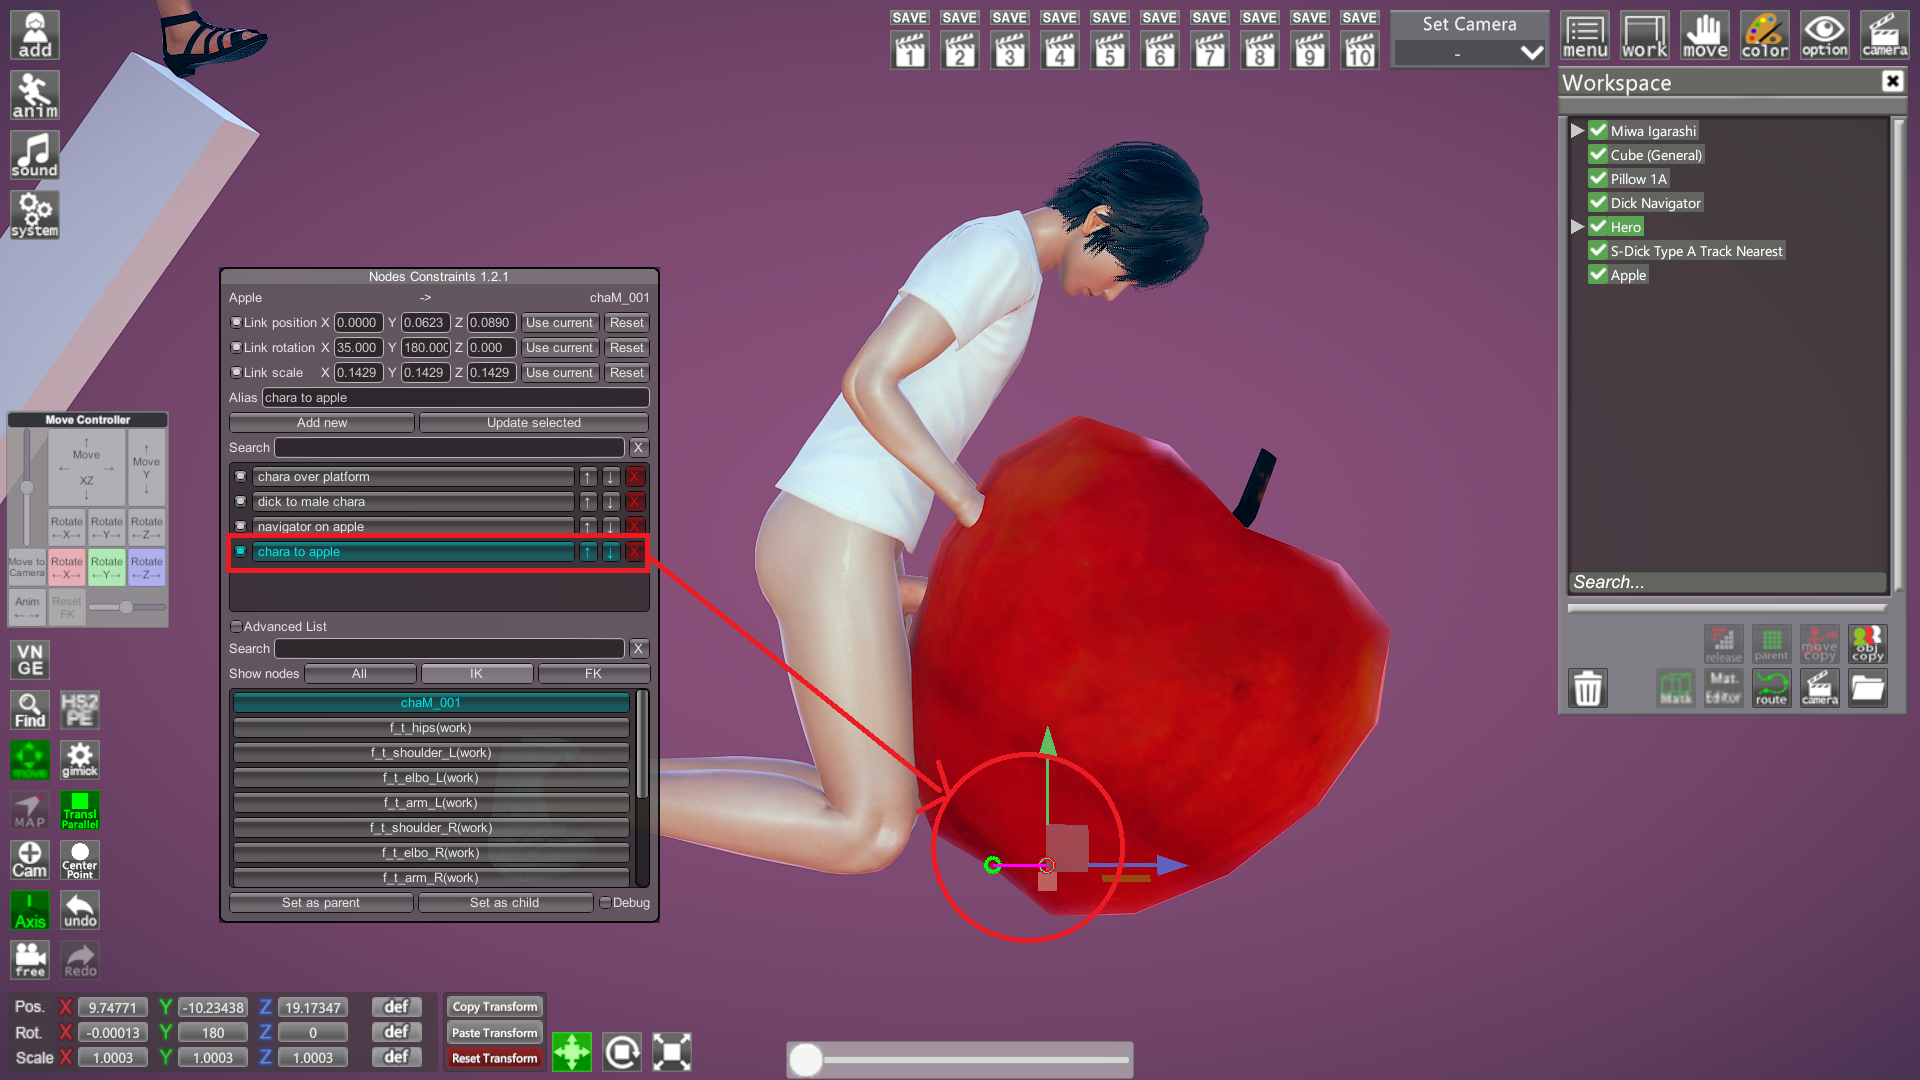
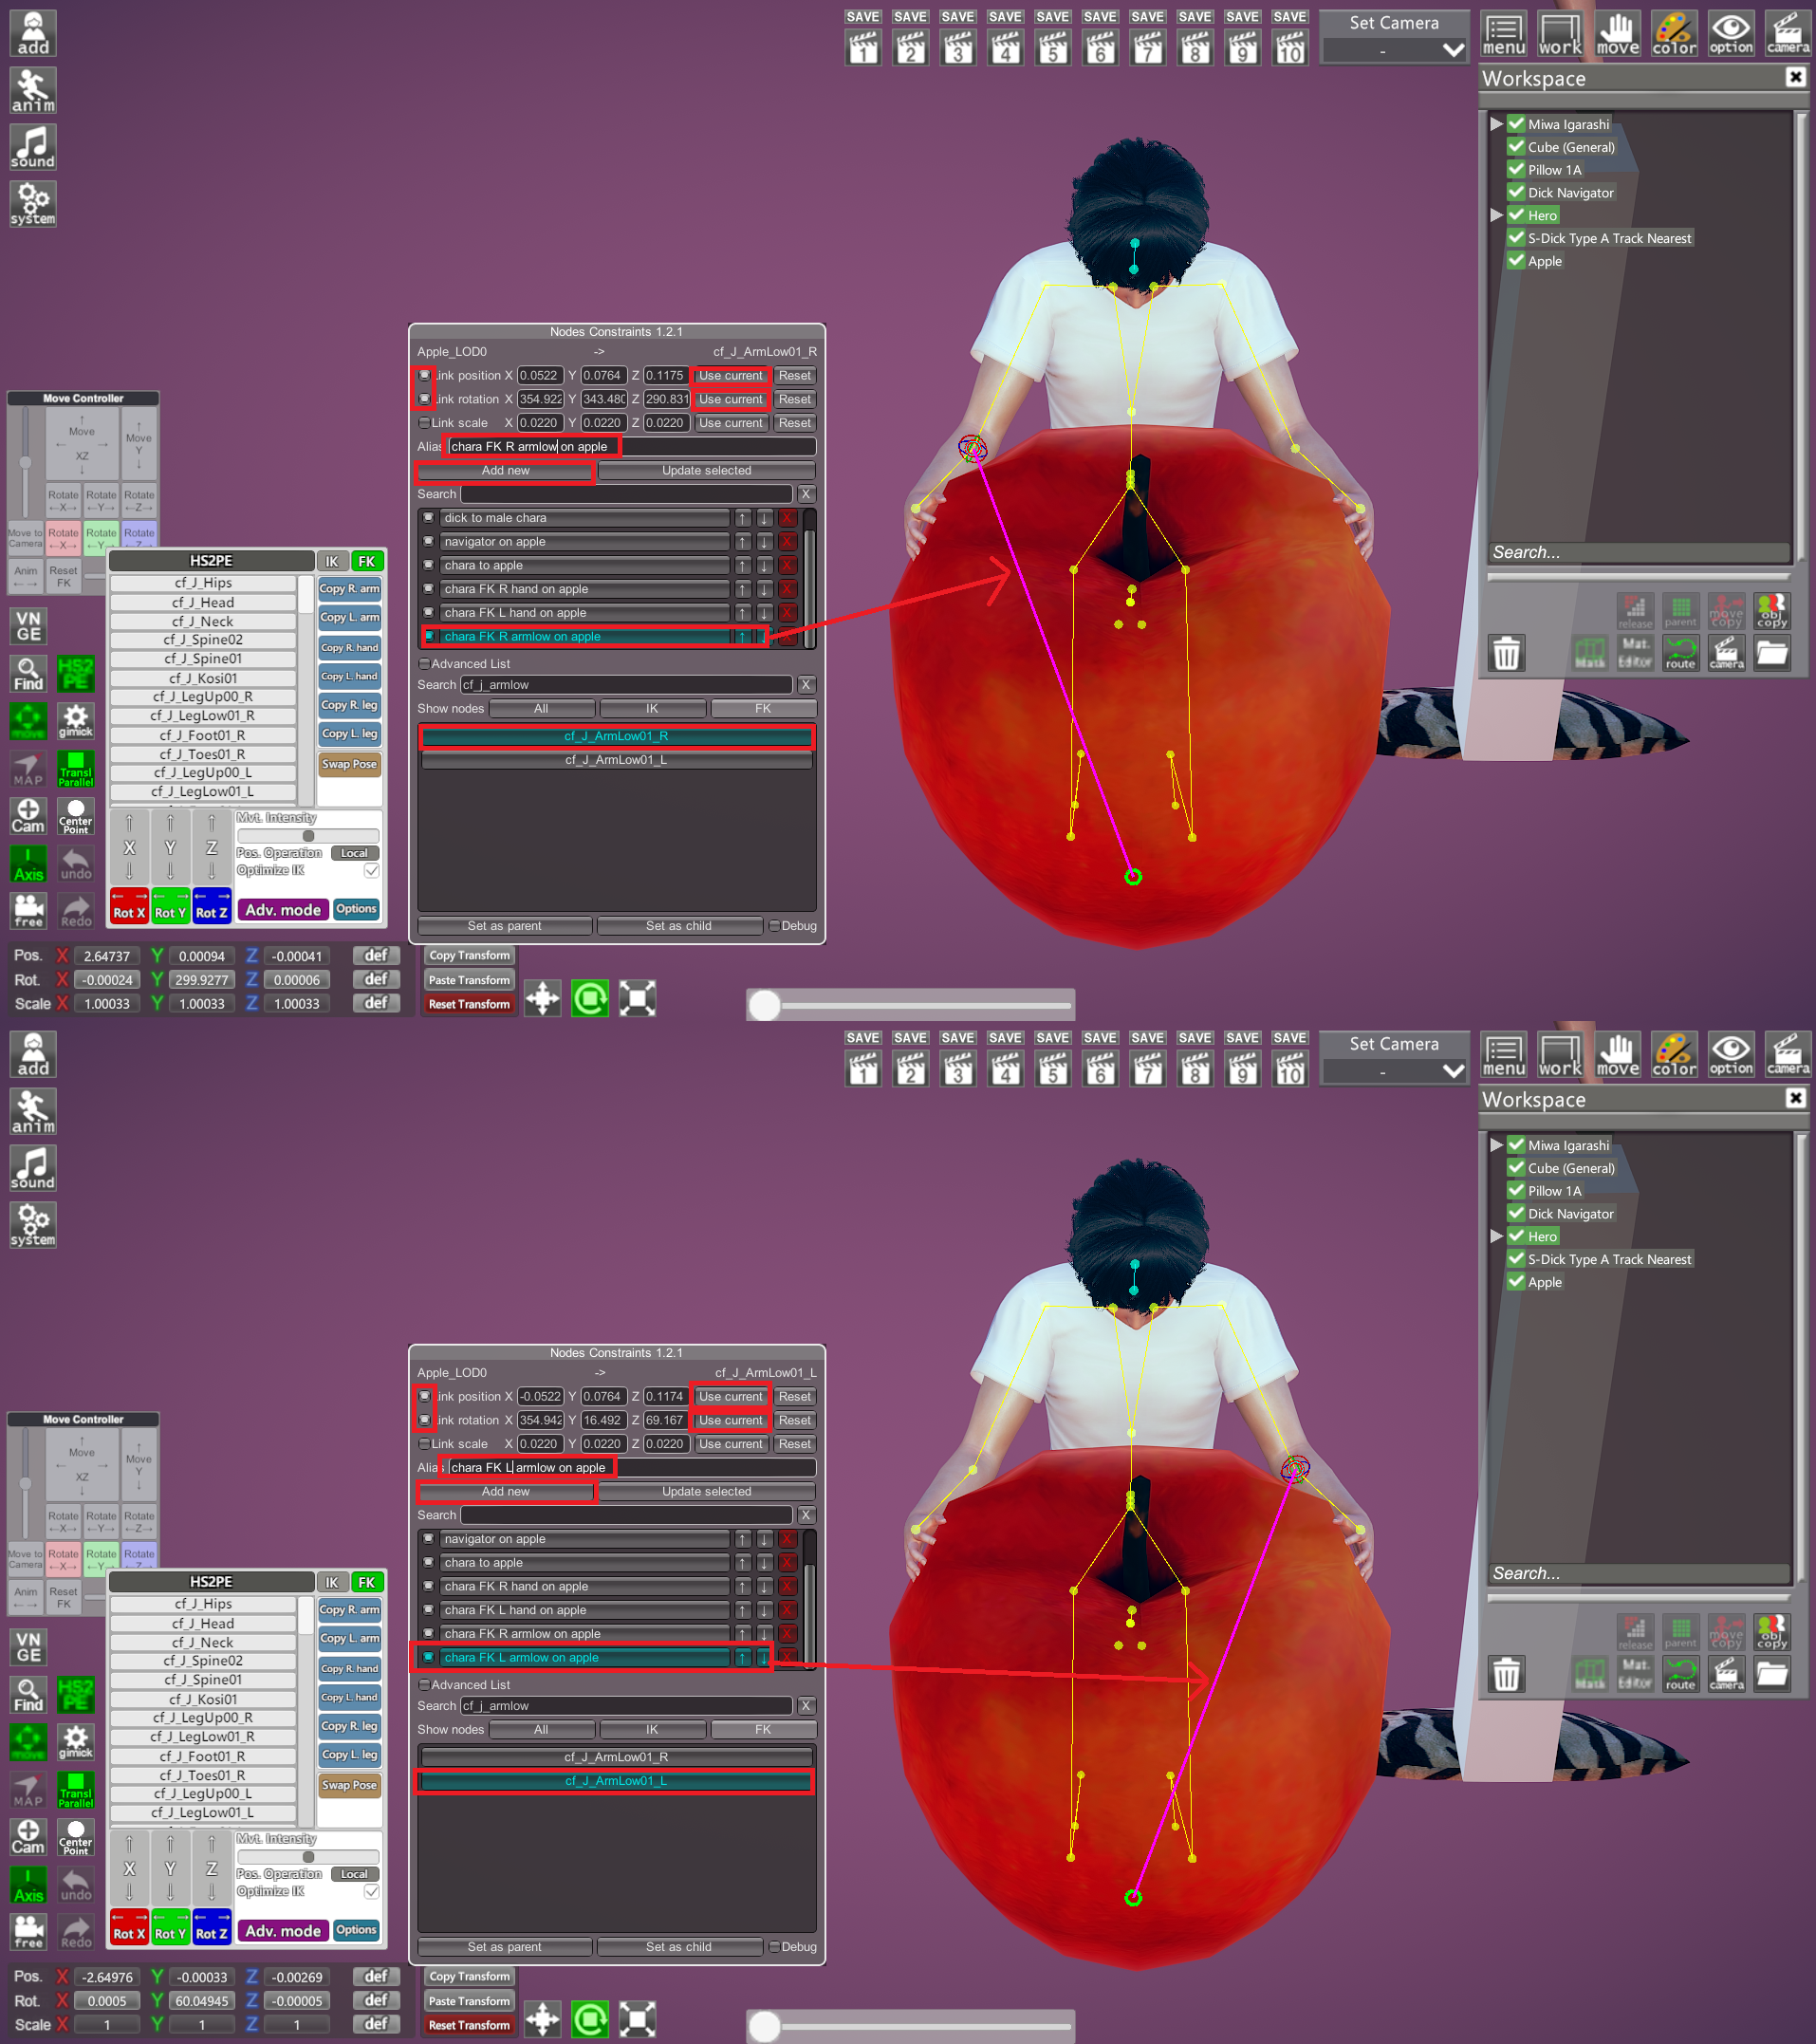
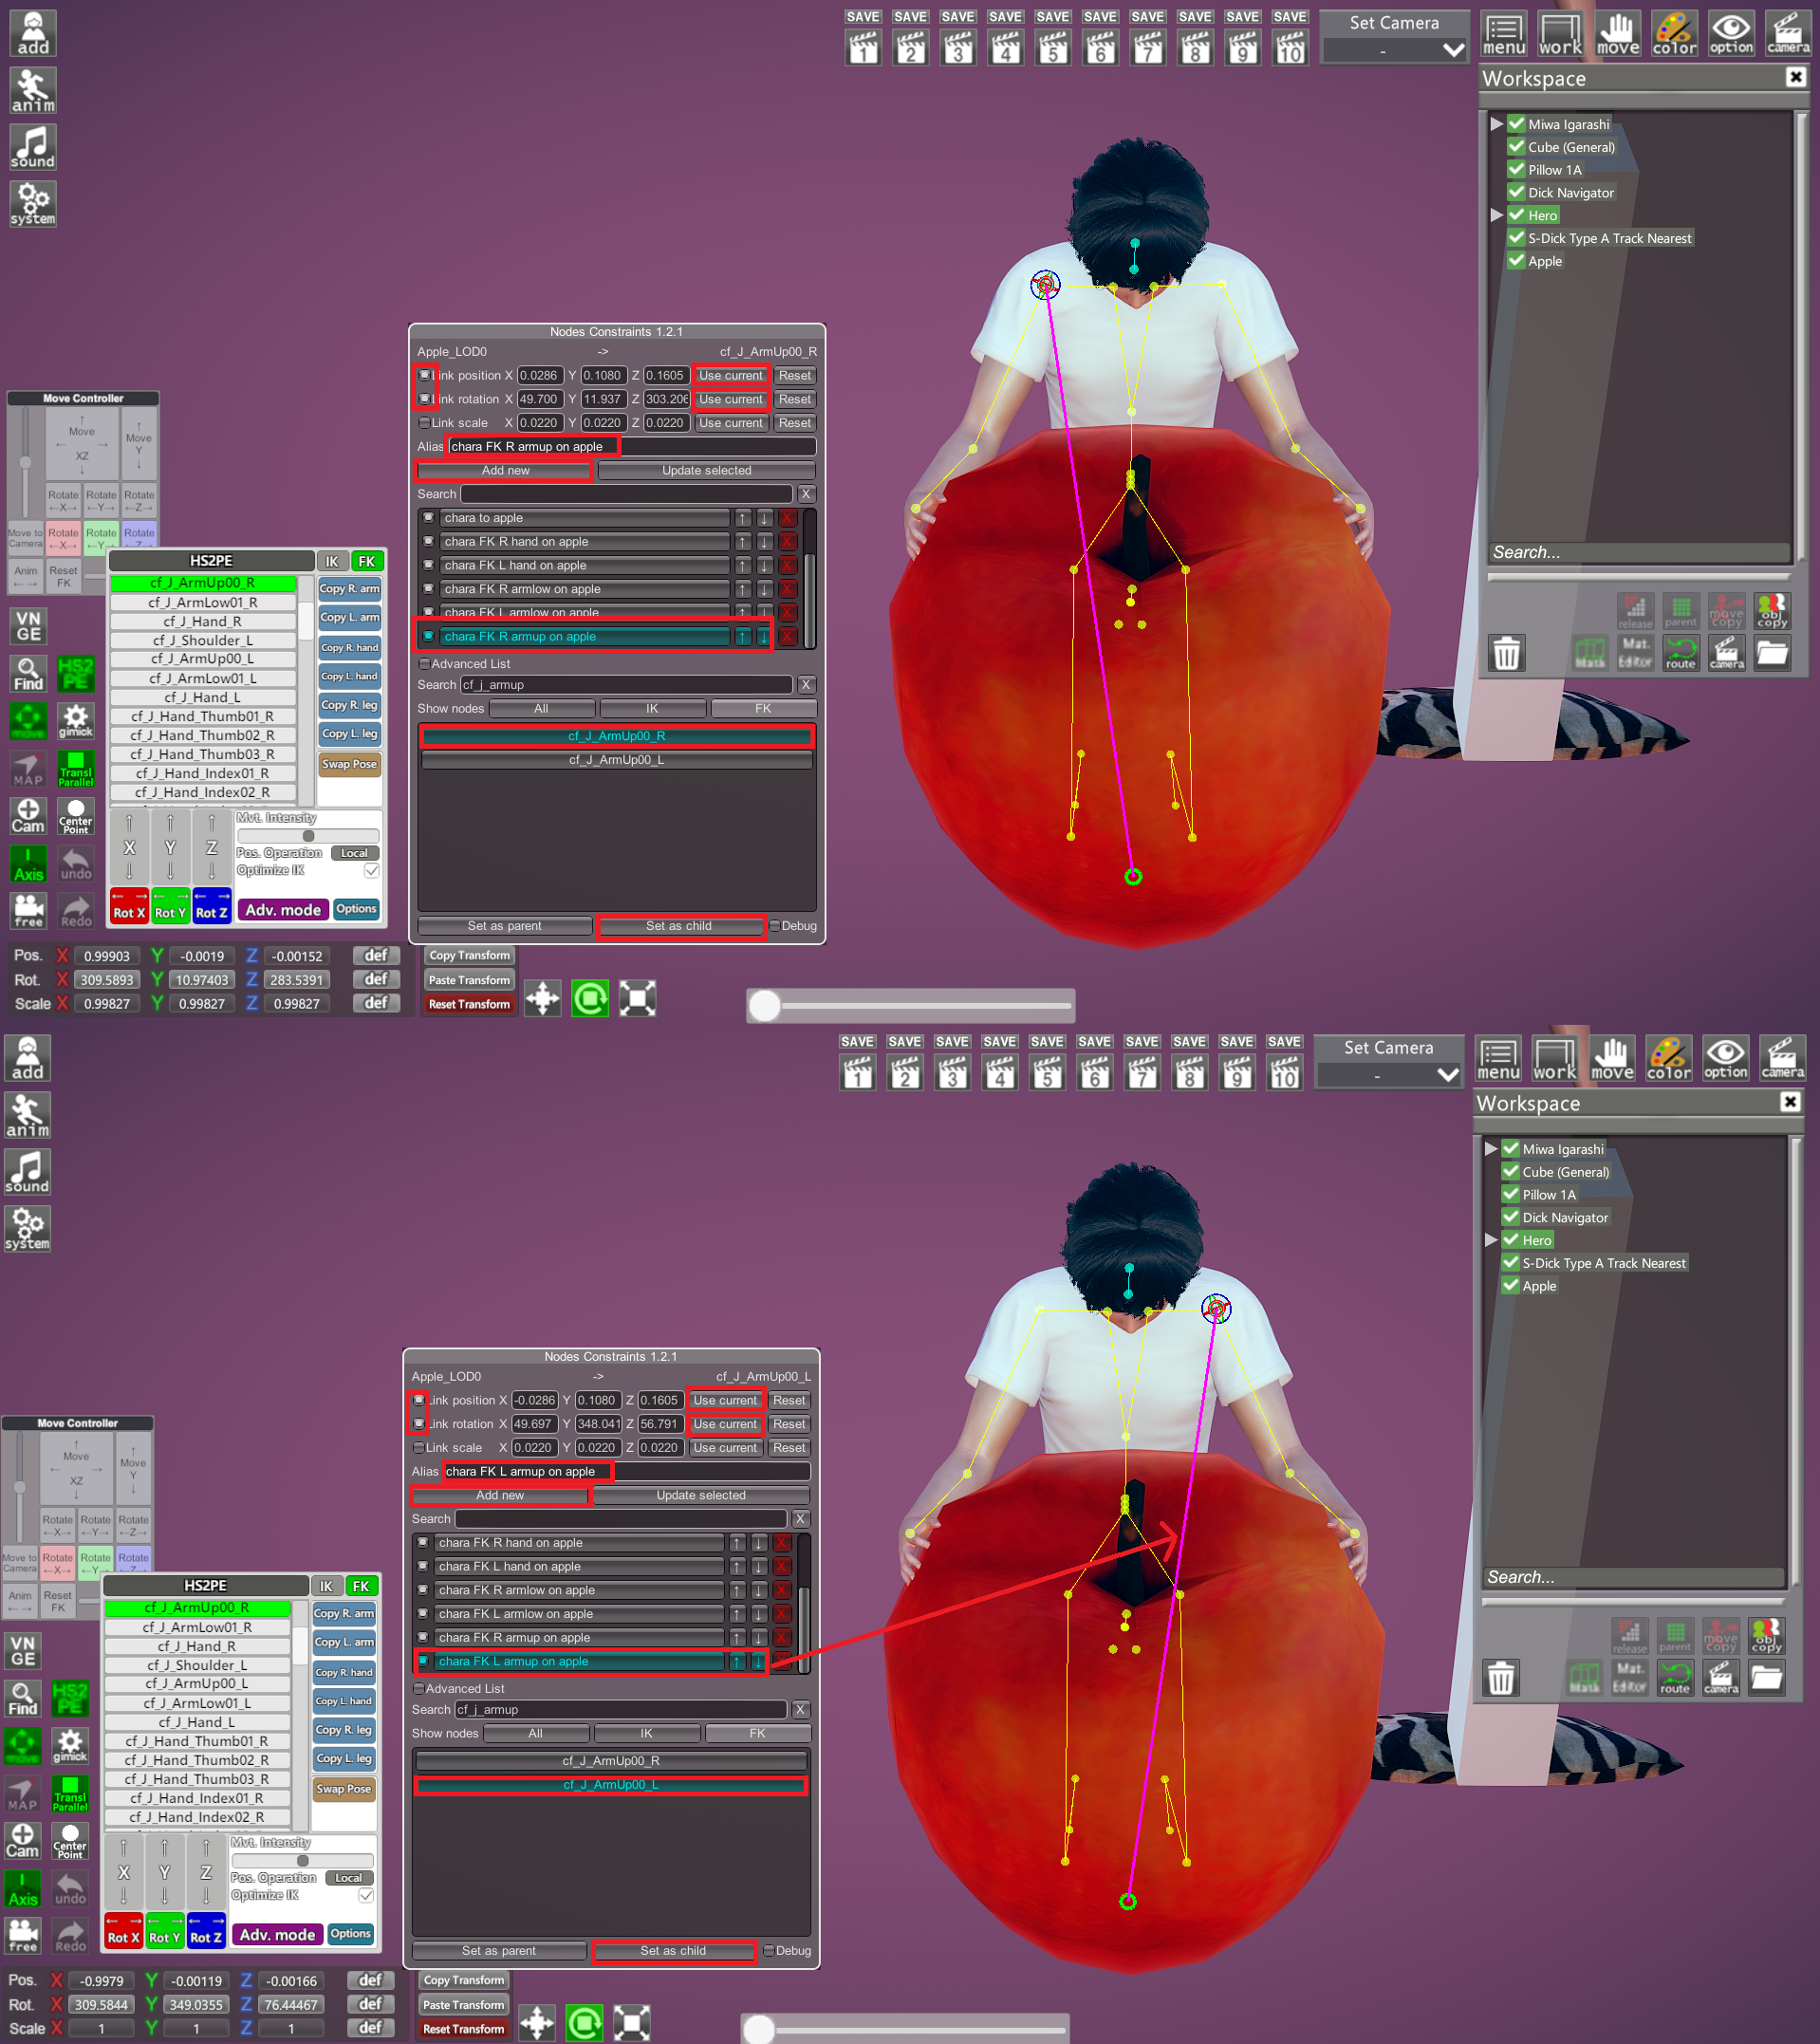
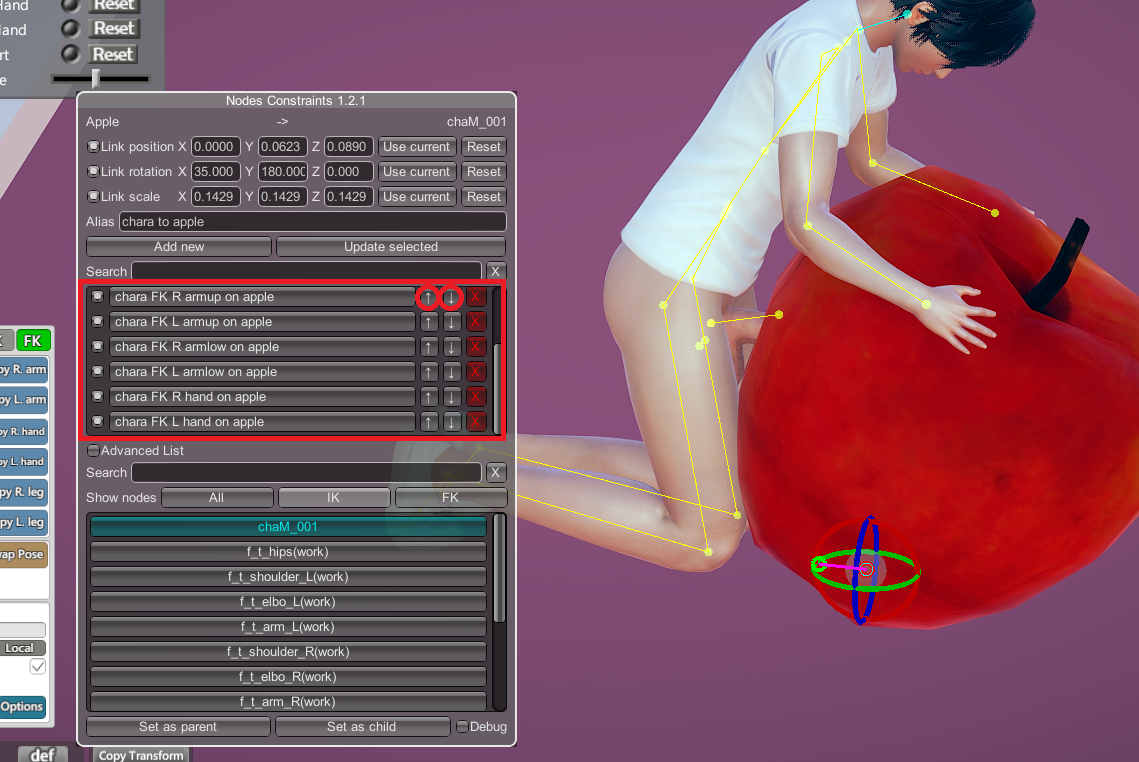
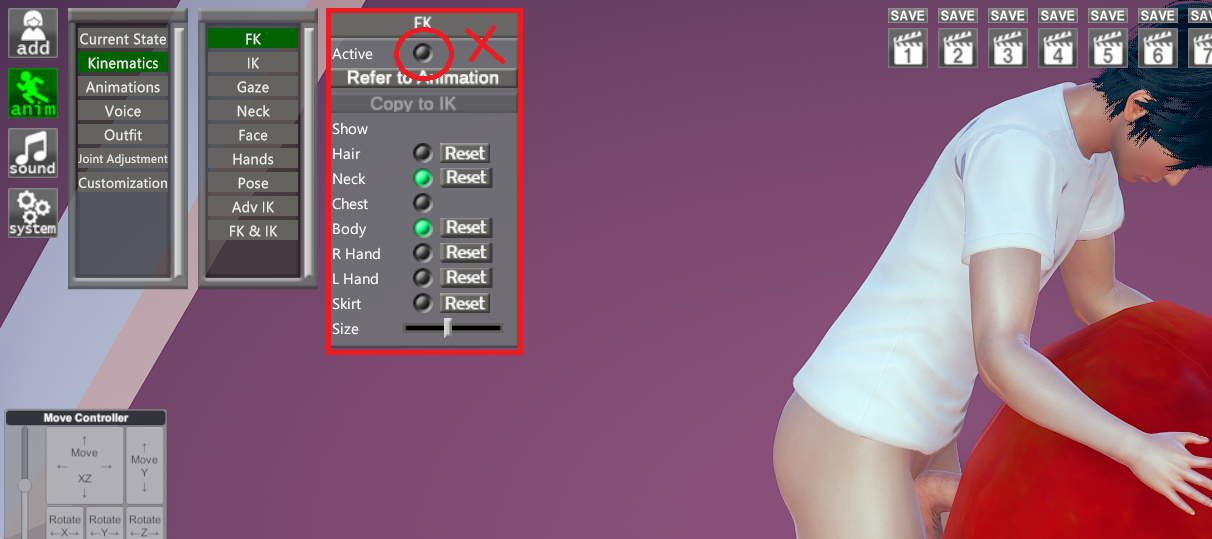
Studio Related Plugins: these that have things to do with both the studio and characters while working on studio scenes (internally or externally). such as FK&IK plugin,HS2PE, nodconstants,VNGE screenshot manager. . .etc.
Tools: such as photo/CG/image/video editing programs and applications or anything that may help with the studio exports of any format. photoshop, gimp, after effect . . .etc.

button1.png Notes:
please feel more than free to create/share guides, plugins or post any helpful information, even if the shared info is minor or too brief as long as it is informative. you can also create a guide related to previously mentioned subject, your input or way of explaining things may be more useful for some than others. so i strongly encourage you to share your experience and help grow the community and user base (tag me so i can link them in OP in case i missed them).
please use whatever medium you are comfortable with if you are creating a guide. text, images, gifs or even videos are all welcome.
please make sure to credit the original authors and creators if you are going to share a guide from an external website here (including discord).
please share links to this thread or guides in it with others but please do not re-post any guides been created here in F95 anywhere without the original creators permission. as for the guides i personally created, feel free to do so. you have my permission as long as it will help somebody out =)
please feel free to join in the discussion, comment and post any related questions.
please share knowledge, advice and answer any questions asked in the thread.
please always provide as many info and screenshots as you can when asking, responding or answering questions if possible.
please be respectful, helpful and understanding to all users and asked questions. let us keep this thread a healthy environment and as informative as we can.
please note that this is not a main game discussion thread (except for the Chara Maker). this include the main game's H-scene related plugins such as the "character switcher plugin" or other ones that does not contribute to working on the studio or the whole process in anyway. stick to the subject as much as you can and please use the following threads to post any unrelated notes or questions:
STN's better repack release/upload thread
Honey Select 2 Libido discussion thread
this is not a modding thread. i personally have very little experience with modding, but if you are a modder or have modding knowledge and would like to share something about the related subject i will be grateful. in fact i would like to encourage you to join the discussion if you are a creator of any of the plugins and mods covered here so readers can learn about them more.
all your memes are welcome :ROFLMAO: fun is needed as well you know.

button1.png Guides & Tutorials List:
LEVELGuide subjectGuide TagCreator
Nonebasics and overview of studio neo 2Studio Neo 2
Beginnerfixing dither effect in clothes by changing the alpha shaderChara Makerhun hunter
Beginneredit/create and load textures on materialeditor and clothes overlay pluginsChara Makerhun hunter
Beginnerbones and IK/FK nodes relation and behaviorStudio Neo 2 - Chara Maker - Related Pluginshun hunter
Beginnerchara posing using FK, IK and FK&IKStudio Neo2 - Chara Maker - Related Plugins hun hunter
Beginnernode constraints pluginStudio Neo 2 - Related Pluginshun hunter
Beginnerhooh's scripted dick itemsStudio Neo2 - Related Plugins hun hunter
Advancedsimple H-animations editing in studio using nodeconstraints and FK&IK plugins (part1)Studio Neo 2 - Related Pluginshun hunter
Advancedsimple H-animations editing in studio using nodeconstraints and FK&IK plugins (part2)Studio Neo 2 - Related Pluginshun hunter
Beginnerhow to use hooh's hijack look & neck gimmicksStudio Neo 2 - Related Pluginshun hunter
Beginnerstudio uncommon issues and solutionsStudio Neo 2 - Related Pluginsgzrtjhgtyhjljk
Beginnerconverting an existing opaque clothing item to translucentChara Maker - Related PluginsGreat_Old_One
Beginner how to use joan's projectors and edit them using rerenderStudio Neo 2 - Related Pluginshun hunter

button1.png Update Log:

You don't have permission to view the spoiler content. Log in or register now.


button1.png Helpful Links & References:
STN's public repack release page and download:

information about the most common and trending plugins
found in this
You don't have permission to view the spoiler content. Log in or register now.


Illusion soft Discord


button1.png Appreciation:
• thank you for reading this thread and i hope you will find it useful.
• thanks to everybody who joins the discussion to help the community and this thread grow.
• thanks to all the modding community and plugin creators who spent countless hours to create such great mods and tools that help us enjoy Illusion games.
• thanks to CLDꝜ, K3NJ1 and the other F95 staff members for helping with this thread's setup.​
 
Last edited:

hun hunter

Member
Dec 30, 2018
194
617
[Guide] fixing dither effect in clothes by changing the alpha shader

dither is sure annoying, in fact to me.. its the second most annoying thing in game right after the over clothes nipple bump :LOL:
but anyway, this shader can be altered/tweaked thanks to the material editor. for clothes, you will have to change the shader setting and force the game to render it in a different way. so select some clothing that has the dither by default and open the material editor from the left side window and scroll down until u get to a setting called "shader", depending on the piece you are trying to edit, you could select another shader that suites. you can also alternate the other material settings and experiment but make sure you save your char card when done before changing to another clothing from the same category or all your changes will get back to their default state. after saving, the card will always load your material edits no matter what unless you switch the clothing on that exact char, but you still can load it again whenever you want. this method can help you out but you have to redo the whole thing all over again for each clothing/item you wish to edit.


same goes to hair and other parts/objects, you can change the shader for each part and sub hair part alone using the material editor OR, you can simply change it whole using this option :)


-----------------------------
Credits
-----------------------------
-guide by: hun hunter
-materialeditor plugin by:
 
Last edited:

hun hunter

Member
Dec 30, 2018
194
617
[Guide] edit/create and load textures on materialeditor and clothes overlay plugins


A.1. Textures:
generally, when there is a clothing that has edited (texture), you will have to load that to (main tex) using the "material editor" plugin. it also should load automatically with character or coordinate cards as data are saved and embedded in there. so you do not have to even download the texture nor have it in the "materialeditor" folder if the card you have downloaded or created is saved with those edits. "game root\userdata\materialeditor".

IMPORTANT NOTE:
avoid using a coordinate card with texture or materialeditor edits as those edits will also apply to all clothes of the same type you change later on.

using coordinate card which has an edited texture for a dress will work perfectly on that type of clothing as the texture is matching the geometry of the dress's mesh. but when changing to another top like lets say a T-shirt, the texture will still be loading. and since a t-shirt's mesh geometry is different than a dress, the texture will also wrap differently. (i dont really know why, probably something about how materialeditor is saving data on cards?).


even if you save the chara in to a card, this will continue to happen whenever this card is loaded. so as you can see it is not so convenient, at least for now. but until this is fixed, here is how to manually load the texture using materialeditor:

1. i will be using the same and for this example, download both then go ahead and load the coordinate card on a character like before. this will let you know what base top the modder used and edited/created a texture for (the simple dress).
2. do not save that chara and reload it again to get ride of the texture edits, then go to tops, and select the vanilla simple dress.

3. now click on the materal editor button on the left to open the menu and scroll down until you find the "main tex" property, click "import texture". a window will appear and allow you to brows through your textures (make sure you are searching the right directory) select the one you downloaded previously and press "open".

4. some times you will notice that parts of the body are missing (in our example's case, it does), that is because the original unity player for the top does not include a mesh for those body parts (it is what i believe at least) or maybe it is masking them out to avoid clipping.

but, an easy way to fix this is to open the top menu then drag the "degree of tear" slider on the "other" tab in to a minus value, this will load the full body mesh and the problem is solved. i think that the proper way to fix this is to edit the "occlusion map" if you wish to keep the tear value at 0 but i'll just..do this for now. lazy :p.


and you are done. you also can edit whatever the materialeditor is offering but for now, save that character in to a card. now go ahead and change the top into something else and you will notice that the new top will still have it's original texture and edits. this way this top edit will be saved to the chara card but it will only load for that exact top (initially) and will revert to the default state if the top is changed. it is a useful method if you have a chara with allot of texture edits on different clothes and accessories, you can load the outfit of a character to another then freely change some of the clothing to something else without maintaining any edits. (maybe sharing chara cards is a better way instead sharing coordinate files to avoid all the trouble. please keep that in mind).

Q. you have a coordinate card and can't find the texture file?
A. easy, load that coordinate, open the material editor and "export texture". there u have it.

A.2. Edit Or Create A Texture
if you wish to edit or even create your own texture from scratch and have the know-how to do it, first scroll up all the way to the top on the materialeditor menu to find the mesh properties and then "export" the UV map for that top, it will show you how is the geometry is spread and use it as a guide to create your texture.

looking at the image above, you will notice that the dress is composed of two parts (top A/b and bottom A/B).
top a = upper part, clothed state
bot a = lower part, clothed state
top b = upper part, half clothed state
bot a = lower part, half clothed state
because it is a full body clothing, you cannot wear bottoms along. but it also means that the dress will be effected by both half clothes states for tops and bottoms but will be handled separately for each part. most top will be conceited of only one mesh or multiple ones if there are ornaments/additions in some cases.

depending on the structure, textures act as a map for all parts usually, but i have seen clothes with multiple textures. in our case we only have one as you already noticed.

since we only need the UV maps as a guide only, half states UV maps wont matter. only export the top a & bot a.

now load both UVs in a photo/paining studio and merge them on the same stage then start creating your own texture on top but on a separate layer, or load any pre-made texture and do your edits. let it be a pattern or just the color of the dress, here is a simple and poorly made edit that i made for the same dress from the example applied to both top and bot UVs.

pink area in this image is only for explanatory purposes and it represents the transparency on the texture.

when you are done with editing remove the UV guides and save your texture, then please follow the same steps above to load it using material editor.

You don't have permission to view the spoiler content. Log in or register now.

NOTE: the final output texture must be in .PNG format with transparency, any transparent area on that image will also be transparent when loaded on the character. can be used to make a skirt shorter, see-through or whatever design needed.
i do not know why the materialeditor is not supporting .DDS format for textures, so stick with .PNG for now.


B. Overlays:

NOTE: it looks like clothe overlays and textures added via materialeditor can not be used at the same time for some reason, i hoped that they can coexist before but i was wrong. you will notice that when you attempt to load any clothes overlay to the top we edited earlier it will revert to it's original texture. but anyway, lets continue and add a clothes overlay to something.

clothes, skin or any other kind of overlay are textures that can be added on top of the main texture of an object, think of it as the body or face paint tattoos. it will maintain the current look of an object but add something else on top of it. in order to add one, select tops then press on the "clothes overlays" button on the left and click on "load a new texture" from the overlay menu.

like any of the other textures, overlays follow the same rules (has to be PNG, has a transparent background and must adapt to the mesh UV). so if you load an image you will notice that it will cover the whole object, that's why it also has to be handled externally and edited to match the UV.

lets say that we want to add this image as an overlay:

since we are adding it to the same top (the simple dress), you can reuse the UVs we exported earlier as a guide, or you can click on "dump original texture" button to export the current texture as a guide, or.. use them both at the same time? it won't matter ether way, they are just to give you an idea where and how the edits will look like. now resize or color it just like we did with the texture from part (A), save it and then press on "load new texture" again and load it.

here are images of both WIP and the finished loaded overlay on the same dress.


Conclusion:
Q. so.. materialeditor OR clothe overlay?
A. well, i'd say materialeditor texture editing for sure. clothes overlay is nice and handy to add stuff on the fly to clothes, also one nice thing about clothes overlay is that you will still be able to edit the color and patterns if made properly (transparency wise) using the chara maker's functions, unlike editing main textures where clothes colors come from the texture itself (not the chara maker's). other than this, don't really bother with it..you can have more control and do allot more editing textures with the materialeditor be cause you can always include more than one image in your project while using gimp, photoshop or whatever, and remove all the parts you don't like of any cloth you work with.


here are the characters from both examples, feel free to use those cards and have a deeper look on the materials inside.


i hope someone will find this guide useful. dm about any errors in data and info and btw, sorry for all the grammar.. just.. don't share this with your english teacher :geek:.

-----------------------------
Credits
-----------------------------
-guide by: hun hunter
-original red dress texture reference by:
-overlay mods plugin by:
-materialeditor plugin by:
-model: :LOL:
 
Last edited:

hun hunter

Member
Dec 30, 2018
194
617
[Guide] bones and IK/FK nodes relation and behavior

illusion's studio neo is pretty much where you want to freely compose a scene of your own using characters you have created with the chara maker in main game, maps and various studio items and objects. it is a great tool to utilize the game assets and allot of modders and plugin creators released hundreds of content for it, that is why it is popular among the community as people use it to create videos, images, comics, game assets for their indie games and more. or you can just use it if you are feeling creative :).

A. Bones
and since we are going to talk about characters it is important to know and understand how are they composed, rigged and what are the bones responsible of a character's movement. now there are hundreds of bones and components for a single character and i am not asking you to memorize each single one, just get familiar with the main ones that you are going to deal with allot, like those the kinematic tools (FK/IK) has nodes for when you a custom pose a character. mostly the ones starts with "cf_j_bone name" in case of a female chara and "cm_j_bone name" for some of the male chara body parts.

a good way to view all bones that you will be dealing with while posing a character is using the HS2PE plugin menu, then click on FK. scroll down the list and read the names to take a general idea.


you will notice that many are similar but has different number or direction L & R (left and right). these bones are not all the bones in a character as not every bone has a node or controller when using FK and IK, only the root bones that contain all their sub bones of the same kind and connected to another root bone of another kind at the same time.

lets take a look on how a left leg of a character is composed of, keep the HS2PE menu on and go to anime>kinematic>FK and turn it on, make sure that the "body" check box is turned on on the FK menu otherwise the body FK nodes wont show on your character. also don't forget to click on the "axis" button on tools so you can see the actual nodes. then start selecting each of the four nodes that the left leg is composed of starting from top (the one connected to the hips "kosi") all the way to bottom. you will notice that the selected node is highlighted green on HS2PE.


now all of these nodes are controlling root bones, and every single one is conceited of multiple sub bones. these sub bones are what shape the left leg's mesh it self and since the rotation or movement of the root will also move all subs along you wont find a node controller for each one of them.

example:
Code:
cf_j_LegUp00_L (root) <---- has a node in studio
   cf_j_LegUp01_s_L (sub) <---- it shapes the upper thigh
   cf_j_LegUp01_L (sub)
   cf_j_LegUp02_s_L (sub) <---- it shapes the mid thigh
   cf_j_LegUp02_L (sub)
   .
   .
   .
   etc
this should be the same for all bones in a character and if you understand how this part work just apply it to the rest in your head :D

B.
FK & IK (forward and inverse kinematics) node movement and behavior in studio
both FK and IK rigging approaches move the body but each one work differently. this is why you will notice that the nodes for each type are not the same and will move the associated bones differently as well. always keep in mind that regardless of the method used to move the character's bones the bone hierarchy is still the same.

FK: node controllers are pretty much located on every root main bone of the body (joints), here you can only rotate these nodes and doing so will also move all the connected nodes to it as a result. look at them as parent and children nodes.

ex. rotating the shoulder node in FK will also move the elbow, wrist and all fingers nodes as it's children nodes and leaves the parenting nodes unaffected. so in order to rise a character hand all the way up you will need to: rotate the cf_j_armup node up then flatten the cf_j_armlow node by 180 degrees, leaving the cf_j_shoulder node completely unmoved.

IK: node controllers are located almost the same as FK but nodes are connected to multiple bones in some locations and can be both moved in XYZ axis and be rotated at the same time in some cases.

ex. moving the shoulder node in IK will only move that that end and drag every thing attached to it behind. so in order to rise a character left hand all the way up you only need to move the lefthand (or "f_t_arm_L" node) on the Z axis all the way up, it will shift all connected nodes (elbow and shoulder) along with it, and it will even drag behind the whole body if you move that lefthand node far enough.

now at first IK sounds the way to go, but in the other hand lets say you want to make a character's whole upper body bend down as if they are bowing down, you will find that a single rotation on the Y axis for the cf_j_spine node will do the trick using FK, while if you attempt to do this with IK you will have to move all the upper body nodes one by one and it won't be as accurate. or maybe move both the legs upward then rotate the whole character 90 degrees down in? FK is still good to be used in some cases. also in studio, FK has control over some body and clothes parts while IK does not, such as hair, fingers, skirt and penis.

Q. so what now, how do i make use of both?
A. read the next part of this guide ;)

-----------------------------
Credits
-----------------------------
-guide by: hun hunter
 
Last edited:

hun hunter

Member
Dec 30, 2018
194
617
[Guide] chara posing using FK, IK and FK&IK

knowing how everything work now, you can tell that using IK is maybe faster and more efficient for general character posing, but FK is also essential to move some of the parts you couldn't with IK and it's also needed for some body fine tuning. but with the FK/IK plugin, we are allowed to use both modules at the same time! thanks to deathweasel <3

so lets get back to our character in studio and try pose it.

NOTE: in this section we will not talk about editing animated poses not h-scene animations as it is we sill lack plugins to do that in HS2's studio, and i personally haven't use joan's HS2PE IK pose weight features in advanced yet. so i am going to talk about still poses only in this guide and leave this matter for future ones or when he releases timeline for HS2.

if you have a pose in mind and wish to start posing straight from the initial T-pose it is completely fine, but if one of the predefined poses in the "animations" menu is close enough and you only wish to edit some part, please do that. just make sure that you select a non-animated pose and that you have all kinematic posing tools turned off before selecting the pose or it will not display.

1. i am going to use the pose called "Pose 8in" in this example and since this animation is not looped, i will take the final state of that animation as my starting or reference pose. if the pose you select loops endlessly just try to pause the animation to the desired pose by dragging the "speed" slider to 0.


2. now while our character is posed like this, we first need to copy the these bone locations as a reference for our FK/IK posing tool and start editing them.

go to kinematics>FK & IK>"refer to animation" then activate the check box on top.


3. this will will give a reference for both FK and IK nodes from the pose we had previously. you will notice some minor difference in pose as some nodes rotations get reset but it's fin, just ignore that for now. also some times the nick will different as you can see in the image above, it can be fixed by selecting the neck node and reset the rotation using the transform tool then select the head node and to the same.


4. now we are ready to start posing, and for the sake of the example lets do some kind of an expressive pose for our character and make it look like as she is about to fall off a platform, will also keep it simple. i have added a simple cube object and transformed/moved it to look like this.


5. back to the character, let us first bend the arms to the sides. to do this and since the FK&IK plugin uses the IK node controllers for body as default, select one of the nodes on the hands and drag/move them away of the body, i suggest using HS2PE this kind of jobs as it is way easier then the vanilla studio way. when done with one of the hands use the "copy" arm or hand function to apply the changes you made to the other arm and hand easily. just remember right hand means the character's right hand and not your right. can always use the "undo" if you moved something by mistake unlike the old studio..thanks illusion <3.

and since miwa chan is looking this way lets edit her expression and the hands poses while we are at it. but first make sure to disable the "right and left hand (FK)" from the IK&FK menu or the hand poses we want to reference will not display.

then when done, we need to re-reference the new hand poses to our current FK&IK pose, but to do this you will need to do it from the FK menu and not from the FK&IK menu, else it will ruin your pose for some reason. then enable the hand checkboxes again too.


6. now lets bend our characters waist down and give the shoulders a little twist. as mentioned above in section A. it will require allot of work to do this using the IK nodes so we are going to temporary switch to FK and perform those edits.

to do this, first go to the IK menu and click on "copy to FK" button then go to FK and enable the "body" checkbox. this will copy all the edits we made to the body in IK and apply them to the FK nodes. not doing so and if you enable "body" on FK directly, the pose will change to how it was before edited the arms to the side, so make sure you don't do that and copy it first.


after doing that correctly, you will be able to see the FK nodes and controllers appear on the character as shown above.

7. now lets first rotate the "cf_j_spine02" node on the X axis slightly so the characters waist bend a little, then do the same with "cf_j_spine01" to mobe the upper hips area.


next twist the "cf_j_spine01", "cf_j_spine02" and "cf_j_kosi01" on the Y axis to have something similar to this

you also can twist "cf_j_shoulder_L" and "cf_j_shoulder_R" back a little for a more dynamic looking motion pose.

8. last thing you may want to edit while in FK node are the toes node as it wont be possible when we are back to FK&IK. so select the node "cf_j_toes_R" and rotate the X axis like this. i did it because i wanted the character to appear as if she is standing on her toes in this pose.


9. next let us get back to the FK&IK mode but first copy these recent FK edits back to the IK nodes. this time you click on "copy to IK" button then turn of the "body" checkbox on the FK menu.

get back to the FK&IK menu and as you can see our FK edits were successfully copied.
NOTE: i dont know why that last edit to the toes didn't get copied with the rest of to FK nodes to FK&IK but it must be a bug in the plugin? lets just ignore it for the time being.

10. now we are back on FK&IK and we still can edit some of the FK nodes on this mode, lets rotate the neck and head nodes toward the ground.


11. finally lets adjust the whole character's body correctly on the platform, first re-select the character from the work space on the right side of the screen to select the character's root node and use the transform tool to move the whole body. if you followed all the steps the final thing should look like this.

YAY. let us leave it at this for now and move to the next section.

-----------------------------
Credits
-----------------------------
-guide by: hun hunter
-FK&IK plugin by:
 
Last edited:

hun hunter

Member
Dec 30, 2018
194
617
[Guide] node constraints plugin


A. introduction
in this section we are going to continue talking about nodes but this time it will be about how to attach these nodes to each other using the "nodeconstraints" plugin, and when i say to connect nodes it doesn't mean nodes of the same character body only, it can be nodes from another character or multiple ones, studio objects and even gimmicks.

every object you load in the studio have at least one node and it is called a "root node" (this include characters), moving or rotating this node will move and rotate the object as a whole and this is how we can move and place objects in a studio scene. always remember that selecting an item from the work space on the right side of the studio screen will always select the root node of an object by default.

some studio objects are composed of multiple bones and even have FK nodes, some call these items "FK items". like character these items can be posed using the the FK approach by rotating the nodes on them, some items are "still" and others are animated. gimmicks like pistons, rotateors and spinners are a kind of those animated FK items but some other gimmicks has more function to them. to access these nodes you have to select the object from work space then click on "anim" from the left to bring up that item's properties then turn on the "FK" checkbox.

B. node attachment
so lets get started, press (control+N) on your keyboard to bring up the nodeconstraints menu. now selecting any object or character from workspace will be detected by the plugin and it will show you it's IK root node highlighted as well.

in our case, the character's IK root nods is called "chaF_001", and if you select the cube object we used as a platform it will show "p_ai_stu_cube01_02" as its IK root node.

make sure that the nodeconstraints plugin is on the IK tab when you deal with root node attachment as they are the type of nodes that can be both rotated and moved on XYZ axis.

now as our first attachment example lets go ahead and attach those 2 root nodes together using the plugin. first lets select the cube as our parent object and the character as the child object. this means when its all done, moving that cube's root node will result in move the cube itself, the root node of the object attached to it and therefore will move both object at the same time as a result.

1.so select the cube while the nodeconstraints is open, and make sure that the IK root node is highlighted.
2.click on "set as parent".
3.then next select the character, select her IK root node just like we did with the cube.
4.set her the root node as a child by clicking on "set as a child".
this will create two circles on both of your objects, green for parent and red for the child over these nodes. they are not attached yet but only defined that way.


next while you are selecting the child object (the character), we need to let the plugin know what properties to link by this attachment. the plugin offers position scale and rotation linkage as shown in the upper part of the menu, linking any of these properties means that any edits or changes to this property on the parent object will also apply equally to the child object on the other end.

example: linking only the scale property in our example above then scaling up the cube will also scale up the character, but moving or rotating the cube will not effect he charter. while linking all 3 properties will apply the same to the character.

for now lets link the "position" only and leave the other two an-linked in case later we want to change the cube's rotation and scale without effecting the character.
5.so check the "position" checkbox".
6.click on "use as current" next to it to define the linked position of the child relatively to the parent.
7.and finally click on "add new".

great, no you have attached two objects together with their positions are linked.

since the chara's position as a child is linked to the cube as a parent, you will notice moving the cube around will also move the chara, and changing the chara's position won't be valid anymore. while on the other hand, scaling or rotating the cube or the chara independently will be possible because the scale and rotation properties are simply un-linked.

i will simply rotate the cube and character in opposite directions next, and maybe try give the cube more height by scaling up it's Y axis to demonstrate this

oh, looks dangerous!:oops: so for miwa chan's own safety lets put a pillow down there so she won't get hurt.

just kidding.. you can skip this point :rolleyes:
You don't have permission to view the spoiler content. Log in or register now.

but what if i changed my mind and want link the "rotation" in that attachment that we made previously? no problem.

before you do anything, it is very important to make sure that the character i selected from the workspace and her data is showing on the nodeconstraints plugin's menu. otherwise you may edit another object's data instead.
1.first you need to un-check the checkbox next to the attachment to disable it temporary
2.then while it is highlighted put a check on "rotation" from the upper part of the plugin window
3.click on "use current" to register the new character's (child) rotation data in relation to the cube
4.then click on "update selected".

you will instantly notice that a new "pink" line is formed between the parent and child colored circles on our objects meaning that the rotation property is not linked as well.

5.now only activating the attachment back on is left, but before you do that, lets do one more thing; lets change this "cube to chara" attachment's name by adding an alias to it. sometimes it is too hard to memorize or understand all those root node names specially when you work with a scene where there are allot of attached objects and links. so let us add a new name (alias) to this and simply name it "chara over platform" so it is easier to read and manage later. you will need to click on "update selected" again after changing the name.
6.finally, turn the attachment's checkbox back ON to activate it.

and done.

now we have both position and rotation linked, so rotating the cube in anyway will also effect the chara's rotation as well. test it if you must.

one last thing to mention here is that the attachments "list" we see in the middle part of the plugin menu is not just for management, order of attachments in that list plays a technical part as well. later when you have multiple attachments that link multiple nodes of an object to a one root node, it will be very important to list them in "how they are connected in that object's rig" kind of order or the behavior, position or shape of what these nodes control may break or look weird. we will take a look at it later in this guide.

so, those was the basics of how to use the nodeconstraints plugin but that was just a simple example on linking two root nodes and it is probably not so different than the "parent" option in the "workspace" where you can also attach different objects together or include them in a folder ..etc, but it will always link all three properties (position, rotation and scale) it doesn't give you the control you get with nodeconstraints plugin. and it will always attach the root nodes of the selected objects.

also, node constraints will help you adjust and prepare those connected objects for further editing such as custom animations using gimmicks, timeline or VNGE (or all together), like using the same setup in the example we'v made above you can simply start animating these attachments. it is a different and a more advanced subject, for me as well.. especially VNGE as i didn't start using that plugin yet (QAQ). it is a GREAT plugin really, it allows you to make key animations, shift between expression and camera states, create a graphical novel like scenes using all that and allot more. no promises but hopefully ill be able to cover it in another guide in the future.

just check VNGE out and you will know what i mean:
plugin:
videos and tutorials:

back to our guide. so what if you wish to connect a specific FK node of an item that is not visible or accessible in the worksapce to something else? let's find out on the next section (y)

-----------------------------
Credits
-----------------------------
-guide by: hun hunter
-nodeconstraints plugin by:
 
Last edited:

hun hunter

Member
Dec 30, 2018
194
617
[Guide] hooh's scripted dick items

A. introduction
these items and mods made by are similar to other studio objects but they offer more features in functionality, and will be useful when creating your own studio H-scenes.

B. attaching to characters
lets get back to our scene and load another male/female character (doesn't matter, attachment method will still be the same) and then go to add>item>scroll down to "hooh A">scroll down to "hooh Ecchi">"S-Dick Type A Track Nearest" and add it as well.

NOTE: by mistake..i used the item called "S-Dick Type A" instead of "S-Dick Type A Track Nearest"in all the examples below, but it should not effect a thing in those examples as both items are identical in composition and node formatting, the "track nearest" type can interact with other objects made by hooh. so any way please use "S-Dick Type A Track Nearest" for all examples to save yourself some time switching them later.


then rotate, move and scale it as desired and adjust it to the new character's crotch. take the character's clothes off and turn on the penis on if any for a better positioning reference. and adjust the item's color to match the character's body.


then (control+N) to open nodeconstraints and lets apply everything from the previous example. but this time we are going to have our character as a parent object and the S-dick as a child object. also, we are not going to have the character's root node as our attachment node but instead we are going to attach the item to one of the character FK body bones.
1.so select the chara from the workspace first.
2.then on the plugin menu, open the "FK" tab.
3.use the search field to look for the key word "dan"
4.select and highlight the bone "cm_j_dan101_00", this is the original penis's root bone used to connect it to the body. so to be able to have hooh's S-dick to act and behave like the original chara penis while the the other body bones move in posing or animations, it is better to use this dan node as our attachment anchor point.
5.then click on "set as parent".

you should have your green circle when done.

6.next, select the S-dick type A item from workspace.
7.make sure to clear the search field first or no results will show as it will look for a node called "dan" in the S-dick item's bone list and return nothing.
8.then click on the "IK" tab since we want to use the item's IK root node and not any of its FK bone nodes.
9.highlight the bone named "scripted_dick" (the item's IK root node).
10.click on "set as child"

and there is the attachment's child red circle.

11.now from the upper part of the menu, turn on all three properties to link them as we want the chara body (or the "dan" bone node to be precise) to take full control over the S-dick's position, rotation and scale. just like it does to the original one.
12.click on "use current" for all three properties to set their data.
13.write down an alias name for better managment
14.finally click on "add new".

you should see that the plugin has added a new attachment with the alias name you provided and the attachment link line is visible on the objects.

congrats, you character now has an upgrade! btw turn off the character's original penis from the "current state" menu, it is not needed anymore :LOL:

test the attachment if you like by moving, rotating or scaling the character. and remember that you can always adjust and fine tune anything by turning OFF the attachment check box from the list>do all edits>update selected.

C. S-Dick's FK nodes and posing
before we begin, lets take a look at the S-dick item details and view all it's FK nodes available. to do that, select the item from the workspace then click on "anim". this will show the same menu we used to recolor the item but this time we are going to turn ON the "FK" checkbox so we can view all FK nodes available for this item. turn on the HS2PE plugin menu for a better bone listing.

now as you see at the image above, the S-dick item contains multiple FK nodes unlike the cube item we's used earlier. this means that this item can be posed, shaped and animated if needed. and that's what makes this and all FK items special. here is an image for both the original penis and hooh's S-dick in comparison of FK nodes:

the difference is too clear. and as we all know, node count DOES matter! :LOL:

the stock penis's rig for the rod has onlt 2 FK nodes makes it much harder to pose and bend properly while it is not the case in the S-dick's rig.

this will be handy while creating your own H-scene in studio if you specially if you replace the original penis with hooh's. so just for an example, lets go and try shape the S-dick using rotation for those FK nodes. use the nodes marked inside the red box on HS2PE, the rest mostly for the balls sack.

NOTE: the bone called "root" in this list is an FK root bone and it is not the same with the IK root bone we lined to the body earlier, this is why you still can rotate this node freely while the IK root is linked to the body.

next in this guide, you will learn that there is a better way to pose/use hooh's S-dicks using the "dick navigator" studio item which will add a dynamic functionality. so go a head and perform a couple of "Undos" and reset all FK edits we just did to the S-dick.

D. dick navigator
the dick navigator item serve a single purpose which is to help the S-dick navigate through things, it may appear as a magnet when you add it at first, but it actually can be rotated and directed to a certain point or direction. while the dick puller's job is to pull back/forward the foreskin attached to the S-dick (or to stop it from moving if it is still).

first let us add the "dick navigator" item to our scene an test it for a better understanding.
1.first, double check that the S-dick you are using has "track nearest" after it's name other wise the dick navigator will do nothing.
2. go to add>item>hooh A>hooh ecchi>"dick navigator" and add it somewhere in the scene. if the navigator's location is somewhere close to the S-dick you will notice that the dick is being pulled towards it. ignore it for now.
3. then select the S-dick and click "copy transform" from the transform tools at the bottom left side of the screen to copy the S-dicks location, angle and scale if there is any. you may want to reset the scale 1's.
4. now select the navigator back again and click on "paste transfrome".

the S-dick should appear shrunk down like this as the navigator is too close to it.

6.next, select the navigator and move it on the Z axis and place it directly in front of the S-dick. use whatever way you like, arrows, move tool, keyboard..etc just make sure you only move it on "Z". an easy way to do it is to click and hold you left mouse button on the "Z" letter in position then drag it "right" to move it away. try make something similar to this:


7.then do the same but this time by clicking on the "X" axis of rotation and drag it right to rotate the navigator slightly up in this angle:


so, what does it all mean? what are those red and blue balls and what is it exactly that the navigator does?

simply, this navigator item has a function called "target" (similar to the one you use to manually make the character's eye gaze move to a fixed direction in chara face kinematics), while the S-dick has a tracker component that allows it to follow that target in a certain way (which is going through point "A" the red ball to point "B" the blue ball). it is important to understand this when using the hooh's navigator so you will be able to know how to make use of it, adjust it and where to place it.


since the navigator can be rotated, moved and scaled it will be effecting the S-dick accordingly. that is why we tilted it up in step (7.) of the example above. let us test this now.

8. select your character from the workplace, and since we previously attached the S-dick to it moving the character will also move it along. then, move your chara (slowly) on the Z axis toward the navigator by dragging. you should be able to see the navigator in action now.


this simple example should be enough to make you get the whole idea about scripted dicks and their tools, so go ahead and experiment with different navigator angles, positions and ideas.

TIP: most basic things to do with these items is:
-replace the characters penis with hooh's "S-dick track nearest", attach it to the character penis bone node "cm_j_dan101_00"
-place the hooh's "dick navigator" on the female's vagina and attach itto the bone "cf_j_kokan".
-pair both character with some H-animations in studio and the S-dick will navigate through vaginas.


-----------------------------
Credits
-----------------------------
-guide by: hun hunter
-nodeconstraints plugin by:
-scripted dicks by:
 
Last edited:

hun hunter

Member
Dec 30, 2018
194
617
[Guide] simple H-animations editing in studio using nodeconstraints and FK&IK plugins (Part1)

next i am going to give meaning to all our efforts and do something with what that we'v learnt so far. it's about to get weird and nasty! :censored:

first let us give our hero something to screw with. nope, not miwa san..she already has enough in hand dealing with that risky cube platform. so how about this.. apple? :unsure: ye ye this huge ass red apple!

what..? :rolleyes: come on.. it's not like i have some kind of weird fetish or something.. i swear! just a random studio item.. to tell the truth i only wanted to use a very simple object for this example. so deal with it ( U _U).

great! now load that apple and don't forget to scale it up.

after that, move the apple, rotate and position it somewhere in the scene. then select the "dick navigator" and move it close to it.


next push the navigator further inside the apple leaving the "red" ball almost visible out of the apple's body just like this.

NOTE: i was able to to take this (side cut) view of the apple by using mikke's " " plugin which is also available in "game root>[OPTIONAL] Mods" if you are using STN's better repack. just press "N" on keyboard to show the slider on bottom then slide for clipping control.

we are going to attach those to each other (apple is parent, dick navigator is child). select the apple, then open the nodeconstraints plugin with (control+N). click on IK tab>select the IK root node>set as parent. green parent circle appeared.


then select the "dick navigator", click on IK tab>select the IK root node>set as child. red child circle appeared.


next while selecting the dick navigator (child), turn on all three link properties>use current for all three of them>write an alias name of your liking, i used "navigator on apple"> add new. new attachment has been created in list and attachment link appeared.

grats, our apple has a vagina now :eek:

so.. we attached the dick navigator's IK root node (not the FK nodes) to the apples IK root because we want to lock the navigator from moving and rotating independently. we also linked position, rotation and scale to this attachment so the navigator will move, rotate and scale the same with it's parent (the apple). later when you apply this example on a real character's vagina (not an apple's) then you will realize that the character will/may be animated and constantly moving. you will need the navigator to move along with it right? people's vaginas don't move on their own you know.

now next, select your chara, and this time we are going to use one of the H-animations from main game. so go to anim>animations>male insertion>doggy>fastloop. then pause the animation by dragging the "speed" slider to "0", pull the "extra 1" slider to "1" for a better humping form and finally give your chara a 180 degrees flip using the transform tool at the bottom.


now let's move our character closer toward the apple, start the animation by setting speed to "1" then see how things look like.

ok nice, but not good enough.. let us adjust the navigator's position and make it a little higher, a little further and rotate it a little lower too. you can edit all this by first disabling the attachment temporary>select the dick navigator>edit what u like>"use current" on all properties> then "update selected">turn it back ON.


much better, but we are not done yet.

as you can see, the character's hands are diving in the apple clipping and all, so lets perform some character attachments to the apple and both his hands FK nodes and use some of our posing skills to fix this.
 
Last edited:

hun hunter

Member
Dec 30, 2018
194
617
[Guide] simple H-animations editing in studio using nodeconstraints and FK&IK plugins (Part2)

NOTE: since we are going to do something like editing an existing animation in studio, please expect it to be too buggy and imperfect, there will be allot of sharp edges here and there even for minor edits. doing it with the method i will be using (node attachment only and no bone weight control) may work for a simple job like the one we are going to do now, but not for more complex ones. but anyway it is something that never meant to be done in studio and get something perfect out of it, not with the tools that we currently have at least (creating animations from scratch is the way to go here). that's why if you are going to do this you need to have a really good understanding of how the FK bones work and move the body, else you will end up having allot of deformed limbs and stuff ^^' it'll never hurt to try anyway, lets to this!

please follow every step:
first, we will attach the character and the apple as a whole; pause the animation (speed to "0"), then open the nodconstraints, then select the "apple" and set it's IK root nod as a parent just like we did with the previous example. select apple>IK tab>set as parent>green circle appeared.

then select the character>IK tab>select the character's IK node "chaM_001">set as child>red circle appeared>link all properties from top>use current for all three>put an alias name>add new>attachment link line appeared. easy.


now its time to edit the character's hands using the FK&IK tool (temporary) to make them look as if they are holding the apple. make sure your character's animation is still paused while doing this.

select the chara, go to anim>kinematics>FK&IK>click on "refer to animation" button>turn on FK&IK>edit the hands to something close to this


now we will be dealing with FK nodes starting from this point, as FK nodes are the type that mainly used in animating the character.

so, first select the apple, then on nodeconstraints plugin menu, this time open the FK tab and select one of the apple's FK nodes as our parent (doesn't matter which as both are still and will act as a parent or reference). so select it>set as parent.


now let us make our character nodes view a bit clearer to work with. get back to the character and while in FK&IK mode, go to IK mode and click on the "copy to FK" button (this will copy our pose we made for the hands from IK to FK nodes.

then get back to FK&IK and turn it OFF, then go to FK mode and turn it ON then make sure that "body" is enabled, you can tell by seeing the FK body nodes on the chara.

this will put you purely in the FK edit mode along with our hands edits and no IK nodes will be visible to mislead you or anything.

after that, get back to nodeconstraints. to get this job done, we need to attach six FK nodes as children from the character
to the FK parent node on the apple. these six nodes (three of each hand) are "cf_j_hand_R", "cf_j_hand_L", "cf_j_armlow01_R", "cf_j_armlow01_L","cf_j_armup00_R" and "cf_j_armup00_L".

some will be linked with only the rotation property while others will be linked with both rotation and position properties.

lets do the attachments now, click on the FK tab>on the "search" field look for a node named "cf_j_hand_R" make sure that the node highlighted below>set as child>link ONLY the rotation property>use current for rotation>add an alias name for attachment>add new. it should be successfully added:


now do the same with the other hand "cf_j_hand_L":


next, search for a bone called "cf_j_armlow01_R">set as a child>then link both position and rotation this time>use current for both>alias>add new.
left arm, "cf_j_armlow01_L">set as a child>then link both position and rotation>use current for both>alias>add new.


next is "cf_j_armup00_R">set as a child>then link both position and rotation>use current for both>alias>add new.
left arm, "cf_j_armup00_L">set as a child>then link both position and rotation>use current for both>alias>add new.


the final and most important step! now i know we'v added the attachments ("hand", "armlow" then "armup") for the bone nodes in this order, but actually they have to be added top to bottom like this: ("armup, "armlow" then "hand"). just like they are located in the character body.

so please go ahead and fix them in list by pressing the ↑ and ↓ buttons on node constrains list, like this:


now finally, we need to turn OFF the FK tool before un-pausing the character's animation. not doing so will not play the animation as it is supposed to do, as the FK mode is an editing mode and will put all nodes available to edit on hold. so turn any kinematic mode completely OFF.


then go to anim>animations>resume the animation.


happy humping!


and this is how to edit and lock part of the character's body to something during an animation, so these 6 FK nodes we attached to the apple will be overrode by the nodconstraints attachments we'v created and will not follow the original FK nodes animation movements. this example was very simple as you can see, because we used a single and still (not moving) FK parent node from the apple, but later you when you want to use another character as a parent instead (not..an apple) you will notice that you will have to deal with other different (and sometimes moving) FK nodes as a parent to these attachments, which is allot more complicated to do as you will have to deal with more parent and child nodes from both ends. and now you know why i used an apple an apple for our example ^^; poor apple.


_____________________________________________
summary:
so, the things you'v learned in this guide should be:
-how the main bones are forming a character, how are they connected and how do they move.
-what are the tools that move these bones and help you create poses. FK, IK and their mechanics.
-how to connect these bones and nodes using the nodeconstraints plugin which will help you create even more complex poses, pre-animation frames and more.
-usage of hooh's scripted dick items and how it can replace the stock penis for further custom H-animation and scenes.
-how to screw an apple :sneaky:.
_____________________________________________

you also should be ready to get in the core character posing & related matters in studio neo now, hopefully all the essentials were covered in this guide, and maybe it will motivate you to use these tools and make you practice new things.

i hope someone will find this guide useful. dm about any errors in data or info and btw, sorry for all the grammar.. just.. don't share this with your english teacher :geek:.

-----------------------------
Credits
-----------------------------
-guide by: hun hunter
-FK&IK plugin by:
-nodeconstraints plugin by:
-scripted dicks by:
-camera clip controller plugin by:
 
Last edited:

hun hunter

Member
Dec 30, 2018
194
617
Thanx man i was strugeling with animations with this tutorial now i can make something decent
i am happy to hear that. i will soon update the "h-animations editing using NC" guides with the example scenes so people can take a clearer look over the examples themselves. also i am currently trying to figure out VNGE which will be a superior alternative for the NC method used in that guide, and a guide on how to use it will follow that of course. but i also have a couple of other subjects planed as well (mostly beginner and introduction guides) so VNGE probably will need to wait a little.
 

hun hunter

Member
Dec 30, 2018
194
617
help me please, why grass from village fantasy like this?

View attachment 904411
that is sure weird :LOL: but don't worry it is not only happening at your end (i tried the map and i have this too), your game is not broken and it is not causing this particular problem.

it looks to me that this simple problem could be caused by a missing alpha mask for the grass's .DDS texture, that is why the negative space around the grass is showing on the 3d plain. the modder (hooh) who created/ported this for the game must have forgotten to add it but it can be fixed easily if you notify him about it on for (don't forget to tag him if using discord when you address the problem). unfortunately i cant fix this as it requires to extract the .zipmod file then open the unity files and inspect the elements in SB3UGS, fix the texture, repack it again. .etc, and i am avoiding editing thing on that level for both technical and ethical reasons. i am sure he will fix this eventually but it is better to contact hooh about it if it is too important for you to use this map.

sorry i couldn't be much of help but i am not actually a modder :(.
 
  • Like
Reactions: Mr_NyanNyan

Mr_NyanNyan

Newbie
Mar 25, 2019
38
16
that is sure weird :LOL: but don't worry it is not only happening at your end (i tried the map and i have this too), your game is not broken and it is not causing this particular problem.

it looks to me that this simple problem could be caused by a missing alpha mask for the grass's .DDS texture, that is why the negative space around the grass is showing on the 3d plain. the modder (hooh) who created/ported this for the game must have forgotten to add it but it can be fixed easily if you notify him about it on for (don't forget to tag him if using discord when you address the problem). unfortunately i cant fix this as it requires to extract the .zipmod file then open the unity files and inspect the elements in SB3UGS, fix the texture, repack it again. .etc, and i am avoiding editing thing on that level for both technical and ethical reasons. i am sure he will fix this eventually but it is better to contact hooh about it if it is too important for you to use this map.

sorry i couldn't be much of help but i am not actually a modder :(.
ok ok thank you, you help me a lot..

I thought this was from my graphic settings, it wasn't
 
  • Like
Reactions: hun hunter

TheTitaniteSlob

New Member
Aug 7, 2017
4
3
How do you use spotlights in studio? I remember the first studio you had to turn off the global light with LRE. Can they be used with DHH?
 
  • Like
Reactions: a1110

hun hunter

Member
Dec 30, 2018
194
617
How do you use spotlights in studio? I remember the first studio you had to turn off the global light with LRE. Can they be used with DHH?
DDH shouldn't effect any kind of light source but some DHH presets may add new light sources. the studio lights can be treated as any regular studio item, can be moved, rotate ..etc.

spot, point and whole lights can be added by going to ADD>light, it comes in 3 kinds,: both chara and BG light, chara only light and BG only light. each effect the character and BG or both the same way and adding more than source add to the total sum.

here is a simple example (with DHH ON):
first lets load a character , then go to system>character light and turn it all the way down for the sake of this example. also use a very simple low light DHH preset (preset 4 and turn off depth of field).
1606753555349.png
then load a map with a light that can be turned off as well (some map mods will not allow you to do so). then select the map tool and turn off both "setting" and "light" for a better light demonstration and space. use the female room for this example, and position your character somewhere in the scene.
1606753339963.png

then go to ADD>light and add those three spot lights for the demonstration (each effects the character and BG differently).
1606753791982.png

then select the first one "spotlight" from workspace rotate and move it as desired (point it at the chara) and then go to anim and change the spot light's settings as you like.
1606754116674.png

this spot light effects both character and BG, to show how other spot lights perform, lets position all three of them exactly at the same position, angle and have the same light settings. to do this, select the first spot light we just edited and copy the transform setting at the bottom. 1606754455654.png
then select both the "spotlight(char)" and "spotlight(map" from workspace and use the "paste transform" function to apply the transformation data of the first spot light. now they are all at the same location, their light settings from ANIM. turn them ON and OFF and and see how they effect our scene.
1606754921265.png

add more than spotlight, pointlight and test other sources and DHH presets. a more detailed and advanced guide and lighting setup will be needed to achieve better and complex results. i hope this helps.

You don't have permission to view the spoiler content. Log in or register now.

Hi, how do we go about making penises ejaculate in Studio Neo 2?
it can be manually created or animated (complex, and probably require something like VNGE or timeline) and there is no plugin to do it for the HS2's studio at the moment as far as i know, but i hope it will be ported soon.
 
5.00 star(s) 1 Vote