Daz Tutorial Creating custom room's for Daz3d

polywog

Forum Fanatic
May 19, 2017
4,062
6,257
anyone can open a pre-made scene and render it

pCon max wall height is 200m, you can make your own city towers, or just stack floors, if you want multiple textures, save it as a scene simple building scene, so you can merge it into any full city scene when you want
it's not a "pre-made object" like Daz crap
it's a city generator
blender does a million things Dazstudio can't even dream of... better, faster, cheaper, unique, amazing, much wow, happy fans
 

OhWee

Forum Fanatic
Modder
Game Developer
Jun 17, 2017
5,655
28,449
So, I did this (building an entire house) the hard way, with Daz3D primitives and Hexagon. I recently made a moulding strip for my walls in Hexagon, with the irregularly shaped profile, and a separate 'outside corner' moulding piece, also in Hexagon, then imported these into Daz and placed them manually in there.

I'm sure using other programs might be faster in some cases, but in my case, particularly when I'm joining separate room products together, just working inside of Daz ensures that the texture maps won't get messed up when exported and then re-imported. I use the geometry editor tool to delete the stuff I don't want, and then replace the stuff I need with primitives, objects made in Hexagon, etc.. If I was building rooms from scratch, then working with a separate program would be fine, but I'm often modifying existing products as opposed to trying to build something new. Usually because the existing product has the stuff I need, and if I'm doing fanart, I like to use/work with the same models that the 'source material' uses.

This was done almost entirely in Daz Studio only, combining several existing products into a unified structure, with a couple of things done in Hexagon (the moulding I mentioned, and I need a 'parallelogram' for my glass section under the railing bannister on the stairs, and a simple triangle for my planter dirt.

The 'lot' the house is sitting on is from Airport Island, although I replaced the pool with a tennis court:


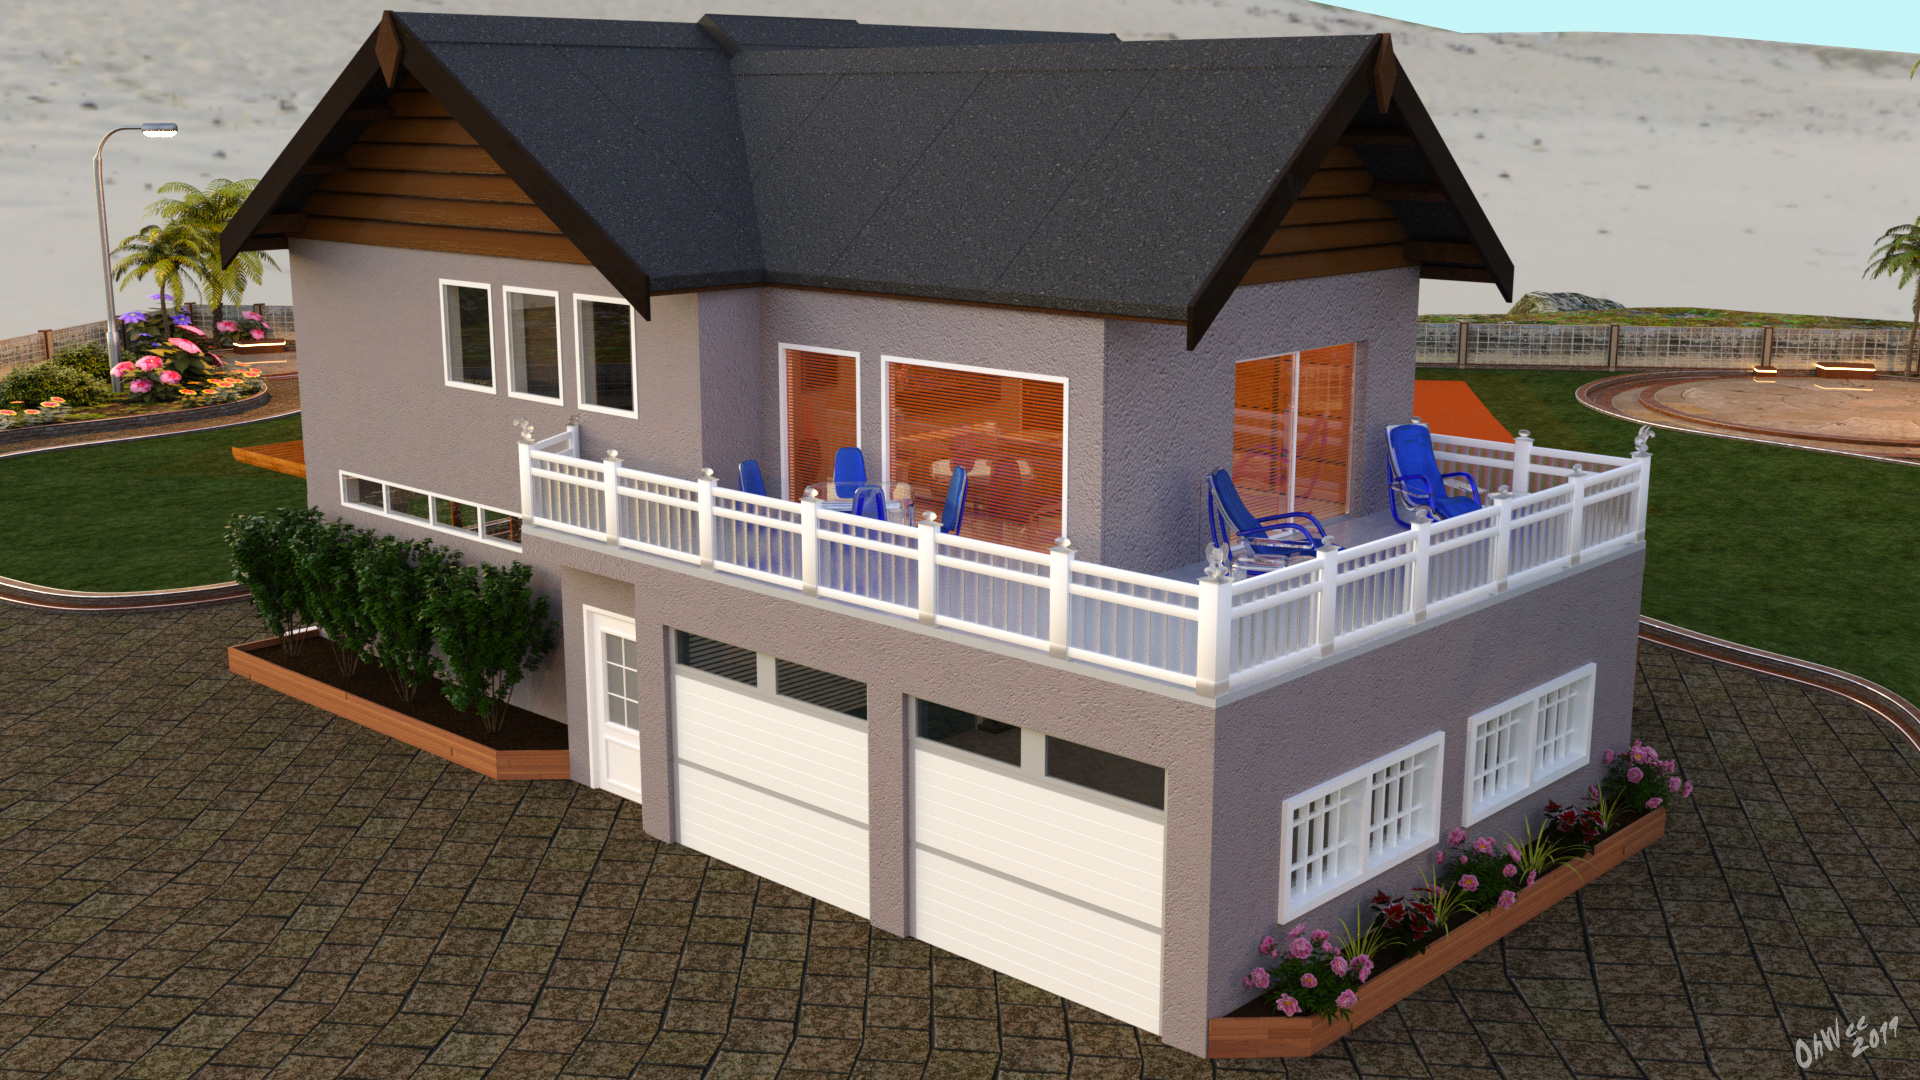
In the next render (below) the room sitting on the balcony is actually a kitbash of two separate rooms, which I merged together after deleting half of the walls on each, and then positioning 'kitty corner' to each other. I wanted the glass windows/sliding doors on the two walls facing the camera. The white & clear fencing used to be wood fencing (from a Daz product), and I added the crystal gargoyles to the corner posts. Daz shaders at work here. I also built the planters by hand using primitives, with 'triangular' dirt pieces that I edited from a plane in Hexagon real quick for the angled corners. The garage is an existing Daz product, with the exterior textures modified to match the house. Same for the roof pieces (from some beach hut actually). The long window and three smaller windows to the left were built by hand in Daz, as was the wall that they are part of. I grabbed the front door from another Daz product, then retextured it accordingly of course.


Here's a rear view. Note that the second floor above the kitchen/patio was originally two separate rooms (still is), unified using primitives, and of course I added the support pillar using yet another primitive. The two long windows next to the patio and hot tub were built in Daz using primitives as well. I borrowed the wood blinds from another Daz product (also seen in the render above), rescaling them to fit the various windows of course.


Note the seam above the corner of the flower planters next to the hot tub in the above render. This was a slight wall misalignment issue, which I addressed after doing this render. Also, I intentionally kept the number of windows on the back wall to a minimum, as it's facing North (the house is located in the northern hemisphere in my mind), hence no sun ever hits the north wall. Plus the two bedrooms and laundry room on the second floor didn't have windows on that side in the first place, although I added the small second floor window above the hot tub deck just for fun.

Here's an earlier render of the staircase area, which is between the garage and the living room, and between the two long windows I just mentioned and the front door. This is an early 'test render', so don't mind the black texture to the left. I've since finished up this staircase/hall area after I did this render, and unified the textures/coloring for the stucco walls and ceiling but haven't done an updated 'showcase' render for it as of yet. Also, I was still aligning the walls in this section, hence the 'seam' behind Coco's head (fixed that after I did this render).


There's some other details involving the stairs, but I don't have a test render handy at the moment (on a different computer). My point is that this entire area is effectively a new room built almost entirely inside of Daz. About the only 'premade' product you see here is the door you see behind Coco and the stairs. Oh and the picture frame, with some image I added.

Here's the shot of the hallway from the Kitchen and Living room angle. The Kitchen and Living rooms were two separate products from different content creators, and were the 'impetus' for me wanting to create a 'unified' house for my crossover story. The garage is from a third content creator, that I wanted to incorporate as well. The doorway behind the stair railing pillar goes to the garage, and came with the garage product. I just had to rework the door frame a bit to 'match' the hallway. You can't quite make out the corner moulding piece next to the vent above the patio doors, but that's why I needed a moulding profile...


Note that this is a later render, hence the 'black ceiling' issue in the hallway was addressed. Actually, I ended up shifting the second floor room entirely over the garage,, hence the need for an overhang over the hall was eliminated, except for the 'walkway' to that bedroom of course.

There are a few other details I added, Namely a second floor hallway closet and hallway/walkway, also added another existing product, a Study, from the same 'set' that the Garage, Laundry Rooms, and Bedrooms are from, but I've already made my point here, plus I don't have renders handy for those at the moment.

One other cool feature of the Geometry Editor tool is that you can select polygon faces, and assign them to a new texture group(s). This is how I was able to modify the existing room products so that the interior walls would have stucco textures while the exterior walls would have a concrete texture. (The rooms and front door model shared the same texture maps for interior and exterior walls before). This is why I prefer cubes to planes for walls in many cases when modifying existing rooms or making new ones. This also helps with light leak issues, as aligning planes perfectly can be a pain sometimes, while cubes have the 'edges' to help block light a bit.

Another cool thing you can do with cube primitives is (after you select an appropriate number of subdivisions when creating said primitives), is to 'knock out' holes for your windows, then send the primitive to Hexagon real quick to 'join' the inner and outer walls around the window frame area. I did exactly this for the rear hallway wall next to the patio and hot tub, then added a five more cube primitives to build the window glass (1) and window frames (4 strips total).

I like using cubes for glass instead of planes, because glass generally has a bit of thickness to it, plus it might be 'double paned', which technically you should use two glass cube primitives for, but most people would never notice that in a render.

Anyways, my point in sharing all this is to point out that, once you get a hang of a few of the tools in Daz (mainly the Geometry editor tool and primitives), you can actually do quite a bit inside of Daz itself if you don't mind taking the time.


For an entierly new house or room, yeah other programs may be a bit faster, but if you are working with existing products, just keep in mind that all you may need is Hexagon and Daz Studio... if you don't mind investing a bit of time to make it all work.
 

polywog

Forum Fanatic
May 19, 2017
4,062
6,257
That's a neat one, thx for the share!
Can you open the doors or are they part of the wall?

If you want to save some money, use the base shaders and free textures instead ;)
Here are some nice free ones:
 
  • Like
Reactions: recreation

xht_002

Member
Sep 25, 2018
342
352
it's not a "pre-made object" like Daz crap
it's a city generator
blender does a million things Dazstudio can't even dream of... better, faster, cheaper, unique, amazing, much wow, happy fans
blender isnt faster, everything todo with the UI is mentally retarded and the typical we're, lets pretend we are logic

generators are rubbish for games, everything has to work around a random
 

xht_002

Member
Sep 25, 2018
342
352
if you download any textures from any of the free texture sites, and want to make them seamless in paintshop pro, the first tool you need to use will be the clone brush, and changing all brush settings to maintain as much detail as possible


and then you need the seamless tiling image effect set to edge and bidirectional


xht_002

Member
Sep 25, 2018
342
352
you can have a free texture, made using paintshop pro and the clone brush

original image :

modified attached

seamless_clone_brushl.jpg

you don't need to spend a million dollar's on photoshop

you can clean up a few bits and pieces on the attach image yourself if you want to use it
 

polywog

Forum Fanatic
May 19, 2017
4,062
6,257
you don't need to spend a million dollar's on photoshop
Adobe has always been very generous. Any student can get full working creative suite for free for a few years.
Even if you're not a student... go to Adobe.com
create an account, login to your new account, click on downloads
some older versions are free, full working licensed software, not demos
 

OhWee

Forum Fanatic
Modder
Game Developer
Jun 17, 2017
5,655
28,449
BTW, for image editing, GIMP is still free and open source, guys and gals. Always has been!


It has Mac, Windows, and Linux versions available.

Blender and GIMP. The ultimate open source creation combo!
 
  • Like
Reactions: The Japanese

xht_002

Member
Sep 25, 2018
342
352
BTW, for image editing, GIMP is still free and open source, guys and gals. Always has been!


It has Mac, Windows, and Linux versions available.

Blender and GIMP. The ultimate open source creation combo!
paintshop does everything, from your photo galleries to touchups, to DLSR stuff, to be an freehand artist, to vectors, to anything your like, with photoshop plugin support for a 1 time $80 payment if you don't find a $10 key on ebay

and no lame account needed
 

OhWee

Forum Fanatic
Modder
Game Developer
Jun 17, 2017
5,655
28,449
paintshop does everything, from your photo galleries to touchups, to DLSR stuff, to be an freehand artist, to vectors, to anything your like, with photoshop plugin support for a 1 time $80 payment if you don't find a $10 key on ebay

and no lame account needed
I'm sure Paint Shop is a decent program. It's obviously no Photoshop killer though, otherwise Photoshop wouldn't be the standard...

As I said before, GIMP is 100% free, although they do accept donations. No license required. Just download and go. Gimp also supports .psd natively, to a point of course!

Note: I still use Photoshop (albeit an older version), but I took a stab at GIMP a few years back. It's improved significantly since I tried it, but it was a pretty capable program even back then. I like my Adobe Styles too much though, hence why I stick with my older version of Photoshop.

Some people around here like free, especially if it's legally free, in perpetuity, as opposed to some trial offer...

For editing texture maps, you often simply don't need a whole lot of the extra bells and whistles that is packaged with the 'higher end' programs these days. Sure, they can be nice to have, but most people around here will be doing simple things like making icons for games and editing texture maps. The premium programs are more capable sure, but are generally overkill for most people looking to just make a modest indie game, hence why they are using Daz Studio or some similar relatively inexpensive/free program to generate their renders.

GIMP may not be for everyone, as the learning curve and alternate methodology (less intuitive is a common observation) can be a bit of a pain for some, but some people around here do weird things like use Linux, etc... Plus, the open source community loves it when you use their stuff! Like those Blender guys...

Adobe STILL doesn't offer a version of Photoshop for Linux... GIMP has a Linux version at least. Yeah most people don't care about Linux support, but some do! There's some diehards on the Daz forum that have managed to get Daz Studio working on Linux (via WINE of course).

Someone did take a stab at making GIMP more Photoshop like in it's workflow (GIMPShop), but that project stalled at 2.8. Gimp is at 2.10 currently...

Plus, some people really don't like to encourage the subscription model, and like to fight it any way they can. By using alternatives from companies and open source projects that aren't onboard with the subscription model in any way shape or form, for example. Plus, Open Source is doing their part to keep prices down for everyone else to some degree. Why pay for extra capability you won't use if you can just get what you need for free? If more people use Open Source stuff, more companies will need to adapt to attract those consumers if they want their business (i.e. lower their prices, etc.). Plus, if the Open Source guys end up with more donations in the process, and invest said donations into improving their software, well that's good too!

Some people prefer the subscription model, which is their decision of course! But as a consumer, I personally avoid it like the plague when I can. Hence why I personally still use an older version of Photoshop - Adobe wasn't doing the subscription thing back then, and my ancient version still holds up quite nicely even today for what I use it for.

Anyways, I've said my peace about GIMP and supporting Open Source alternatives. It may or may not be of interest to the OP'er.

As for keys you may find for various programs on Ebay, you roll your dice and take your chances. But then that's been an issue with just about everything you find on Ebay. Some sellers have stellar reputations, others not so much... good luck with the refund and hopefully your CC info isn't compromised in the process if things go awry! Oh, and hopefully you don't run into issues with illegally obtained keys (even though you bought it, it doesn't automatically mean that it was acquired legally by the seller).

This being a bucaneer forum and all, though, OF COURSE if you want to go down the dark path instead, there are lots of options... I think there are still some relevant downloads in the Assets section for the bucaneer types!

But I digress...

We really should get back on topic though (sorta). The OP was looking for free/cheap suggestions for creating custom rooms, so the conversation should focus on that. Image editing software has a role in that, sure, but the merits of the various software options have been discussed at length in other threads already, and we REALLY should have a dedicated thread for that by now, as that in of itself is a huge and very relevant topic for everyone, be they game designers, artists, or Just average Joes and Janes that want to edit an image occasionally or make a meme.

The 'how to edit the edges of an image so that the texture map tiling is continuous/seamless' thing is of course HIGHLY relevant to this conversation. But that's not necessarily program specific, as most photo editing programs have the clone tool these days.


Of course, if there is an automated tool out there that 'mates' your edges to each other to make your texture map tiling seamless, THAT would be an awesome find! Anyone know of one?


BTW, Apologies again to the OP for my contribution to the temporary derailing of this thread, but hopefully the back and forth has given you some ideas r.e. photo/image editing options and the various programs involved.
 
  • Like
Reactions: The Japanese

xht_002

Member
Sep 25, 2018
342
352
if you want free and don't get on with GIMP, try
its alot faster to use then GIMP for quick editing of things
 

Xyze

Member
Modder
Dec 30, 2018
149
805
Hey xht_002

I've tried your tutorial, but I don't know if I do something wrong (I'm little noobish on Daz), but when I try to apply any Iray shader on any node of my "house" Daz do nothing and no texture is applied on my wall. I followed all the step you described but unfortunately the shader doesn't apply :/
 

recreation

pure evil!
Respected User
Game Developer
Jun 10, 2018
6,253
22,168
Hey xht_002

I've tried your tutorial, but I don't know if I do something wrong (I'm little noobish on Daz), but when I try to apply any Iray shader on any node of my "house" Daz do nothing and no texture is applied on my wall. I followed all the step you described but unfortunately the shader doesn't apply :/
You have to select the surface you want to apply the shader to in the surface tab.
 
  • Like
Reactions: Xyze

Turitar707

Member
Nov 17, 2019
126
211
First up you will need to download pCon Planner from

pCon planner tutorials will teach you how to make a basic room, so I will not bother....

.....
Thank you.
I guess I will give it a try. I need something to create facades :)
 

GNVE

Active Member
Jul 20, 2018
634
1,105
I'm having trouble applying textures. As in they are not showing up or are otherwise not applied correctly.
In this example I have applied a tile texture as you can see here:
1584275860003.png

In renders it just shows as a plain surface:
1584275954703.png

In another experiment the texture sort of shows up on a wall but not on the floor. I know it is not the texture pack (which I have used extensively and other textures have the same issue) What am I missing/doing wrong?
1584277038005.png
 

ttrreess

Newbie
Feb 26, 2019
34
58
I don't know if this helps, but here is the text from a post made in Sept. 2019 on the Daz forums. Here is the original thread: . I have taken the original poster's text and aggregated it below. I'd like to hear back if this helps or if there's anything you'd add.

----- Text from the post -----
(pCon Plannr is) a program that allow's you to create your own room's quick and easy for interior designing, but also export's to collada so the geometry room's are in scale with Daz charector's after an import. it can also help converting 3ds model's to fbx by just double clicking on the 3ds file and then exporting to fbx, and also export sketchup warehouse model's used

you need to texture everything in p.Con planner to add UV map's if you want to add custom Iray shader's in Daz

(snip)

its quick and painless, if you want todo the little detail's, you can import the geometry into or another CAD program

(snip)

ungroup everything in p.Con planner, before you start in the edit tab, then you can delete the 2d images and material all of it using the materials in the start tab, then edit material size, rotation, scale in the material editor under the edit tab

(snip...)
----- End text from the post -----

I'm just starting to learn Daz and pCon Planner, so I'm not sure I'm understanding everything the poster is talking about. Any clarification would be greatly appreciated. Plus, thanks to you all for all the helpful posts!! :)
 
  • Like
Reactions: p_staker

recreation

pure evil!
Respected User
Game Developer
Jun 10, 2018
6,253
22,168
I'm having trouble applying textures. As in they are not showing up or are otherwise not applied correctly.
In this example I have applied a tile texture as you can see here:
View attachment 587294

In renders it just shows as a plain surface:
View attachment 587295

In another experiment the texture sort of shows up on a wall but not on the floor. I know it is not the texture pack (which I have used extensively and other textures have the same issue) What am I missing/doing wrong?
View attachment 587323
I'm probably a bit late here, but pcon sometimes exports objects with extremely small or big size, so when importing in daz they can have a scale of 1% or even 10k% of the original, this might be the reason why the textures aren't visible, if they get scaled too much too.
Oh and of course you'll have to add textures on the surface before exporting.

I don't know if this helps, but here is the text from a post made in Sept. 2019 on the Daz forums. Here is the original thread: . I have taken the original poster's text and aggregated it below. I'd like to hear back if this helps or if there's anything you'd add.

----- Text from the post -----
(pCon Plannr is) a program that allow's you to create your own room's quick and easy for interior designing, but also export's to collada so the geometry room's are in scale with Daz charector's after an import. it can also help converting 3ds model's to fbx by just double clicking on the 3ds file and then exporting to fbx, and also export sketchup warehouse model's used

you need to texture everything in p.Con planner to add UV map's if you want to add custom Iray shader's in Daz

(snip)

its quick and painless, if you want todo the little detail's, you can import the geometry into or another CAD program

(snip)

ungroup everything in p.Con planner, before you start in the edit tab, then you can delete the 2d images and material all of it using the materials in the start tab, then edit material size, rotation, scale in the material editor under the edit tab

(snip...)
----- End text from the post -----

I'm just starting to learn Daz and pCon Planner, so I'm not sure I'm understanding everything the poster is talking about. Any clarification would be greatly appreciated. Plus, thanks to you all for all the helpful posts!! :)
What exactly is the question? What is it you didn't understand?
 
Last edited:

GNVE

Active Member
Jul 20, 2018
634
1,105
Don't worry I had the files saved so nothing lost. :) Thanks for both your help that was indeed the problem. I've got it working now.
 
  • Like
Reactions: recreation

ttrreess

Newbie
Feb 26, 2019
34
58
What exactly is the question? What is it you didn't understand?
Hi Recreation,

Sorry for the confusion. The blog I was quoting from was speaking of needing to do some specific things to be able to use Iray in Daz, but exactly what and where wasn't really clear to me, and I don't even know if it is accurate. What I'd like to do is some custom modeling in pCon Planner, as well as bringing in models there, and then be able to open them in Daz and use Iray shaders. So putting that whole blog aside, what I'd like to know is what is the best way to bring a model into Daz from pCon and then be able to use Iray shaders, textures, etc. Are if there are any tricks to doing that? Can you use textures from pCon in Daz? Or is it better to just bring shapes in pCon and then add shaders and textures in Daz? You've already touched on the texture scaling issues (thanks for that!!), but is there anything else that needs to be taken into consideration? Thanks in advance for your help. :)