
Tutorial [ILLUSION] HS2 Studio Neo|Chara Maker - (Help & guides Thread)
- Thread starter hun hunter
- Start date
5.00 star(s)
2 Votes
AmaNo04
Active Member
- Jul 6, 2020
- 883
- 750
- 278
No AFAIK.Sorry if this has been asked before; is there a male uncensor out there with a functional anus that works similar to female BP type orifices?
AmaNo04
Active Member
- Jul 6, 2020
- 883
- 750
- 278
Not being offensive, but I dont think ever seen anyone made gay scene.A shocking neglect of our gay comrades
Even for femdom scene, I never seen a scene that focusedd at the male anus.
You can circumvent this just but making a girl that looks like a boy. You can do that fairly easy, but it will take you some time until you get the hang of the char editor. There are a lot of addons you can put on the females char to make that happen.A shocking neglect of our gay comrades
Anyways, you gotta understand how the real world works, people do things on demand, and not because some political party or supremacist/separatist group (aka lgbt) is trying to enforce a trend or something. If someone decides to make mods of animated male holes, that is fine. But don't expect to be the rule in this comunity. Here things are on demand, and nobody is doing that stuff, for now. If you want to start a trend, be our guest.
Don't get depress or something, this is how things are in reality. Freedom without enforcing.
- Jun 7, 2023
- 69
- 158
- 170
just bepisdb female but tag male or smth like thisYou can circumvent this just but making a girl that looks like a boy. You can do that fairly easy, but it will take you some time until you get the hang of the char editor. There are a lot of addons you can put on the females char to make that happen.
Anyways, you gotta understand how the real world works, people do things on demand, and not because some political party or supremacist/separatist group (aka lgbt) is trying to enforce a trend or something. If someone decides to make mods of animated male holes, that is fine. But don't expect to be the rule in this comunity. Here things are on demand, and nobody is doing that stuff, for now. If you want to start a trend, be our guest.
Don't get depress or something, this is how things are in reality. Freedom without enforcing.
You must be registered to see the links
Oh, I was joking. I don't care about any of that in the way you took it; I have no political view, expectations, or entitlement in that regard. I like femboys with flat male chests, and was having trouble de-breastifying a female model in a convincing way. I'll just keep tweaking until I get it right. No worries. I will say though (without judgement) that the category ratio of HS2/AI scene types I've come across was interesting to me, with almost no gay content but an overwhelming amount of NTR, much of it raceplay. Funny how every community is different.You can circumvent this just but making a girl that looks like a boy. You can do that fairly easy, but it will take you some time until you get the hang of the char editor. There are a lot of addons you can put on the females char to make that happen.
Anyways, you gotta understand how the real world works, people do things on demand, and not because some political party or supremacist/separatist group (aka lgbt) is trying to enforce a trend or something. If someone decides to make mods of animated male holes, that is fine. But don't expect to be the rule in this comunity. Here things are on demand, and nobody is doing that stuff, for now. If you want to start a trend, be our guest.
Don't get depress or something, this is how things are in reality. Freedom without enforcing.
Cheers, I'll give that a try as well.just bepisdb female but tag male or smth like this
You must be registered to see the links
Listen, no harm done here. But you stated: "A shocking neglect of our gay comrades". That's a demand, using guilt as a weapon. Don't do that. Only undermine your request. It's like you are waving a flag here, and we are all perverts around, my brotherOh, I was joking. I don't care about any of that in the way you took it; I have no political view, expectations, or entitlement in that regard. I like femboys with flat male chests, and was having trouble de-breastifying a female model in a convincing way. I'll just keep tweaking until I get it right. No worries. I will say though (without judgement) that the category ratio of HS2/AI scene types I've come across was interesting to me, with almost no gay content but an overwhelming amount of NTR, much of it raceplay. Funny how every community is different.
Cheers, I'll give that a try as well.
As some other pointed, and I said you can actually make some pretty good femboys out of the female bodies. You have A LOT more of assests to play around, too.
You can start using whatever card you want and add penises and/or using shemale replacers. Sadly I think those don't have BP on them, but the tools are there. If you know how to fiddle around with blender, I think you can pull that off.
Have fun, brother!
Yeah, that was an entirely tongue-in-cheek statement. I'm not under the impression that I'm able to guilt people on a peepee-whacking forum to do anything, regardless.Listen, no harm done here. But you stated: "A shocking neglect of our gay comrades". That's a demand, using guilt as a weapon. Don't do that. Only undermine your request. It's like you are waving a flag here, and we are all perverts around, my brother
Have fun, brother!
Renpy changing my videos color to a redder tint. is there any way to change this? its break immersion pretty badly.. edit: and big quality degradation as well.. such a shame. edit2: for others coming across this problem, it seem you need bt601 colour.. something, im in the process of learning more about it and testing but atleast youll have that potentially clue.
Last edited:
Crishbatin
New Member
- Nov 15, 2023
- 9
- 1
- 45

AmaNo04
Active Member
- Jul 6, 2020
- 883
- 750
- 278
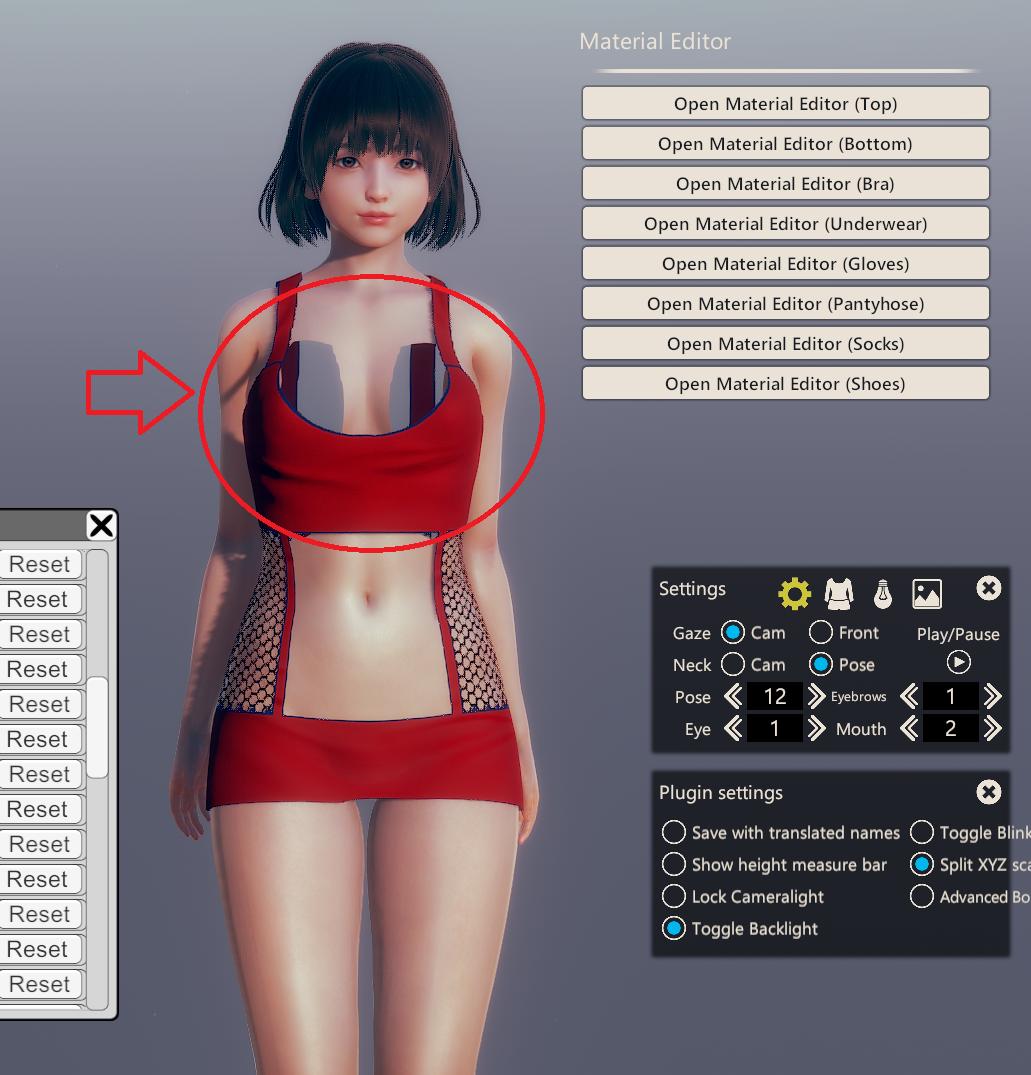
Play around with the bone slider and choose the correct uncensor if you want it to be "puffy" around the areola.View attachment 4983966
Can someone tell me how to fix boobs shape, is it normal if it's not round shaped?
You don't have permission to view the spoiler content.
Log in or register now.
You don't have permission to view the spoiler content.
Log in or register now.
Sorry to bother, but I was wondering if you ever posted your scene or character data anywhere? I checked around for your patreon but it seems gone. Are they private now?Play around with the bone slider and choose the correct uncensor if you want it to be "puffy" around the areola.
AmaNo04
Active Member
- Jul 6, 2020
- 883
- 750
- 278
I closed up my patreon a year ago but I'm planning to reopen it soon.Sorry to bother, but I was wondering if you ever posted your scene or character data anywhere? I checked around for your patreon but it seems gone. Are they private now?
Crishbatin
New Member
- Nov 15, 2023
- 9
- 1
- 45
Please give me the specific part which have to set to make it round shaped? i can't find the proper slider mune part which make it worsePlay around with the bone slider and choose the correct uncensor if you want it to be "puffy" around the areola.
You don't have permission to view the spoiler content. Log in or register now.You don't have permission to view the spoiler content. Log in or register now.
AmaNo04
Active Member
- Jul 6, 2020
- 883
- 750
- 278
Mune00 is for the base.Please give me the specific part which have to set to make it round shaped? i can't find the proper slider mune part which make it worse
Mune01 and mune02 are for the middle parts.
Mune03, mune04 are for the tip (affect the nipple part).
Just play around the mune01 and mune02 for the general shape.
I know there is cause I saw it once. Pretty sure they were originally on arca, but also saw them on BP. Having said that, I got the feeling that BP recently purged a lot of stuff so don't know if they'll still be there. Worth a shot looking though.Does anyone knows if there are complete sailor moon character cards for hs2? Illusioncards.booru.org have some sailor moon themed character cards but when I download it, nothing shows up in the studio. It means it is not for honey select 2.
Sena has some sailor clothings but I just wanna know if there are direct character cards for that. Because I am someone who usually never satisfied with my own work. So if I try to create one, probably there will always be a flaw(for me) especially in the head and face section.
- Nov 11, 2017
- 306
- 143
- 276
Thanks for the info. Already have my own version after downloading so many cards from illusion.booru and db.bepis.moe, and 1 more site I forgot is it kenzato or others. Do you mean db.bepis.moe or other site by BP?I know there is cause I saw it once. Pretty sure they were originally on arca, but also saw them on BP. Having said that, I got the feeling that BP recently purged a lot of stuff so don't know if they'll still be there. Worth a shot looking though.
OSHAViolation2025
Newbie
- Jul 28, 2017
- 89
- 228
- 195
Absolute dogshit of community. No one is willing to help nor even try to. I found the compatible plugin, which is not included in this package. Many others seem to have done this too, as they are able to export the models without any issues, and at the same time, those are the fuckers who are not willing to help. Absolute cinema of human scum.
You don't have permission to view the spoiler content.
Log in or register now.
Last edited:
Illhoon
Active Member
- Jul 7, 2019
- 531
- 637
- 260
hi i just wanted to say the links to the coordinates etc are offline still managed to get a smoewhat desired result thanks so much for the guides ![Guide] edit/create and load textures on materialeditor and clothes overlay plugins
A.1. Textures:
generally, when there is a clothing that has edited (texture), you will have to load that to (main tex) using the "material editor" plugin. it also should load automatically with character or coordinate cards as data are saved and embedded in there. so you do not have to even download the texture nor have it in the "materialeditor" folder if the card you have downloaded or created is saved with those edits. "game root\userdata\materialeditor".
IMPORTANT NOTE:
avoid using a coordinate card with texture or materialeditor edits as those edits will also apply to all clothes of the same type you change later on.
usingYou must be registered to see the linkscoordinate card which has an edited texture for a dress will work perfectly on that type of clothing as the texture is matching the geometry of the dress's mesh. but when changing to another top like lets say a T-shirt, the texture will still be loading. and since a t-shirt's mesh geometry is different than a dress, the texture will also wrap differently. (i dont really know why, probably something about how materialeditor is saving data on cards?).

even if you save the chara in to a card, this will continue to happen whenever this card is loaded. so as you can see it is not so convenient, at least for now. but until this is fixed, here is how to manually load the texture using materialeditor:
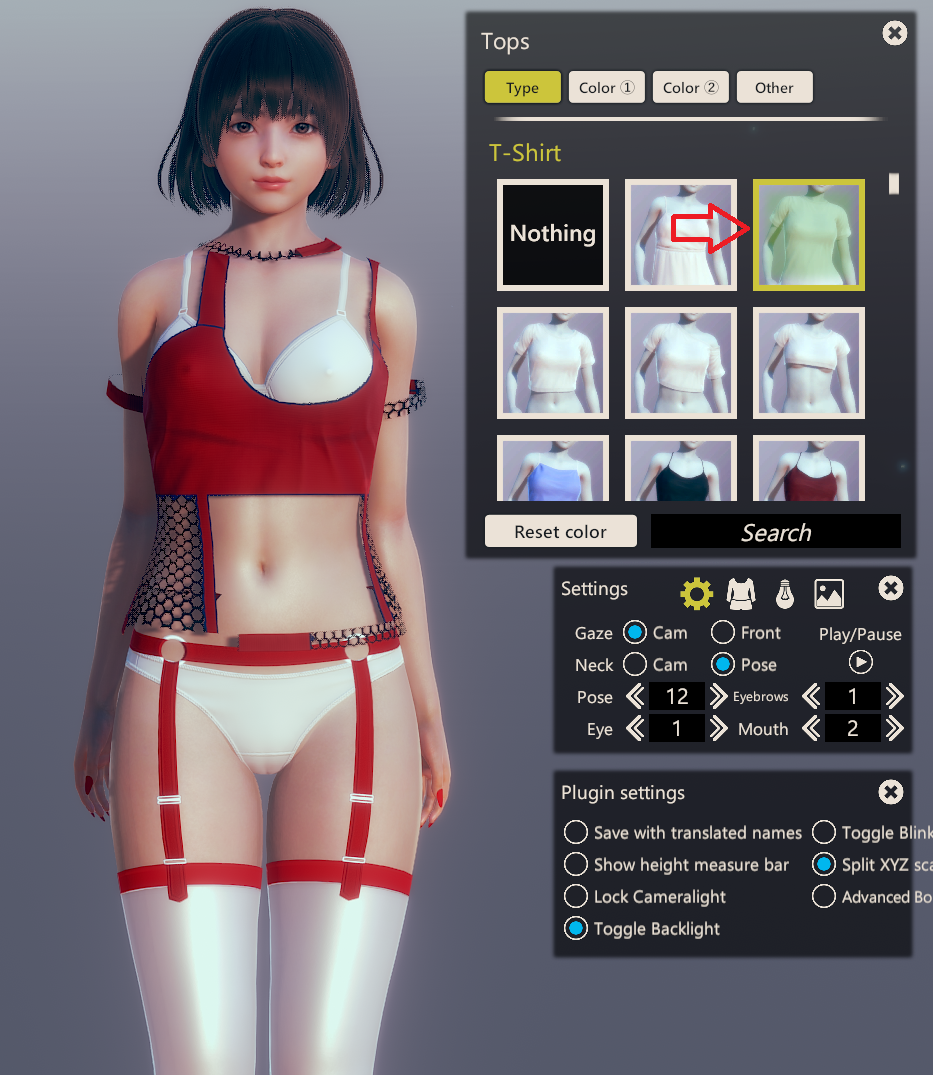
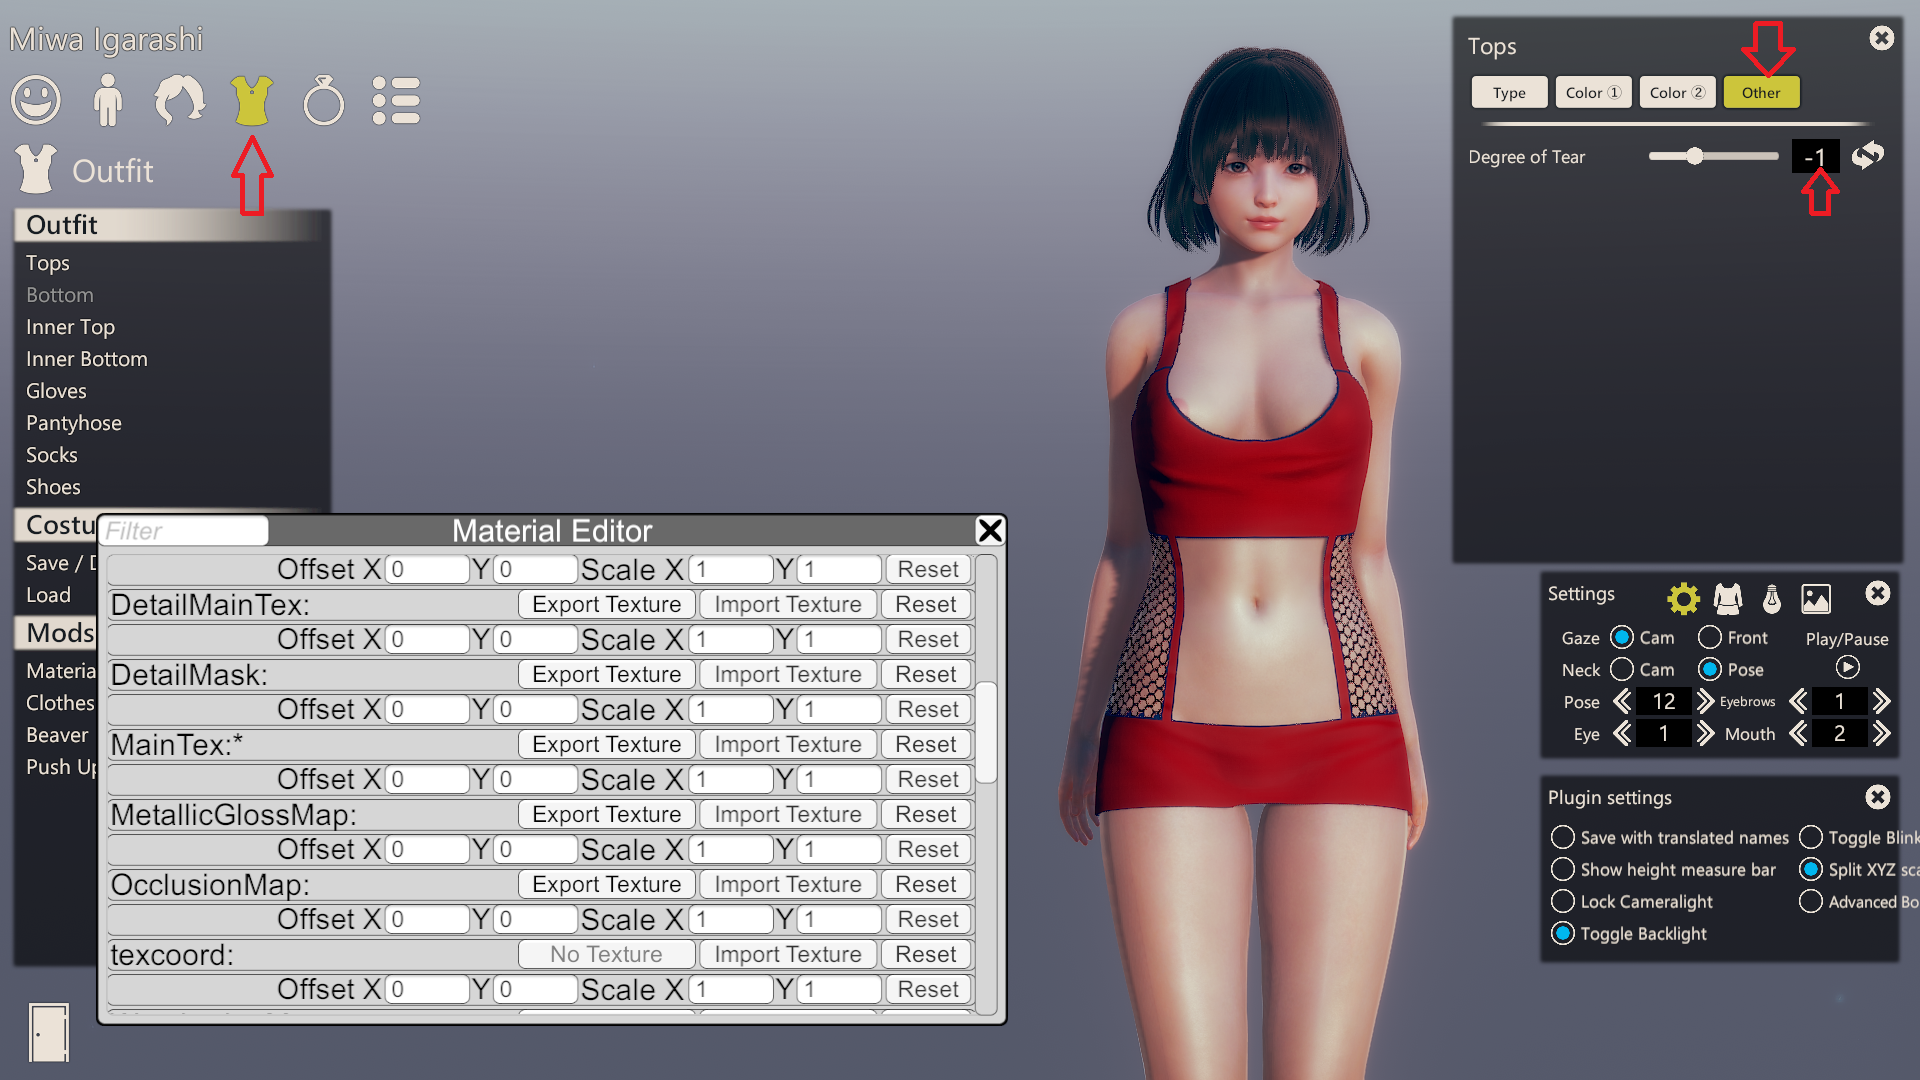
1. i will be using the sameYou must be registered to see the linksandYou must be registered to see the linksfor this example, download both then go ahead and load the coordinate card on a character like before. this will let you know what base top the modder used and edited/created a texture for (the simple dress).
2. do not save that chara and reload it again to get ride of the texture edits, then go to tops, and select the vanilla simple dress.
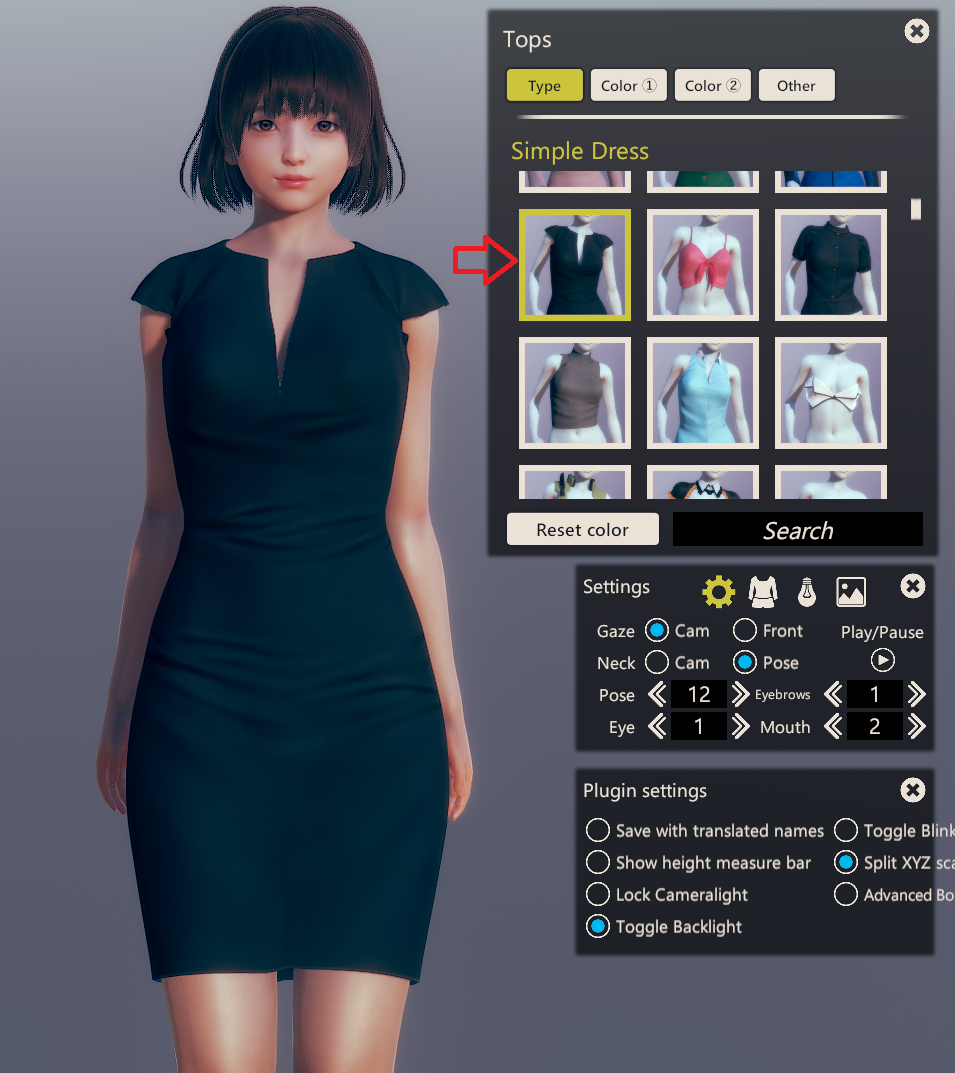
3. now click on the materal editor button on the left to open the menu and scroll down until you find the "main tex" property, click "import texture". a window will appear and allow you to brows through your textures (make sure you are searching the right directory) select the one you downloaded previously and press "open".
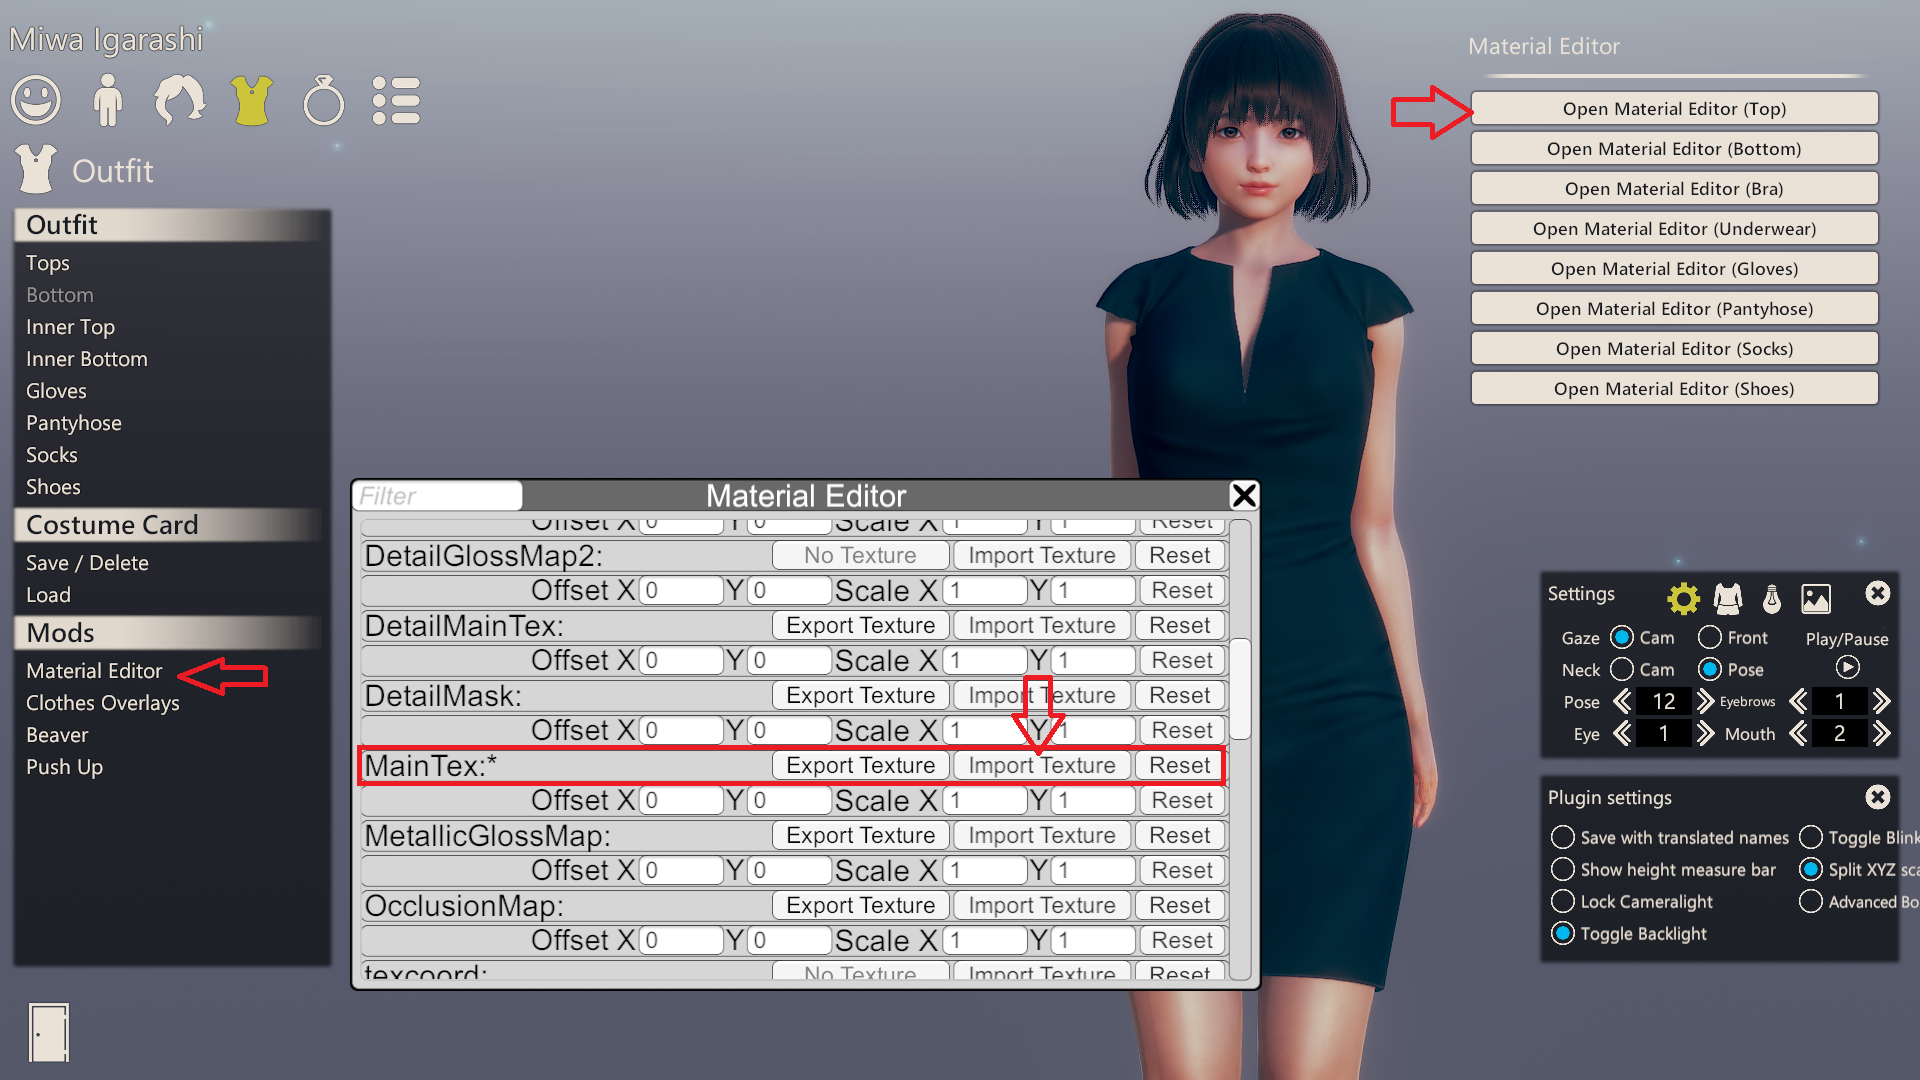
4. some times you will notice that parts of the body are missing (in our example's case, it does), that is because the original unity player for the top does not include a mesh for those body parts (it is what i believe at least) or maybe it is masking them out to avoid clipping.
but, an easy way to fix this is to open the top menu then drag the "degree of tear" slider on the "other" tab in to a minus value, this will load the full body mesh and the problem is solved. i think that the proper way to fix this is to edit the "occlusion map" if you wish to keep the tear value at 0 but i'll just..do this for now. lazy
and you are done. you also can edit whatever the materialeditor is offering but for now, save that character in to a card. now go ahead and change the top into something else and you will notice that the new top will still have it's original texture and edits. this way this top edit will be saved to the chara card but it will only load for that exact top (initially) and will revert to the default state if the top is changed. it is a useful method if you have a chara with allot of texture edits on different clothes and accessories, you can load the outfit of a character to another then freely change some of the clothing to something else without maintaining any edits. (maybe sharing chara cards is a better way instead sharing coordinate files to avoid all the trouble. please keep that in mind).
Q. you have a coordinate card and can't find the texture file?
A. easy, load that coordinate, open the material editor and "export texture". there u have it.
A.2. Edit Or Create A Texture
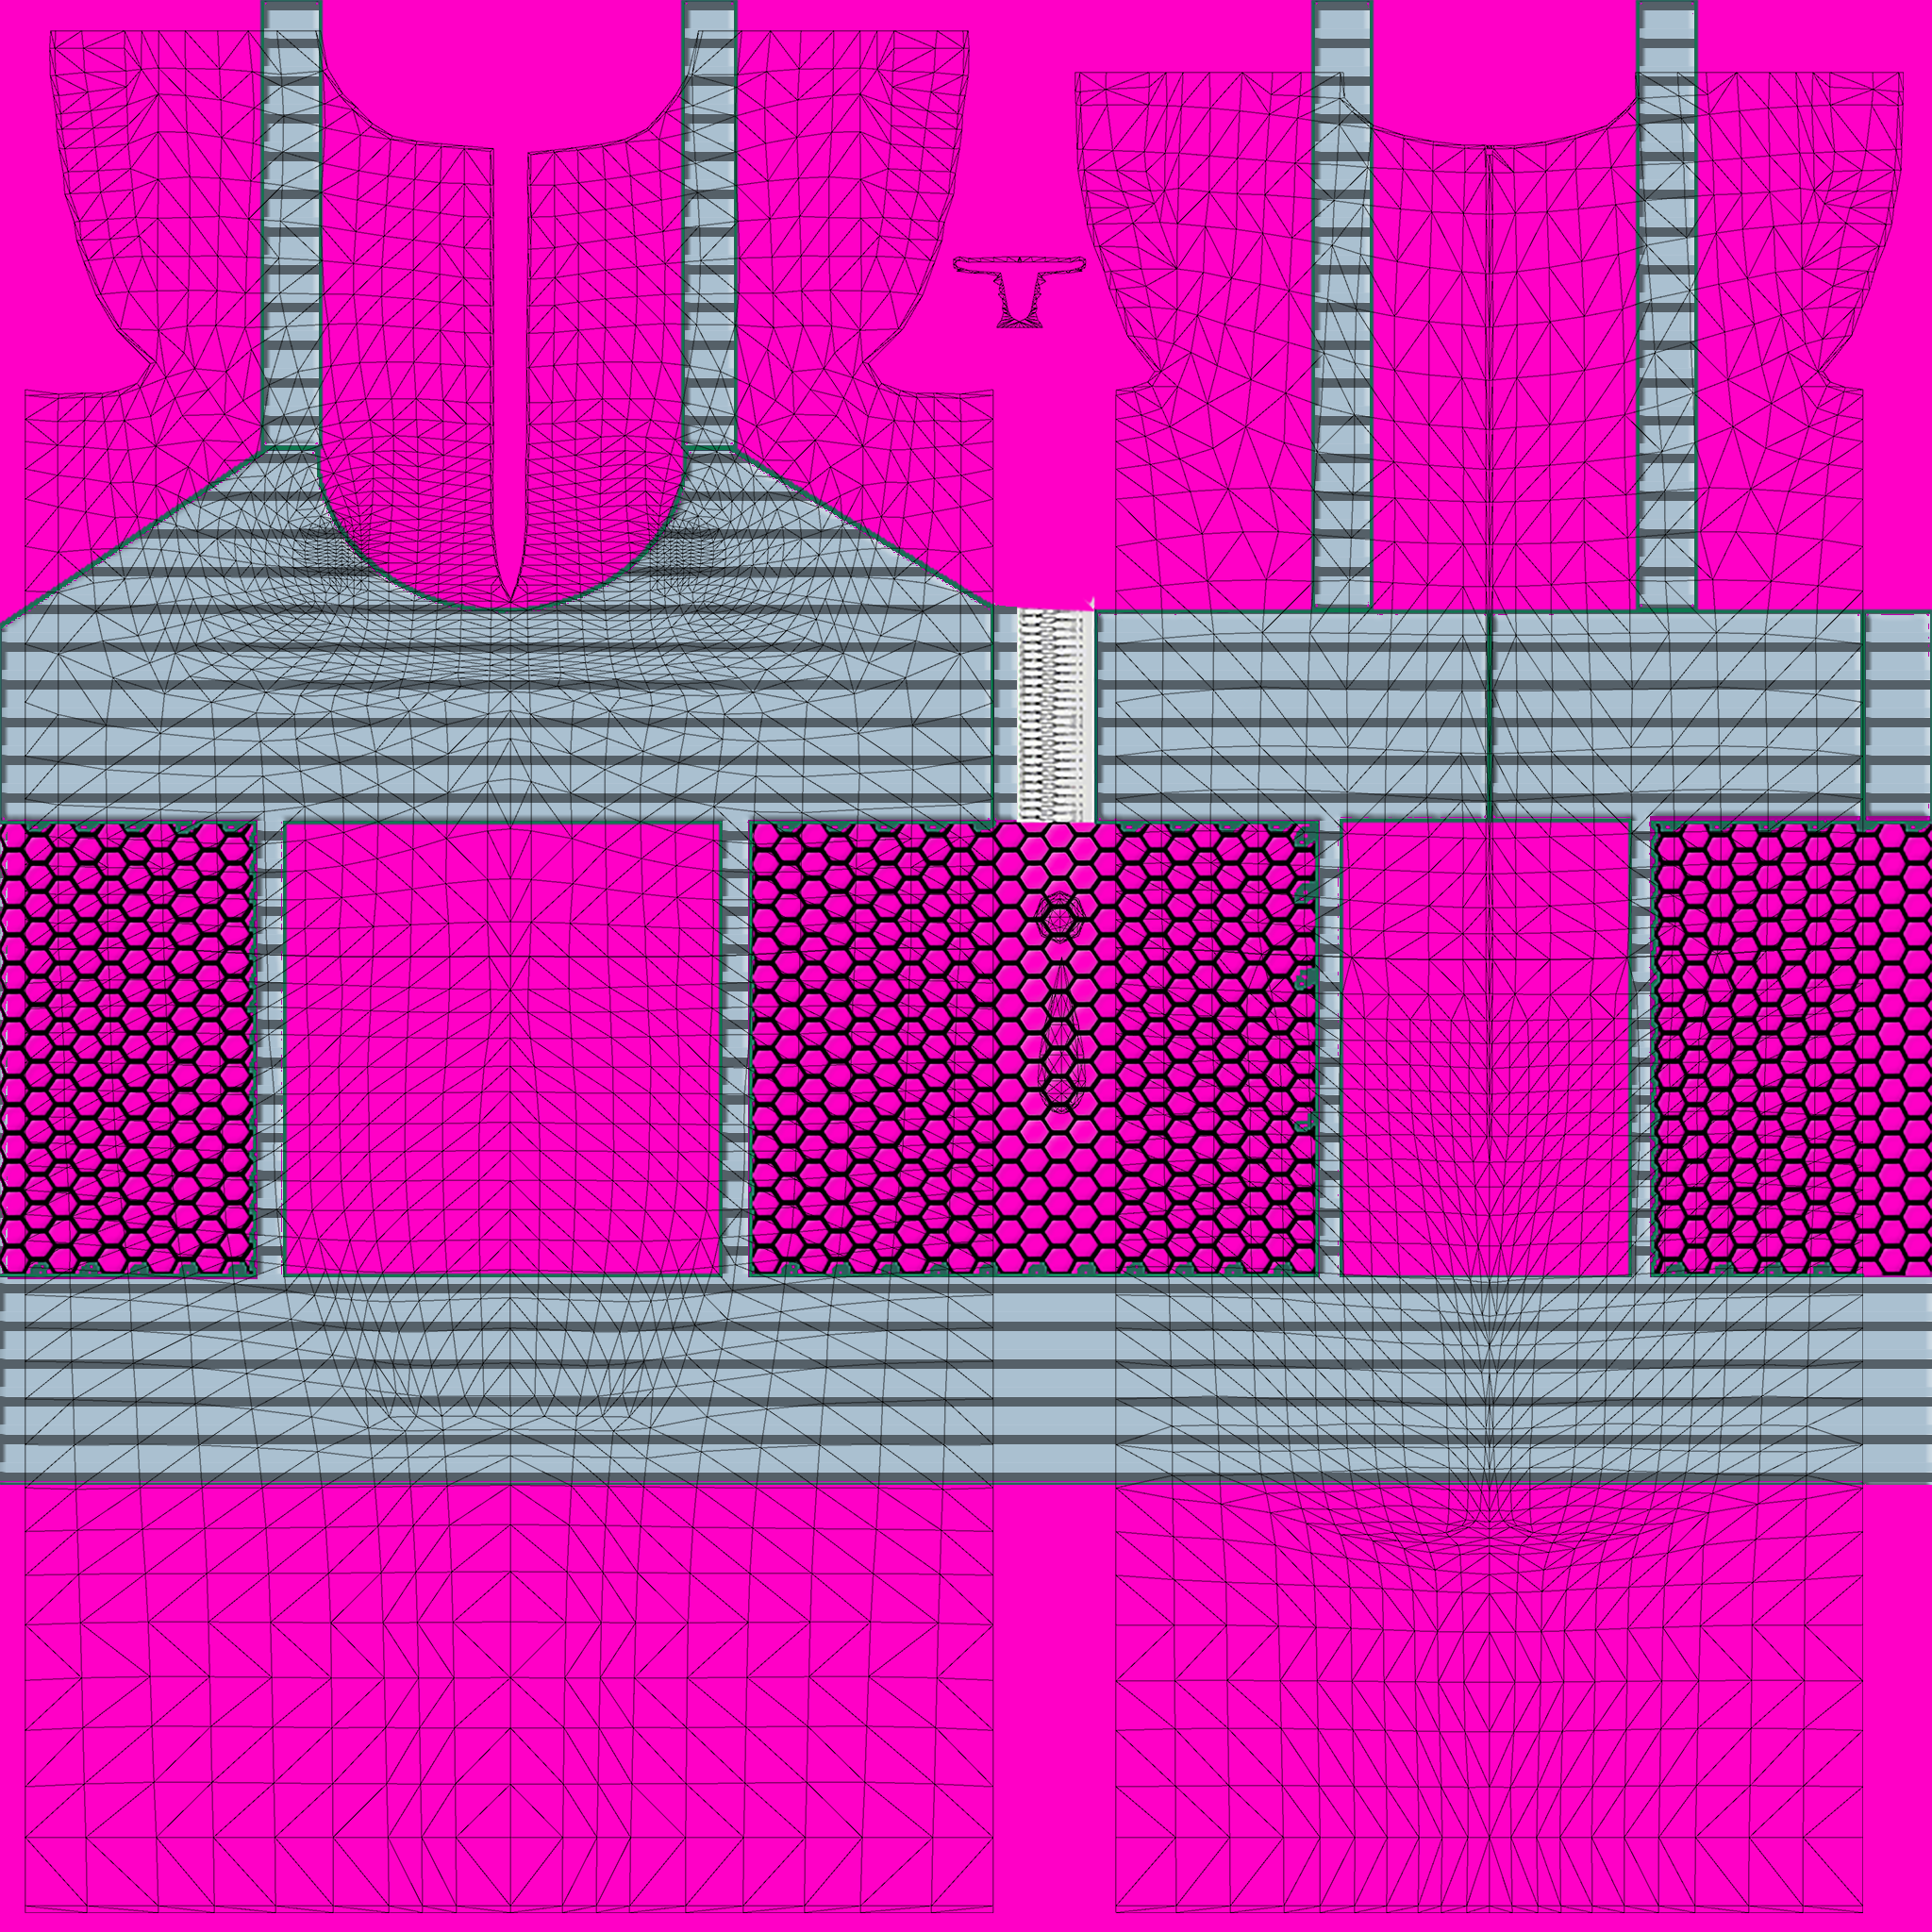
if you wish to edit or even create your own texture from scratch and have the know-how to do it, first scroll up all the way to the top on the materialeditor menu to find the mesh properties and then "export" the UV map for that top, it will show you how is the geometry is spread and use it as a guide to create your texture.

looking at the image above, you will notice that the dress is composed of two parts (top A/b and bottom A/B).
top a = upper part, clothed state
bot a = lower part, clothed state
top b = upper part, half clothed state
bot a = lower part, half clothed state
because it is a full body clothing, you cannot wear bottoms along. but it also means that the dress will be effected by both half clothes states for tops and bottoms but will be handled separately for each part. most top will be conceited of only one mesh or multiple ones if there are ornaments/additions in some cases.
depending on the structure, textures act as a map for all parts usually, but i have seen clothes with multiple textures. in our case we only have one as you already noticed.
since we only need the UV maps as a guide only, half states UV maps wont matter. only export the top a & bot a.
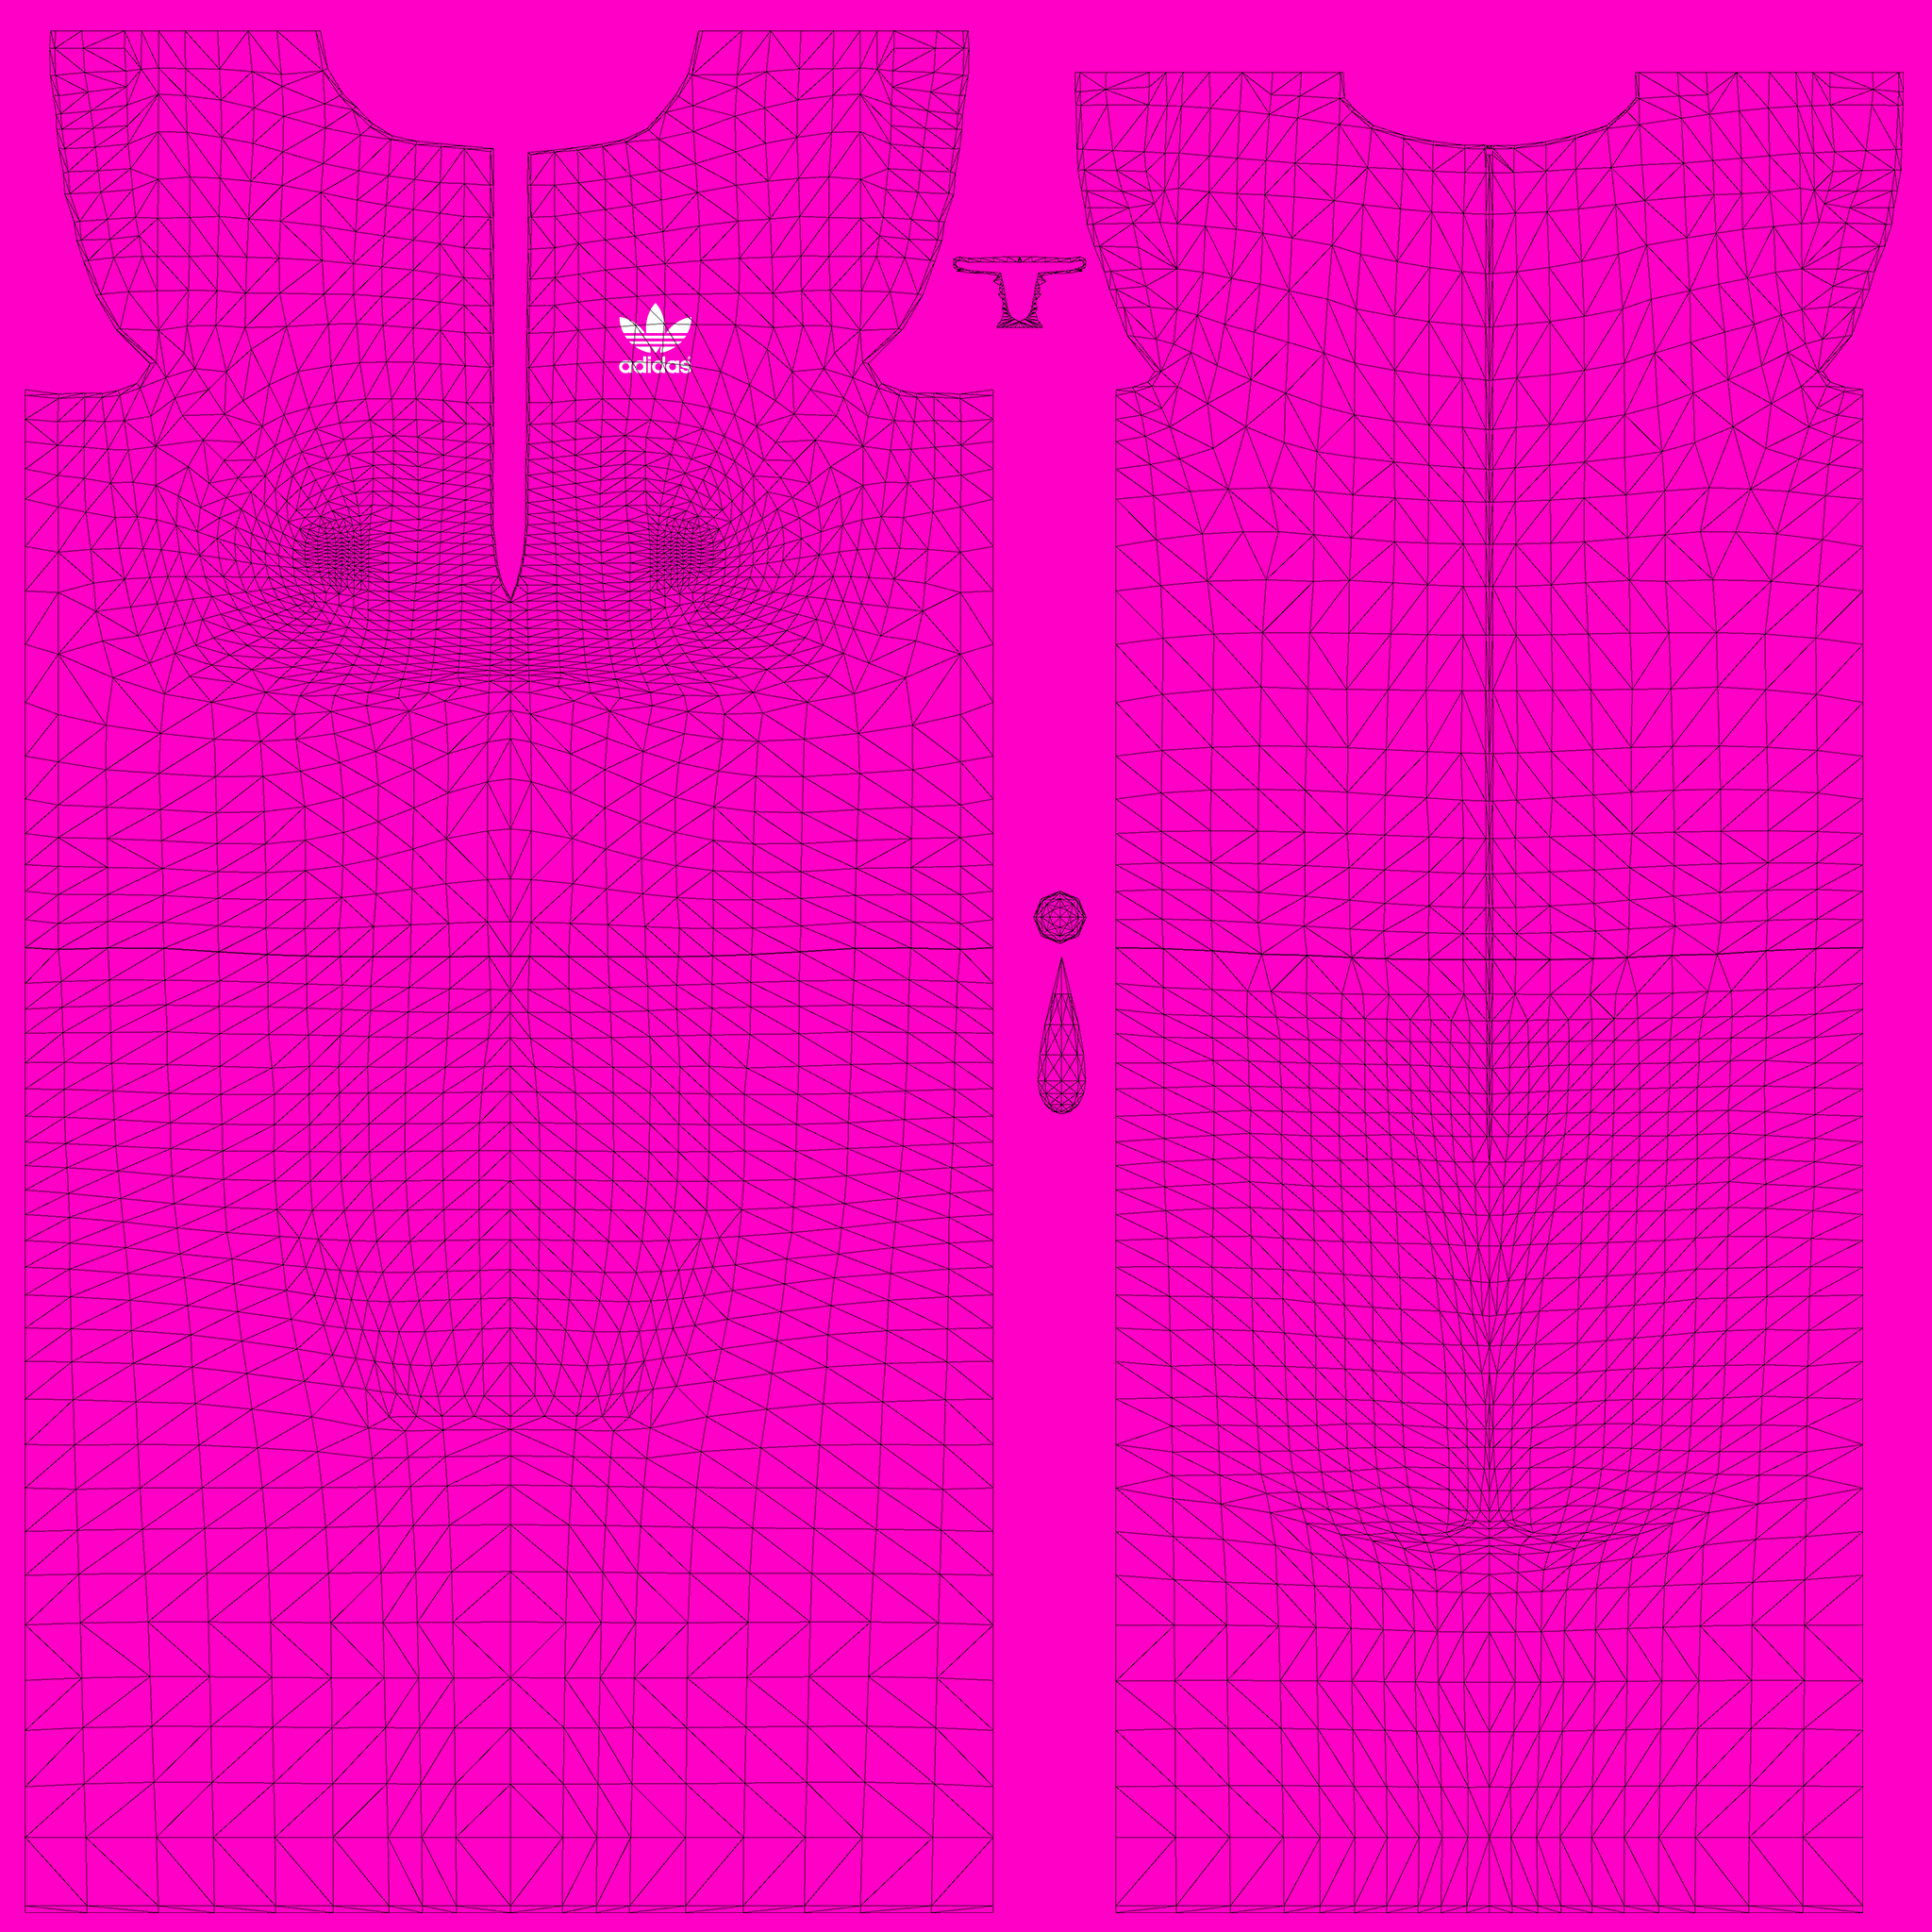
now load both UVs in a photo/paining studio and merge them on the same stage then start creating your own texture on top but on a separate layer, or load any pre-made texture and do your edits. let it be a pattern or just the color of the dress, here is a simple and poorly made edit that i made for the same dress from the example applied to both top and bot UVs.
pink area in this image is only for explanatory purposes and it represents the transparency on the texture.
when you are done with editing remove the UV guides and save your texture, then please follow the same steps above to load it using material editor.
You don't have permission to view the spoiler content. Log in or register now.
NOTE: the final output texture must be in .PNG format with transparency, any transparent area on that image will also be transparent when loaded on the character. can be used to make a skirt shorter, see-through or whatever design needed.
i do not know why the materialeditor is not supporting .DDS format for textures, so stick with .PNG for now.
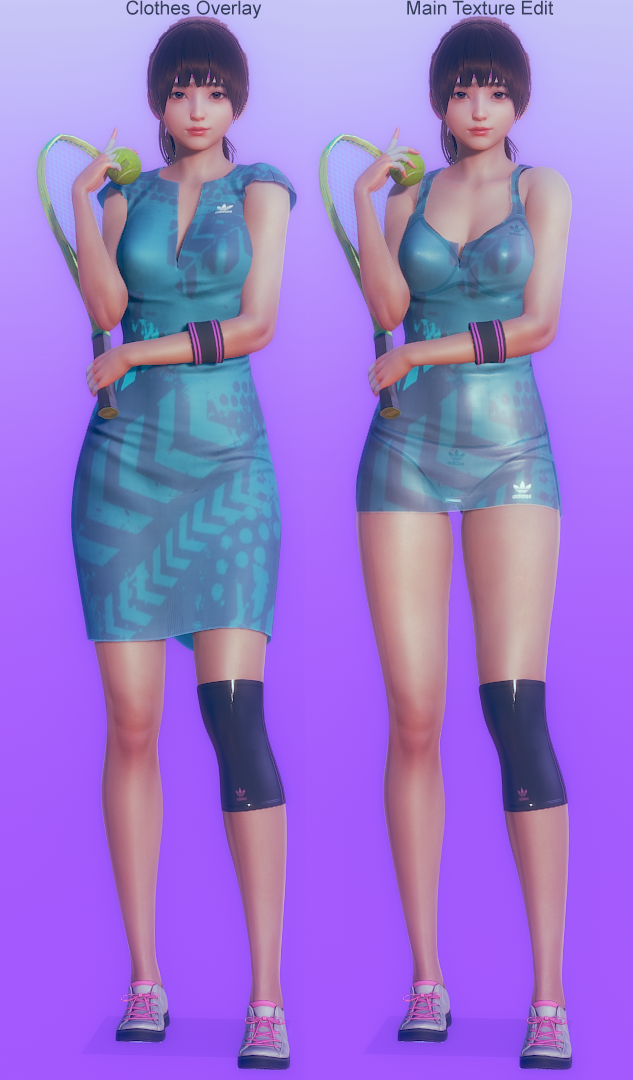
B. Overlays:
NOTE: it looks like clothe overlays and textures added via materialeditor can not be used at the same time for some reason, i hoped that they can coexist before but i was wrong. you will notice that when you attempt to load any clothes overlay to the top we edited earlier it will revert to it's original texture. but anyway, lets continue and add a clothes overlay to something.
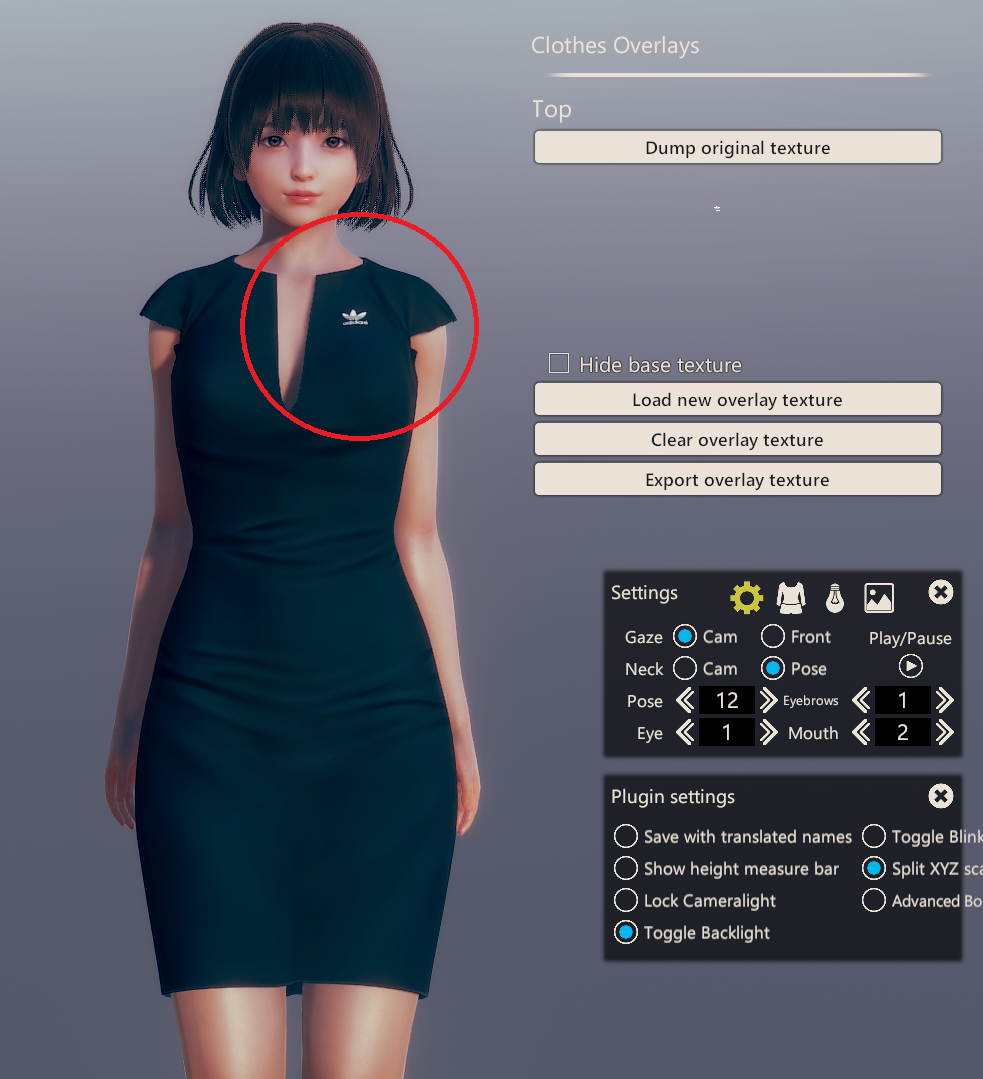
clothes, skin or any other kind of overlay are textures that can be added on top of the main texture of an object, think of it as the body or face paint tattoos. it will maintain the current look of an object but add something else on top of it. in order to add one, select tops then press on the "clothes overlays" button on the left and click on "load a new texture" from the overlay menu.
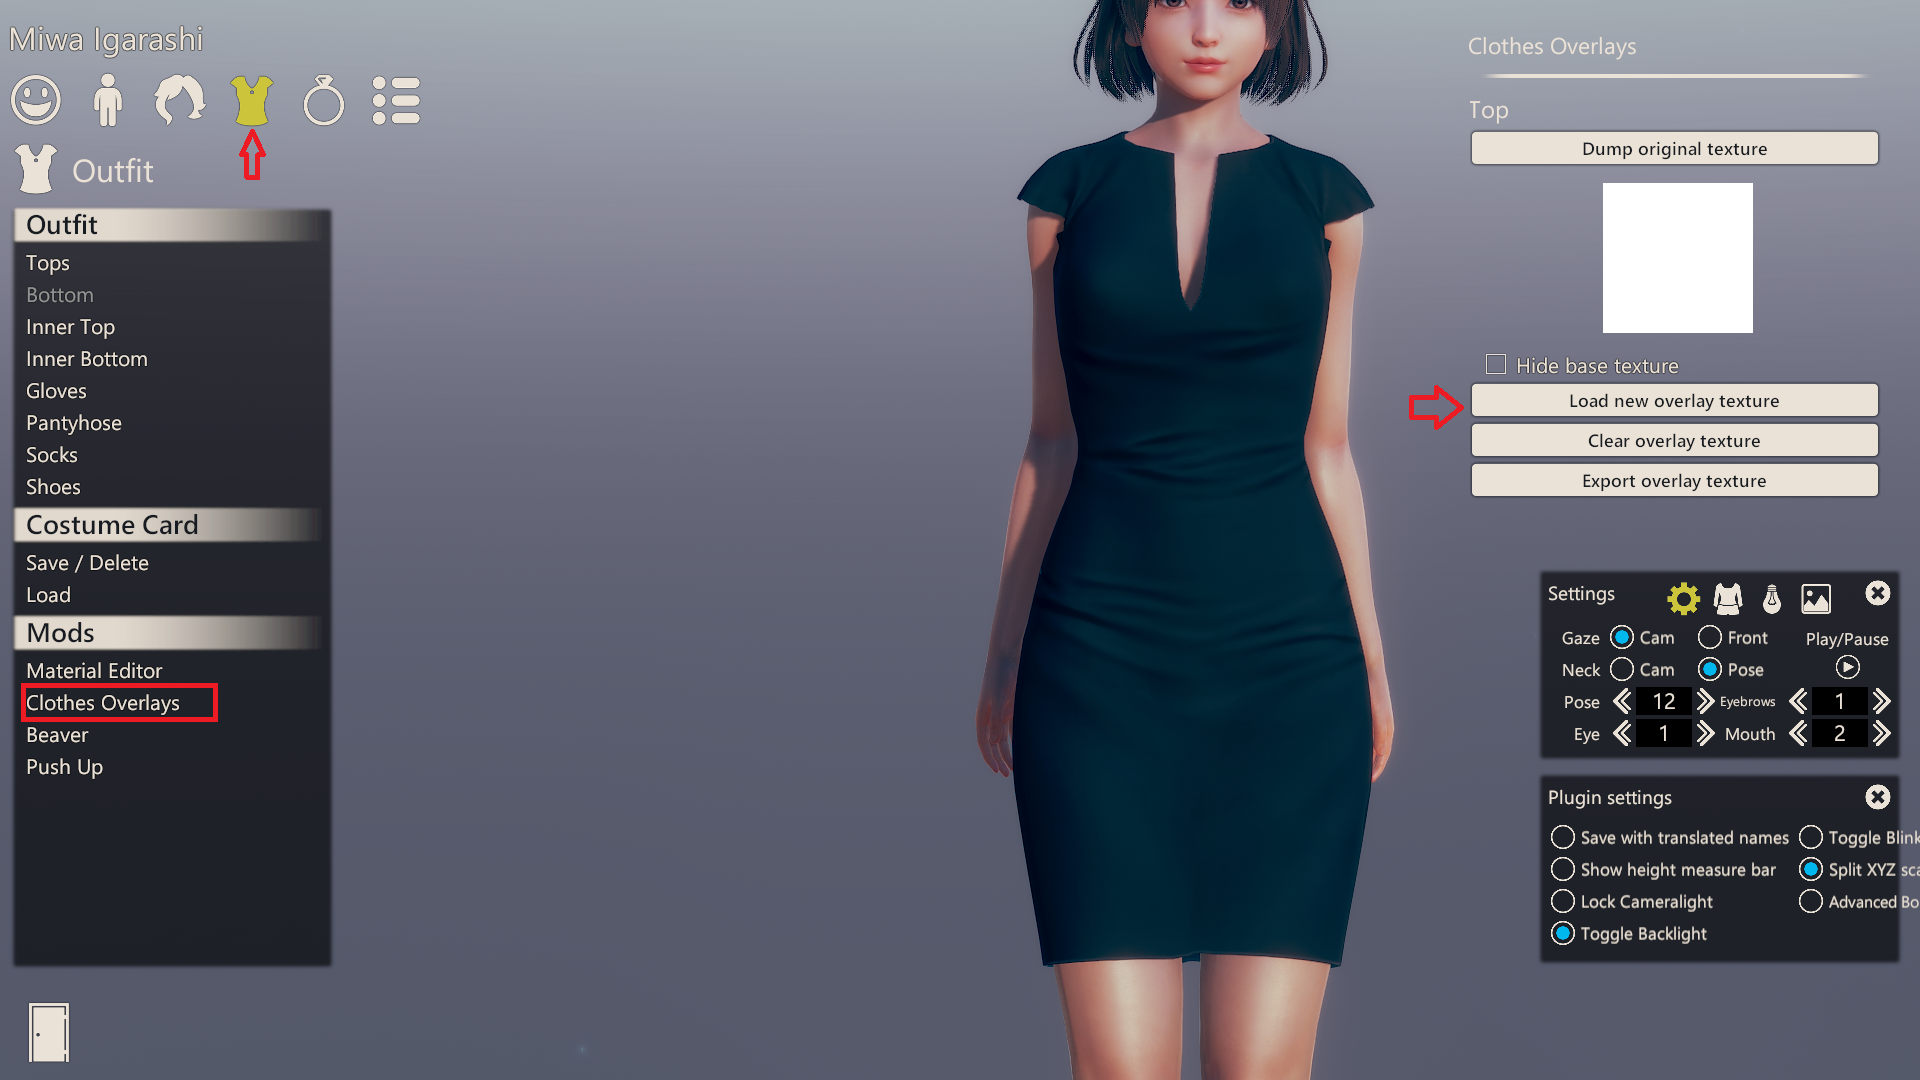
like any of the other textures, overlays follow the same rules (has to be PNG, has a transparent background and must adapt to the mesh UV). so if you load an image you will notice that it will cover the whole object, that's why it also has to be handled externally and edited to match the UV.
lets say that we want to add this image as an overlay:

since we are adding it to the same top (the simple dress), you can reuse the UVs we exported earlier as a guide, or you can click on "dump original texture" button to export the current texture as a guide, or.. use them both at the same time? it won't matter ether way, they are just to give you an idea where and how the edits will look like. now resize or color it just like we did with the texture from part (A), save it and then press on "load new texture" again and load it.
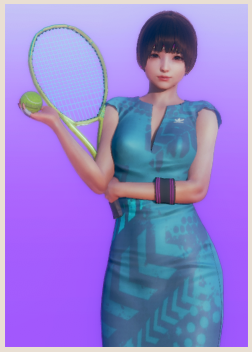
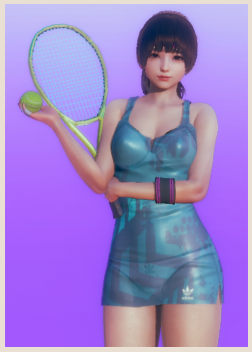
here are images of both WIP and the finished loaded overlay on the same dress.
Conclusion:
Q. so.. materialeditor OR clothe overlay?
A. well, i'd say materialeditor texture editing for sure. clothes overlay is nice and handy to add stuff on the fly to clothes, also one nice thing about clothes overlay is that you will still be able to edit the color and patterns if made properly (transparency wise) using the chara maker's functions, unlike editing main textures where clothes colors come from the texture itself (not the chara maker's). other than this, don't really bother with it..you can have more control and do allot more editing textures with the materialeditor be cause you can always include more than one image in your project while using gimp, photoshop or whatever, and remove all the parts you don't like of any cloth you work with.
here are the characters from both examples, feel free to use those cards and have a deeper look on the materials inside.
i hope someone will find this guide useful. dm about any errors in data and info and btw, sorry for all the grammar.. just.. don't share this with your english teacher
-----------------------------
Credits
-----------------------------
-guide by: hun hunter
-original red dress texture reference by:You must be registered to see the links
-overlay mods plugin by:You must be registered to see the links
-materialeditor plugin by:You must be registered to see the links
-model:You must be registered to see the links