Could you copy your tutorial here or, if this is a problem, in DM?
It's no problem at all. But reading it again, I can see how it seems complicated.
--- START ---
What I'm doing to update the mod is this
Set up :
- Open Visual Studio Code
- Open the mod folder
- Open the files gallery.rpy and gallery_scene.rpy
- Open a second Visual Studio Code
- Open the folder with the game on it
- Open the last update script file (in this case script 1.19.rpy
- Open with Windows Explorer the latest update render folder game/images/1.19/ containing all last update renders
Next, I will use the first scene of 1.19 as example:
- Open the first image in Windows Photo default app and hit the right arrow to go through the renders
- When I find a render that seems to be a sex scene worth putting in the gallery, I copy the name of the file. In this case it's render 304z.jpg so I copy 304z
- I search that number in the script 1.19.rpy[ file with Visual Studio Code.
- Now you can see the moment the render is displayed, with the various text said by the characters around. On a script each line is usually a render display/hidden or a dialogue from the characters (sometimes there is if statement to change the scene using previous choices, and menus)
- I find which sentence I want to be the first thing in the replay, in that case I will choose line 726 of the file, Meiko saying "I want you to...". I start my selection the first render above that phrase, line 725.
- I read the file until the sentence I want the last OR until the end of the label, in this case it will be the end of the label, line 896 included.
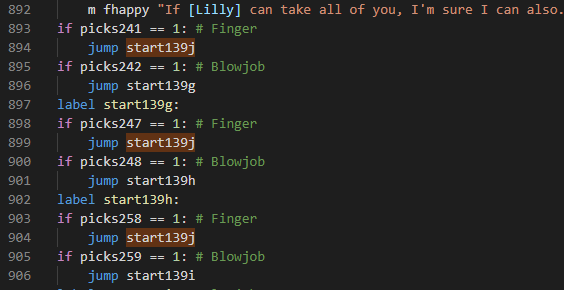
- When there is multiple scene due to choices, the dev usually comment the choices and the label (here you can see # finger and # blowjob Everything after a # is a comment in RenPy
- A label starts like that : label start139g:
- Usually at the end of the label, there is a jump start139g so the game knows that after this jump which label to go to. Sometimes there is multiple jump with if statement depending on previous choices
- I copy all the line, from 725 to 896 included
- Go to the gallery_scene.rpy in the other Visual Studio code (the one with the mod files)
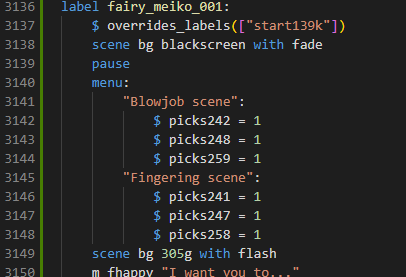
- Create a new label for the scene at the bottom, here I will create label fairy_meiko_001:
- Paste the bloc on the line blow the label (don't hesitate to see how it's done with the one above)
- Add these two line at the start of the label (above the code you just paste) :
- scene bg blackscreen
- pause
- Since there is a choice, the dev usually put a label for each scene then a final label. You can find it easily because he has the comment # Cont. For this scene it is line 1496. If found it by following the jump
- The scene you copied ended with two jumps : jump start139j and jump start139g
- To follow the just you copy one of the label and follow it by searching it (search is Ctrl+F key)
- Searching start139j leads you to the label named like that. At the end of that label, you have a jump start139k that leads you to label start139k: # Cont which means it's the label where all the different scenes will leads to.
- At the start of the label you created, you add this $ overrides_labels(["start139k"]).
- This is saying that if anywhere in the game, there is a jump start139k, it will be overriden to jump to start139k_o instead
- Under that label, you create another label that needs to be the exact same name as the one you want for you end and add _o at the end of its name. Here it will be label start139k_o:
- in this you undo the override and close the replay. Here are the lines :
- $ restore_overrides_safe(["start139k"], "start139k")
- scene bg blackscreen with fade
- $ renpy.end_replay()
- Last thing to do : add a menu to choose which scene you want in the gallery
- Adding the menu under the rest of the line you added at the start of the label looks like that :

The picks you have to add so that the if statements can lead you to the right scene like in the next image
Once this is done, you can add it to the gallery by adding this to gallery.rpy
gallery_list.add_replay(ReplayObject("fairy_meiko_001", "images/1.19/305e.jpg", tags=[], characters=[MEIKO], isNew=True))
This says add to the gallery the label fairy_meiko_001,
with the image images/1.19/305e.jpg as preview (choose the one you like the most for the scene),
tags should remain empty,
in characters you put the character in the scene (separated by comma if there is multiple, all the character are defined line 10 of this file)
isNew=True makes the New label appear on the image (usually I removed all the isNew from the previous update before starting)
--- END ---


