Midnight Prophets
Member
- Apr 2, 2024
- 142
- 340
- 149
In order to pose, you need to be in pose mode first. Did you do that?Hey guys, need help with rigging. I'm stuck atYou must be registered to see the linkswhere I can't parent mesh to bone with weights. I followed the tutorial to the letter but when I move the bone, the vertices around said bone doesn't follow. Thanks
Yes, as the video then asks I have to move the bone where the vertices around the bone to follow. Nothing happens. Google suggests skeleton must be in rest mode. Done Alt+G then Alt+R, still nothing.In order to pose, you need to be in pose mode first. Did you do that?
Should be, in Object mode, select the body, then the bones, then hit Ctrl+P to parent it, using Armature Deform with Automatic Weights.Yes, as the video then asks I have to move the bone where the vertices around the bone to follow. Nothing happens. Google suggests skeleton must be in rest mode. Done Alt+G then Alt+R, still nothing.

Yup, as exactly shown in the video. I did follow step by step, still not working. Am trying to Edit mode then by Loose parts to see if it works but my blender crashes and stops working thereafter.Should be, in Object mode, select the body, then the bones, then hit Ctrl+P to parent it, using Armature Deform with Automatic Weights.
After that, go to pose mode, and rotate the bones.
View attachment 4553199
Edit won't show the bends, and usually better if it's all one part.Yup, as exactly shown in the video. I did follow step by step, still not working. Am trying to Edit mode then by Loose parts to see if it works but my blender crashes and stops working thereafter.
Apologies, buddy. But I've been googling where to navigate my blend files in order to upload them here to no avail, sadly.Edit won't show the bends, and usually better if it's all one part.
Shy of seeing the setup, I am not sure then. I won't be up much longer, but if you want to show me the file, I can take a look, see if I can see what is wrong.
Just do a save as, it will tell you where it's saving.Apologies, buddy. But I've been googling where to navigate my blend files in order to upload them here to no avail, sadly.
Tried that, went to Documents/placed it at Desktop. Blend file is not visible when uploading files, sadly.Just do a save as, it will tell you where it's saving.
Finally made it work. The edit mode then CTRL+P>Loose by parts instead of whole mesh parented to skeleton made it possibleJust do a save as, it will tell you where it's saving.

You could try dragging and dropping into the chat box here, or if that fails, might have to zip it, they have a few restrictions here. Glad to hear you got it working though.Tried that, went to Documents/placed it at Desktop. Blend file is not visible when uploading files, sadly.
I don't know of any for Blender, only Daz. You could try some of the shops, like RenderHub, or Gumroad, but I would not expect anything, Blender is generally too custom.Hey guys, I have not cleared my schedule as of yet rendering me no time to watch 1 hour long animation tutorials and spend time mimicking the tutorials. I can't, for the love of boobies find a tutorial concerning using premade animations (I downloaded one). In need of assistance. Thanks.
Turns out I still have few mishaps. Can't somehow select these parts and after I parent-Armature deform with Automatic weights the model to skeleton, I have a yellow banner Weight error to which I was unable to take a screenshot of.You could try dragging and dropping into the chat box here, or if that fails, might have to zip it, they have a few restrictions here. Glad to hear you got it working though.
I don't know of any for Blender, only Daz. You could try some of the shops, like RenderHub, or Gumroad, but I would not expect anything, Blender is generally too custom.
.png")
For the hair (I am guessing), you parent to the head bone, but instead of Armiture, it would be normal parent, keep transform. In Daz, you would parent it to the head, and for either the hair would need it's own bones, unless you plan to simulate it.Turns out I still have few mishaps. Can't somehow select these parts and after I parent-Armature deform with Automatic weights the model to skeleton, I have a yellow banner Weight error to which I was unable to take a screenshot of.
Because of the high poly hair, I reckon?
View attachment 4555636

I certainly don't know, but your post has made me curious. If you could put that simple environment with the light source and the mirror prop (the female model is not necessary) all together in a scene subset and share it in another post, I'd gladly experiment with it.(DAZ Studio) Does anyone know how I can get mirror surfaces to transmit light? They'll show an image of what's reflected, but I'm talking about having thing project the rays of light they're receiving, much as they do in the real world. If the distinction isn't clear; I made a sample scene:
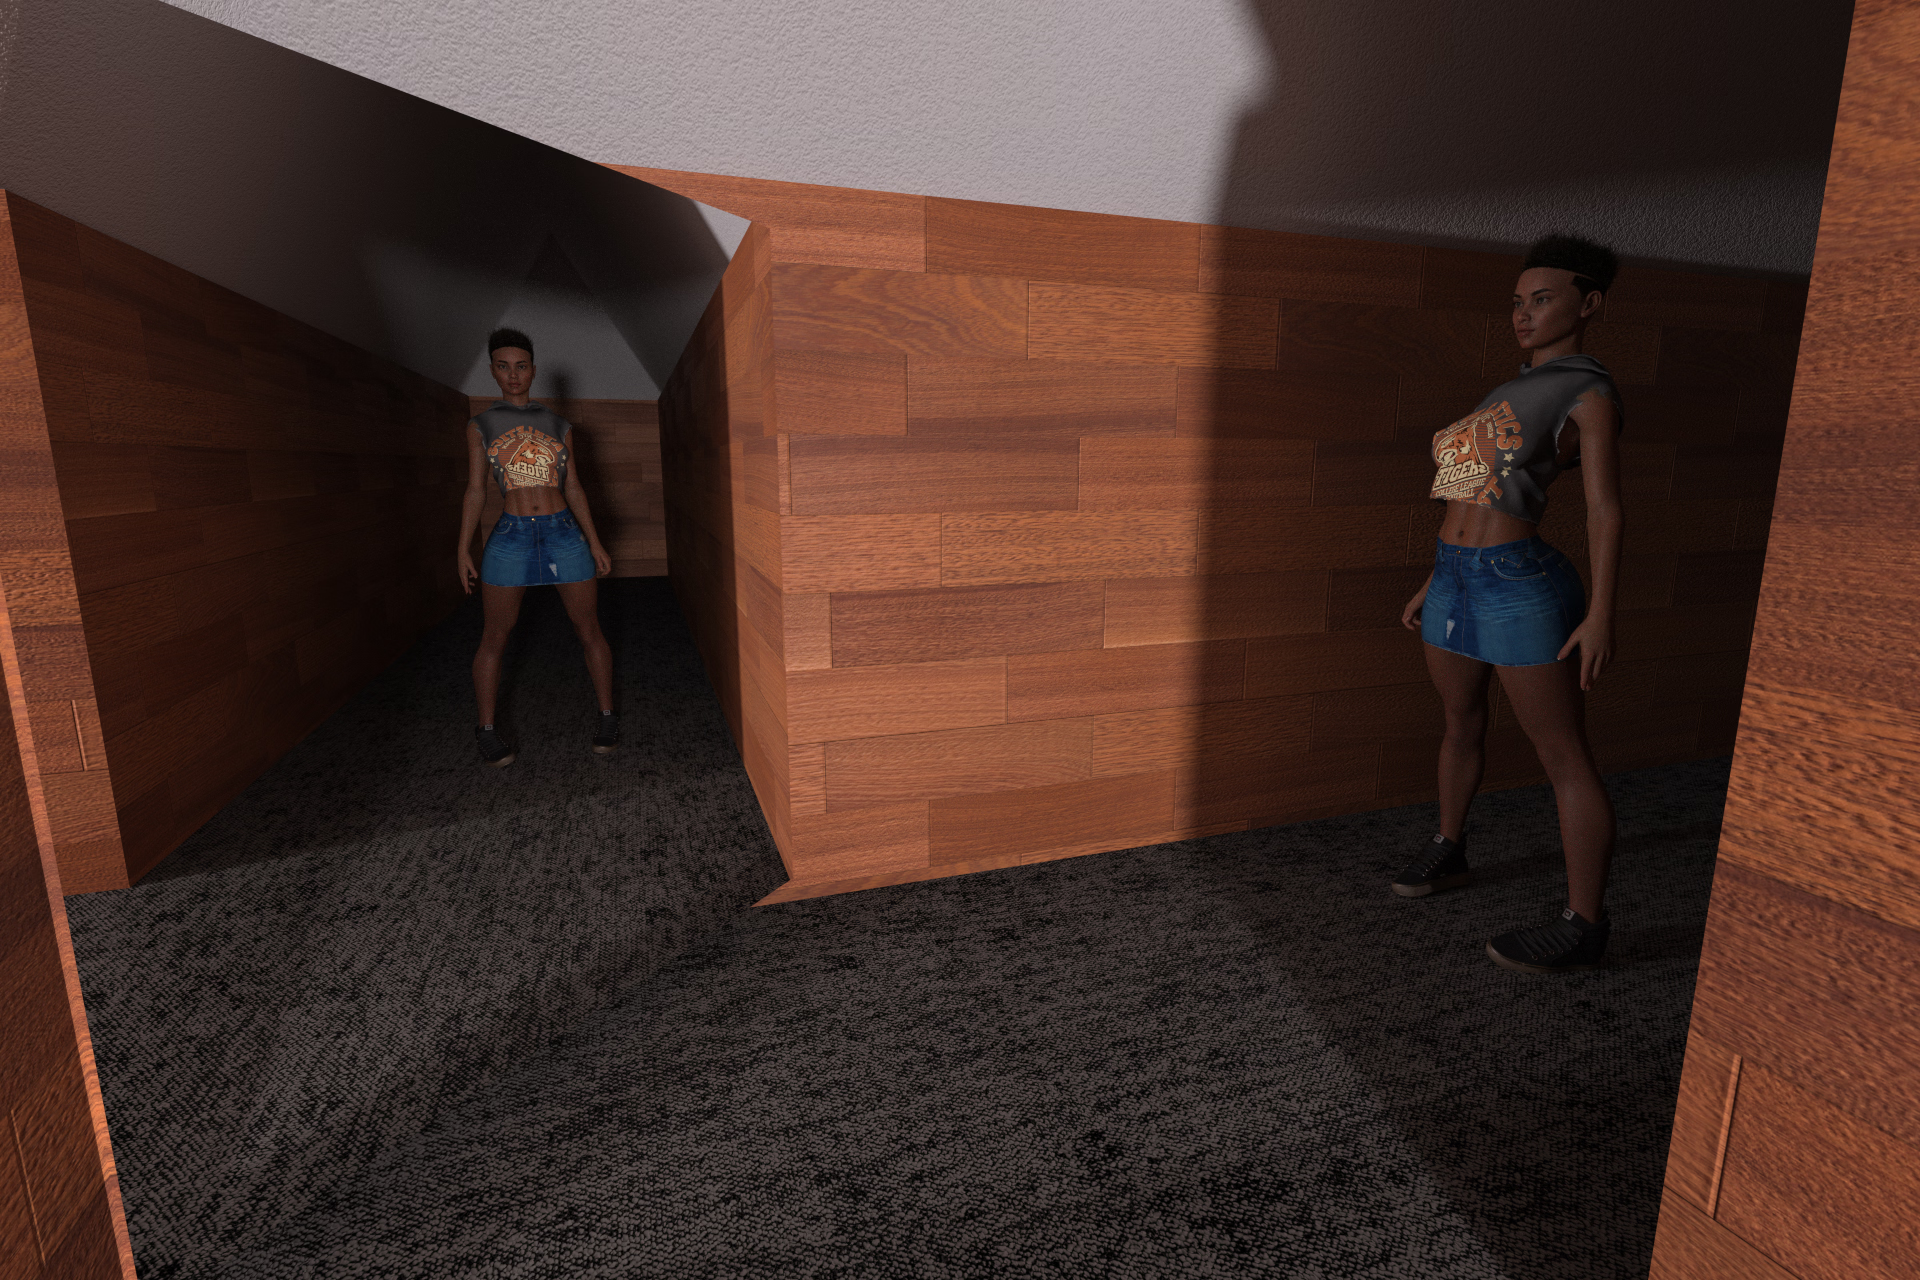
View attachment 4567892
Where (A) is a light source, (B) is the corner mirror, (C) is the figure standing around the hall corner
As it is, the figure looks almost identical:
You don't have permission to view the spoiler content. Log in or register now.
(To those thinking she's ever so slightly brighter - i did a test and that's almost all from having a surface closer to light - note when mirror shader is replaced with flat texture - it's comparable)
Seems like I must be missing something because the entire idea of raytracing graphics is predicting rays instead of just using computationally cheap tricks to simulate an image. Anyone know?You don't have permission to view the spoiler content. Log in or register now.
Your second paragraph is EXACTLY how i came across this - i was making my own spotlights and searchlights which use parabolic reflectors for concentrating and focusing the light, and noticed they weren't behaving as I'd expect. There are a LOT of objects in our world which use light bouncing off mirrors and lenses, it'd be a shame if there was no way to implement this in daz.I certainly don't know, but your post has made me curious. If you could put that simple environment with the light source and the mirror prop (the female model is not necessary) all together in a scene subset and share it in another post, I'd gladly experiment with it.
Anyway, don't they use in photography and modeling reflectors with the idea you're explaining? And these do not have mirror-like surfaces.
I've done some tests, that I'm putting below. The main difference with yours is that I do notice a significant difference in my tests, regarding how much light gets reflected, between having the mirror-like surface (full metallicity) or a non mirror-like surface (metallicity disabled).(DAZ Studio) Does anyone know how I can get mirror surfaces to transmit light? They'll show an image of what's reflected, but I'm talking about having thing project the rays of light they're receiving, much as they do in the real world. If the distinction isn't clear; I made a sample scene:
View attachment 4567892
Where (A) is a light source, (B) is the corner mirror, (C) is the figure standing around the hall corner
As it is, the figure looks almost identical:
You don't have permission to view the spoiler content. Log in or register now.
(To those thinking she's ever so slightly brighter - i did a test and that's almost all from having a surface closer to light - note when mirror shader is replaced with flat texture - it's comparable)
Seems like I must be missing something because the entire idea of raytracing graphics is predicting rays instead of just using computationally cheap tricks to simulate an image. Anyone know?You don't have permission to view the spoiler content. Log in or register now.