3D-Daz Daz3d Art - Show Us Your DazSkill

5.00 star(s) 13 Votes

AlexStone

Member
Aug 29, 2020
487
2,560
When deciding on my render settings for my game i did extensive tests, rendering at 1080x1920 and 2160x3840 with iterations at 100 and 400 respectively. The render time was basically the same and the quality of images were identical when reducing the 4k image down to match. And I mean identical. I would never be able to tell the difference and if the 4k image was blurred, it must have been incredibly subtle. Maybe there are some lighting situations or render settings that make one preferable over the other, but in my case, rendering at a higher resolution just added extra post work.
Even though I'm Russian, I don't like 'Russian measures of length' of the 'дохуя and a little bit more' kind. Even though there 'a little bit' may be more than a 'дохуя' ('a shitload of').

The first thing worth mentioning is that DAZ spends time processing the scene itself, and in complex renderings, but with short iterations (as you mentioned '100 to 400') this will be the main rendering time.

For example, I took this scene here and cut a show piece out of it.
AliceSmile.jpg
After that I saw that DAZ takes about 1 minute (1m 5s to be 100% correct) on my computer to prepare the render.

I then ran the test renders and timed them. Here are the results, just DAZ, no canvases, no tricks!
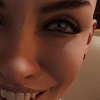
Alice1000-3m15s.png
400x400 render, 1000 iterations. No visible grain. Full time 3m15s, render time 2m10s.

Alice500-2m14s.png
400x400 render, 500 iterations. Grain is coming! Full time 2m14s, render time is 1m09s.

Alice500x133-3m15s.png
532x532 render (x1.33 size), 500 iterations. Grain is coming, you can easily see it! Full time 3m14s, render time is 2m09s.

Photoshop time!
Downscaling of 532x532 cubic interpolation of pixels:
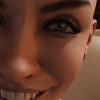
Alice500x133-3m15s-PS.png
Grain is gone? Yes! But...

Lets do layers! I am putting first image (400x400 render 1000 iterations) as a 'Difference' layer. Almost black... but let us make magic Color Curves:

999.png

Result:

Alice500x133-3m15s-PS-d.png

As I said, compressing the image in Photoshop removes all the harsh brightness transitions that are just as important in the focus of your rendering. The lighter the point in the 'difference' image, the more distortion the Photoshop has introduced.

And we didn't save anything on rendering time itself in 532x532 versus 400x400, but then we fiddled with it in Photoshop.
 
Last edited:
  • Like
Reactions: Bip and jojozz

Seanthiar

Active Member
Jun 18, 2020
563
755
View attachment 1354002

I use this version, try to look at your version manuals, I believe similar options should be somewhere in them.
found it in the DAZ Forum regarding DAZ Studio 4.12 :


Removed the "OptiX Prime Acceleration" option from the Advanced page of the Render Settings pane when NVIDIA Iray is set as the active renderer

  • The option is no longer supported by the integrated version of Iray RTX 2019

And btw I think I know why, because on sickleyields page on deviantart there was a statement that only few persons got a performance boost and because Optix runs in the VRAM it can cause a fallback to CPU render and make the render slower. Many reported problems with scripted queued renders and Optix.
 

AlexStone

Member
Aug 29, 2020
487
2,560
found it in the DAZ Forum regarding DAZ Studio 4.12 :


Removed the "OptiX Prime Acceleration" option from the Advanced page of the Render Settings pane when NVIDIA Iray is set as the active renderer

  • The option is no longer supported by the integrated version of Iray RTX 2019

And btw I think I know why, because on sickleyields page on deviantart there was a statement that only few persons got a performance boost and because Optix runs in the VRAM it can cause a fallback to CPU render and make the render slower. Many reported problems with scripted queued renders and Optix.
Fucking hell. 'We've got something loose in our code and our memory manager is weird, so let's remove a useful feature from our program, users can get by without it'.

Then I definitely won't be upgrading, I've got the OptiX really boosting my rendering performance using a lot of free RAM.
 

atheran

Member
Feb 3, 2020
355
2,759
And this is why I don't do postwork for lighting.

Test.png

There's just no way I can add red lighting for the highlights without it simply blowing every highlight up.

I'm currently rendering the next version. Lighting done 100% in Daz and I'll just add the ellipse in photoshop.
 

AlexStone

Member
Aug 29, 2020
487
2,560
And this is why I don't do postwork for lighting.

View attachment 1354206

There's just no way I can add red lighting for the highlights without it simply blowing every highlight up.

I'm currently rendering the next version. Lighting done 100% in Daz and I'll just add the ellipse in photoshop.
Mask for the right highlights / tint over the mask?
I've done an eye reflex here in two minutes, red in colour.

1376108_Test.png

147.png
 

atheran

Member
Feb 3, 2020
355
2,759
Mask for the right highlights / tint over the mask?
I've done an eye reflex here in two minutes, red in colour.
Tried with gradient maps and color ranges but it didn't work.

Celia_neon_1.png

This was much easier. Created the lighting in Daz, and simply had to match it on the neon-like-elliptical-thingy.

Far from perfect but good enough considering it's literally the 2nd time I'm even attempting doing postwork. The image you referenced was the first. What I do not like with this workflow is the attention to details and all the work I'd need to make it proper as opposed to just flat out rendering the damn thing. And there's a LOT of details I should fix here before I'm feeling good about it.

Hair shine for example, eye reflections, the legs look like they're clipping and so on and so forth. But I DO like the hazy look it gives. Iray wouldn't do such a good job if that was a prop light, nor would I be able to have a color gradient in the light.
 

AlexStone

Member
Aug 29, 2020
487
2,560
Tried with gradient maps and color ranges but it didn't work.

View attachment 1354387

This was much easier. Created the lighting in Daz, and simply had to match it on the neon-like-elliptical-thingy.

Far from perfect but good enough considering it's literally the 2nd time I'm even attempting doing postwork. The image you referenced was the first. What I do not like with this workflow is the attention to details and all the work I'd need to make it proper as opposed to just flat out rendering the damn thing. And there's a LOT of details I should fix here before I'm feeling good about it.

Hair shine for example, eye reflections, the legs look like they're clipping and so on and so forth. But I DO like the hazy look it gives. Iray wouldn't do such a good job if that was a prop light, nor would I be able to have a color gradient in the light.

I just didn't initially understand what you wanted to do with the image as a result of post-processing in Photoshop.

In general, post-processing can save a lot of time and make it easier to work with light in DAZ itself, when many subtle lighting effects you see already after the rendering is finished.

Which I always do:

- Canvases. Standard set: Beauty, Environmental lightning, Light group, Depth. From the last canvas, you can easily make a quick mask for both background and foreground, meaning you don't have to waste time picking up DOF.

- Quick character(s) mask, render without light sources on all-white backdrop (255-255-255). Convenient for working with layers in Photoshop.

- Quick mask on light sources or emission canvas. This allows you to then correct the 'overlight' of light sources, which often get unnatural colors in DAZ.
 
5.00 star(s) 13 Votes